Showing posts with label Bo Bunny. Show all posts

Saturday, June 30, 2018

A very special card to share


I have one of my favorite cards to share today not only for the gorgeous die but because it's some of my very favorite colors.  The die i am using today is from the Romancing the Swirl collection from Becca Feeken and is one of the newest card creator dies.  Which means that it designs the complete card front and all you have to do is add embellishments.  I love that so much ......


This was fun too because i love the colors of the costumes from India and Pakistan and i had the perfect papers.  They are so vibrant and beautiful with touches of gold and silver that really set it off.  I added small golden colored rhinestones on the front and a pretty bow with a jewel to finish it off.  Inside i put an extra piece of white on the kraft card to stamp a sentiment to send to my friend.  I know the perfect one that i am going to use for it.


And this is just a closeup of all those gorgeous swirls in the die.  Becca really knows how to design dies and i just love to make pretty things with them so it's a perfect match.  

Thank you for stopping by and enjoy your holiday this week!!  

Teresa

Supplies:


Paper:  Bo Bunny
Gold paper: Micheals

Wednesday, July 30, 2014

Cardabilites #104 is up today...

Sadly today is my last post for this term at Cardabilites.  I always
have such a wonderful time on the team creating with Karan's amazing
sketches and meeting all the talented girls around the world each time!
But i can always try again so maybe after things settle down in
my life i can try for another term :) And i can always join in the sketch right...

So here is my card that i created for the sketch this time...


I am really into using lots of bright colors for summer so i just got
a brand new Bazzill 6x6 pad and it was perfect to use for the sketch.
I didn't use a circle but I put the shapes in the same areas and only used
one large flower and a ribbon.  I really love this paper and i like
the way the card came out :)

* and here is the sketch that we used for our inspiration


Thank you for stopping and don't forget to leave a comment
so i can come and visit you on your blog!!  Have a great day :)

Saturday, September 21, 2013

Quietfire Design and Dreamweaver Stencils Day 5


Hi Everyone and welcome to the last day of our hop with
all the talented ladies on the Dreamweaver Design Team.
 Today we are all sharing projects that we did
with some of the wonderful products that both Quietfire Design
stamps carries and the wonderful stencils and products from
Dreamweaver... It was really alot of fun and there are lots
of ways that you can use the products.. so are you ready?


The first part of my project is a box that I got from Prima
that I painted and then used some chalk ink on and the Dreamweaver
FX powders around the edges to antique it a little bit.  I wanted to create
a really pretty box to hold the book that is the next part of my
project today to put all the photos and fun things that we
do during the fall times at our house....


I Cut/Embossed 3 layers of dies in different colors to match
the flowers. On the top right- the ivory cardstock piece I stenciled
the tree stencil with green ink and embossed it.  Then I added some
distress ink in orange and green and rubbed some of
the orange FX powders into the backround of the tree
with a dauber too.  It's hard to photograph but
it has a really pretty autumn glow to it.  The letters
are adhesive and I glued then onto the tree when it was dry.
The Spellbinders dies I used for it are S5-157 Labels Eighteen,
S5-191 Decorative Labels Twenty-eight and S4-310 Labels Eighteen.
All of them you can get from Quietfire Design website here.


The second part of my project is a quick and easy
book that you can buy or make with chipboard and a 
ruler.  The papers are from Bo Bunny Apple Cider Collection
 and the book fits just perfect inside of the box.  


For my book I used the Quietfire Design stamp #6285
and I stamped it in dark brown ink and embossed it and
then used a foam applicator and stenciled it orange ink
around the inside edges to frame it.  Here is the words on it.


Here is a photo of some of the fun products that the generous
Dreamweaver Company gave us to use.  Thank you so much
for joining us on the hop and be sure and leave a comment so
you have a chance to win some of the fun prizes!  

If you missed anyone.. here is the links for the other ladies today.

Quietfire Design Members...
and
Dream Team members...
and the
and

Wednesday, July 24, 2013

Oh how I love Snowflakes....

I am not going to lie.. I love snowflakes on everything.
They say that what you don't have you love so being from
Southern California we don't get much of this beautiful snow!

So when Spellbinders came out with the new release this 
summer of snowflake dies I had to get out my Bo Bunny
papers and dies and put together a pretty card and this
is what I came up with! I layered the backround and popped
up the frame and added lots of pretty snowflakes and bling!


I just love how the layers of these snowflakes
came out and the blues and greens of the papers and
the embossing of the folder with the white was
just perfect.  Spellbinders has a new die out at
it has beautiful 3D details on it if you look really close.


These are two of my favorite new dies released and
I just had to share them with you!  The snowflake dies
you can see here with some of the other new Holiday
dies just released... Just Gorgeous aren't they?  


My stamp today is from Penny Black and I
used Want2Scrap bling and a pretty piece of bling
in the center from Prima.

Be sure and check back for more fun ideas
with the new dies... You are going to love using them!
Hugs, Teresa

Thursday, July 4, 2013

Sketchabilities #94 today


I am still working on catching up on pages so
here is another page of my daughter and her friend 
when we all went night diving with the Manta Rays
in Kona Hawaii last fall.  It was so amazing and so
fun and we are going again next time we go for sure.

So here is Karan's beautiful sketch's on Sketchabilites
that I followed for the most part but added a backing
and changed it up around the title just a little.

 I think this is one of my favorite Bo Bunny lines
this summer.. I loved last years but the colors this time
are just beautiful.  The line is called Key Lime and 
it's perfect for lots of water related pages like I always need!

 For the letters i mixed Canvas alphas and some round
alphabet letters by Authentique.  I think the ribbon is
neat because it looks like water swirls..

 For my journaling I tucked a tag in the side
of the backround so I can share how amazing it was to swim
with these creatures of the sea that were 10- 15 feet wide.
It was really unforgettable and we even saw a school of dolphins.
And of course I used a Spellbinders die on it
1st because they are beautiful and it seems like
I can't do much without having one or two on it.
It is called Grand Decorative Circles One and
is really great for pages and for other lg. projects you do.

So that's it for today and I have lots more to share
and don't forget to leave a comment so I can hop
over and see what you do in your part of the planet :)
Lots of hugs....

Thursday, June 27, 2013

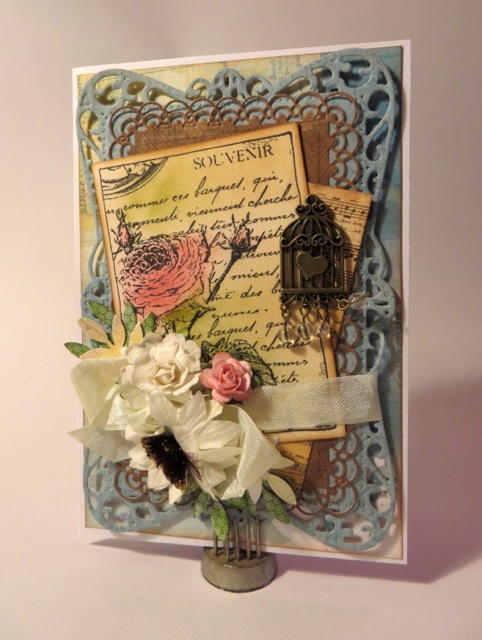
Vintage LOTV card and Bo Bunny...

Here is another card that I did with some new Bo Bunny
papers and a couple of my favorite dies from
the last release at the Spellbinders Winter CHA... 


LOTV has a totally different style in their
last release and the stamps have fun tags and
little bits that you can do in all sorts of colors
and styles.  I bought a few of them that you can
see right here.. and mixed them with the 
Timeless Rectangles and 5x7 Detailed Scallops Dies.
The rose tag in front is the stamp and I inked 
and layered it over the other papers.  And I added
lots of flowers and leaves and a cute little
birdcage charm that I had in my stash..


It's something different and it's always fun 
to play and mix up the papers and dies
and see what happens.. Thanks for 
stopping over and hope you like it.

Teresa

Tuesday, June 18, 2013

Playing along with Sketchabilites today...


Since I got scads of photos printed last week and a 
beautiful new sketch is up on Sketchabilites-- I 
thought I would play along and get some more
pages done while my mojo is still working good!!

Here is Karan's sketch...

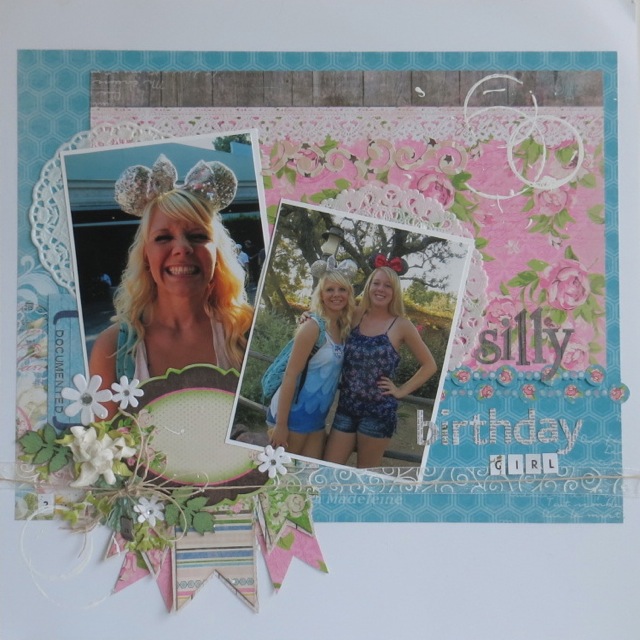
and here is my page that I did...

 This is a picture of my DD and her friend
on her birthday at Disneyland. They are both so funny
and fun to be around and we had a really great day
celebrating with her.  The papers I used are from
Bo Bunny and are from the Prairie Chic line which
fits my baby girl pretty good I think! The sketch was
really pretty and made it easy to put my page 
together quick and I got to use a little paint too!

 I fussy cut lots of the tags and goodies that I had
on the paper to create the flower cluster that she had.
And I inked some prima wood leaves to fill in the spots.


I am still trying to use what I have around and mixed
some Bo Bunny letters and Authentique letters from 
my stash. I love the colors and it was really fun to do.
Thanks for stopping over and have
a really nice day ! 


Wednesday, June 12, 2013

Spellbinders and Canvas...

I love working on Canvas and painting and mixing lots of
different medias on them and today I want to share a fun one
i did in the Spellbinders Gallery! Yay!! They have these beautiful
mini dies out called Die Delights and they have the cutest fun
shapes to create with that you can see here...

  
To start my project I tore and inked some paper for the
backround and stamped some chain with a Bo Bunny
stamp I got.  I layered the Basic Grey papers and embossed
a piece to to layer over some lace.  The gate was my focus
so I actually cut 2 layers of it and glued it together and
them inked over it and embossed it with clear to make
it more shiny.  I wanted to create a tiny rose garden around
it so I fussy cut some flowers and added a die cut swirl
from the Flowers and Florishes die set and some extra 
little flowers to tuck in the sides.  I also added a little
flower from Bo Bunny in glitzy brown rhinestones to match
with the centers of the flowers .  It was really fun and I love
to make these to decorate my house with little sayings
that keep me cheerful and thinking amazing positive thoughts!       


This is another 6x6 canvas that I did a while back and 
it seems like a great time to share it with my other one.
It too uses lots of Spellbinders dies for the base and I used 
some Prima flowers and Zva bling for the rest.  This is
a great way to make gifts and decorate and use up
some of the odds and ends you have laying about your craft
room!  Still working on lots of things for Spellbinders so I have to go but
I hope you get inspired to make one up and thanks
as always for stopping in to see what's new :)

Monday, June 10, 2013

My New File Folder Class with Bo Bunny

I had to share my new File Folder Class that I just taught
this last Sat because I really love the papers that we used and
how it came out.  Each month I teach 1 or 2 new ones with
different themes and this time I designed one for 4th of July
and you can also use it for fun picnic photos!

 The new patriotic line out called Anthem is just beautiful!
It's filled with bright colorful designs and has lots
of tags and cut out perfect to make our file folders with. We also
used the stickers they had and fun patriotic letters with it.


I so love designing these files because there is so
many places for photos which I usually end up with
alot of.. So the flaps go up and there is pockets
for photos and journaling too!


Our next class is going to be on Sat. July 20 and we
are doing a Simple Stories file for everyday family
and a Teresa Collins travel file.  Be sure and call
Hearts N Crafts to sign up, it should be really fun!
626-967-9036

Thanks for stopping over and have an amazing week!
Hugs and Smiles... Teresa

Monday, June 3, 2013

Cardabilites has a new post up today..

So sadly this is my last post this time for Cardabilites so I wanted
to make it a really pretty one.  I have lots of things going on now but
I am sure going to join along on the sketches each month
just because they are always so pretty and fun!


So here is the beautiful sketch that Karan designed
and that we get to work with this time and down below
is my card that I did for it!  I really like it!


The papers I used this time are from one of my
very favorite companies.. Bo Bunny
This is the Cest La Vie Paper line and the cute border
in the middle is actually on one of the papers. The
backround blue and brown papers are cut and embossed
with the 5x7 Matting Basic dies.  Aren't they neat?
I used my On the Edge dies to make the heart
border and added some lace on top of that and then
added the pretty metal frame for the back that
I had in my stash.  I think it looks good behind
the Labels Twenty tag.  

 For the words on my tag i used a stamp from Vintage
Greeting from TPC Studio and used Coffee ink and 
clear embossing powder and then cut it out and glued it.
The flowers are a mix of things I had and I layered them
to make the flower spray.  Last but not least I added 
tiny little pearls and some greenery for it.

Thanks for stopping over and love, love, love to
hear from you and where you are from.  I think 
that is the part I love best about this!
Have a really wonderful day,
Teresa

Wednesday, May 8, 2013

Keepin up with dates

It has been a busy week this week with lots of things
going on around the house and working on 
samples.  I found some things that I did a while back
to share of some calendars that I did for a class.  It was
really fun and once you start making them you can't stop
and they are perfect for gifts.  You can download free
calendars online to put on them or some SVG files
have some great ones to print out for projects too.


I did one of these that was similar
at CHA once and loved having it on my desk
for a quick date reference so I came up
with the bunch of them using chipboard
and some of my Spellbinders Dies.

This one was the favorite.. I love red
gingham too and of course butterflies.

 This one is just 2- 6x6 pieces of chipboard
decorated with a little bit of recipe paper
and a cute little red dotted bow for the top.


The one above is 6 pieces of 6x6 folded in
half and then you glue them together and
you can put a photo on the top and the calendars
all around at the bottom for the year.
The neat thing is you can flatten it and mail
it to someone special for a gift.. Really cute right?


And my last one I want to share is a chipboard
triangle to put on a desk.  The papers are from
Bo Bunny and on the sides you can't see are places
for 2 pictures.  I thought this would be really nice
because you could change it around every once
in a while to change it up.  

Thats all for today and hopefully I will have
some good news to share on friday!! Thanks
so much for stopping by and have a really 
wonderful day....  Teresa 

Friday, March 1, 2013

Birthday File Folder Class


Here is a little sneak peak of my new file folder that
I am teaching tomorrow at the store!!


I am teaching a really fun file folder this month 
with Bo Bunny's new Birthday line of papers.
This was really easy and fun to design with all the
tags, flags and other bits of paper that you had with the set.


and...I just want to say the papers are so cute and I love
the balloons and the borders the best I think.  If you
haven't started these file folders they are awesome and
can really hold alot of photos so I hope I inspired
you a little bit to try a few of your own :)

Time to go to work but have a really great day :)

Wednesday, January 30, 2013

Media Mixage from Spellbinders

I finally get to share a fun project that I did for CHA
this past month!  Spellbinders is partnering with two
amazing artists-Susan Lenart Kazmer and Jen Cushman
and offering some amazing jewelry pieces to design with.  
We had the opportunity to create too and one of the projects 
I made was this fun Wild West Belt that you can see here...
on the Spellbinders Gallery!!  

 For this project I used lots of the New Bezels that they 
designed and created and filled them with embossed papers
 and colored resins and sparkly crackle polish.

Here is a closer view of the resin and the faux leather
that I created using papers and one of the brand
New Metal Embossing plates from Spellbinders.

To make this project you will need ICE Resin,
enough Bezels to fit around your waist or hips,
embossing plate, square dies and re inkers to dye
the resin with, PPA Gloss and brown distress ink.

First you will cut and Emboss the papers and chipboard and
ink around the leather looking pieces to distress each of them
a little bit more.  You are going to glue the chipboard
pieces in the square bezels first just enough so that
when you put the textured piece of paper in it will
be level with the top.  Add a thin coat of a glossy
coating like PPA when it is dry as shown to fill the bezel.


For the round Bezels I started with a tinted batch
of ICE Resin in each and let them dry.  Then I painted each 
with crackle polish and let them dry again.  Then I wiped each
of the bezels off with a soft cloth and polish remover to 
get a distressed look.  When it was dry I coated it one more time 
with ICE Resin and let it dry for 24 hrs.
When all the pieces were dry I attached them together with a fancy
bead and wrapped thin wire between each bezel about 3-4 times.


For the ends I added a chain and a large clasp to
attach it together to wear it with my favorite jeans
or over a blouse.  It was really fun to create and
I think I would love to make another maybe filling
each bezel with resin to look like turquoise.. but
that's another project down the road and I hope that 
you try some of these when they come out in stores
and create something special for yourself!! Be sure 
and check out the other Media Mixage Projects from
Spellbinders in the gallery here.....

Have a wonderful day and happy crafting!

Saturday, January 12, 2013

CHA 2013 started today!

Yay-- the show started today so finally we can share
the excitement with all of you about all the New
Amazing dies, embossing folders and jewelry making products
 that Spellbinders is releasing!
They are gorgeous and there is so many to chose from,
it is going to be a creative heaven for us for months
and months ahead!!  How exciting to finally get to share!! 

Today I made a card using the Filigree Delight die S5-177
that was shown in our sneak peaks last week.  I 
 used the new Valentine line from Bo Bunny for the papers
and some cream colored cardstock and chalk inks from Colorbox.

 All of the dies that are being released at the show
are so detailed and so beautiful.  I really love this
set because it has the fine detailed backround, the oval, a tag
and another piece you can use to adorn a project.
To make the tag I cut one of their tags out with
our die and layered it over the filigree die and tied
a few short pieces of ribbon around to the back.
And to finish it I cut out a red heart on the paper
and inked around it with lipstick red colorbox chalk
and then coated it with clear glossy accents.


I really love the colors and the beautiful dies 
make it easy to create with. I can't wait to show you more 
projects with all the new dies so be sure and check back and see!
Thanks so much for stopping by and visiting.
Hugs and Smiles,
Teresa


LinkWithin

Related Posts Plugin for WordPress, Blogger...