Saturday, August 31, 2019

Away in the Manger card


Hello and thank you so very much for stopping by today.  With our new release out of Christmas dies from Becca Feeken and Spellbinders last week i have had so much fun to putting together new cards for the holidays this year.   Each of the dies that she designed in the set can be used for flat cards or these amazing 3D cards that we showed you on the hop last week.  The choice is up to you on how to use all of the pieces and there really is so much that you can do with them.  

My card today is using the 2 die sets that you see below.  I  found some blue snowflake paper that looked like stars so that is where i started and then chose colors to compliment it.  I used a really dark navy, silver and white to cut out all the pieces and then layered them simply on the front of the card.  Pop dots help make all the pieces show up really great and a few rhinestones helped give it that holiday glow and sparkle i wanted.


You all know that my favorite part of these dies is that fact that you can use them separate too.  I made my card flat so i just used the outside edge and then added the star from the nativity set and the Away in the Manger piece.  I was really happy with how it came out and it was super easy to make.


Here is my closeup to see all the gorgeous detailing in the die set.  I love that all the dies compliment each other so well and make such beautiful cards when put together.  I hope that you get a chance to order a few from Becca's new line of 3D dies.  You will not be disappointed and you can have them ready if you start now to pop in the mail in December.  

And our Guest Designer Ginny Nemchak has her last post on Becca's blog and hers so be sure and stop over to see all the inspiration that she shared this month.  She did such an amazing job!!


Thank you for stopping and be sure and stop back for more ideas with these all month.

Hugs and Smiles....Teresa

Supplies List:

Spellbinders

Shapeabilities Grand Christmas Lattice Arch Etched Dies 3D Holiday Vignettes Collection by Becca Feeken


Paper by Bazzill found at Hobby Lobby and online at Scrapbook.com

Sunday, August 25, 2019

Get ready for Christmas


Hi Everyone and happy Sunday to you all.  Today i have just a quick share that i did for Becca to be included in the packaging samples awhile back for the new Christmas dies that were just released.  

This one is pretty near and dear to my heart because it's all the things a white Christmas should be.    Glittery trees filled with snow and golden bits of trims with reindeer and gorgeous vintage details.

To  get this look i just used 2 colors and did lots of layers to pop out the design in this Reindeer Prance die.  And to make it sparkle i covered it with superfine glitter and then popped it up so that it looks like you are looking outside of a window at the snow.  It would be such a pretty card to make to send to those very special friends and family that you want to do something  really special for.


This is what the die looks like and it comes with 3 pieces so that you can do your own back rounds or add it into the 3D Vignettes die that Becca designed to go with it.  Now that would be an amazing card.  I hope that you have a chance to pick this one up to create with this year and be sure and post your creation on the Spellbinders website so that we can see what you do.

Have a very Blessed Sunday.... and happy crafting to you!

Teresa

And don't forget to visit our Guest Designer this month Ginny Nemchak.  She has another gorgeous card made with Becca's new dies so it's so worth the hop over to see!!

Supplies:


Shapeabilities Grand Holiday Cabinet Etched Dies 3D Holiday Vignettes Collection by Becca Feeken


Paper: Bazzill Ivory Cardstock and Gold Metallic Paper from Hobby Lobby

 Adhesive:  Scrapbook Adhesives by 3L 

Tuesday, August 20, 2019

3D Vignettes Christmas Greetings Snowglobe


It's been a really wonderful week here in terms of weather and it's given me lots of time to work on projects so today i have a new project i did with one of the brand new Holiday 3D dies we just showed all of you this past week on our Christmas Blog hop with our team.  I decided to do a 180 and do a non traditional color scheme for mine this week to see how it would work and i love it.  I found some little snowflakes and crystals on line so i thought how fun to make a wintery wonderland type of snow globe card.  And wow was it ever easy and fun to do.

To make this card you will need to cut 2 sides and 6 pieces of the larger die.  One for the front and back and 4 pieces to put between them.  I altered the colors to give mine some depth and then layered the piece for the Season's Greetings so that it would be thicker and stand out more.  In the very back i added one of the circles that i cut and put the starburst die on it and then popped it up.  It really adds a little bit more and the flowers and rhinestones really set it off.

Here is the picture of the die set and all the pieces that you get.  The poinsettia is a smaller version of the set that came out last season so now you will have 5 sizes.  I used all 5 to make the poinsettia's that match my globe and tucked them in on the sides and front.


And here you can see from above how all the layers work and it's wonderful because it all folds flat if you wanted it too so that you can mail it and they will get this surprise 3D card and can put it out to enjoy it for weeks to come.  I really love these and Becca designed these to be so special for us to create with and it will be fun to make other versions of it in other colors for other holidays too.  

Thank you for stopping by and I hope you have a very nice week.


Spellbinders Supplies:

Shapeabilities Grand Snow Globe Etched Dies 3D Holiday Vignettes Collection by Becca Feeken

Paper: Aqua glittered cardstock, med aqua and light aqua, mutted silver card stock

Pearl stamens, rhinestones, 

Ribbon from Reallyreasonableribbon.com ___iridescent thread, aqua ribbon to match

Monday, August 12, 2019

Introducing 3D Holiday Vignettes Blog Hop and Glimmer


Way back when 3D Vignettes were introduced, messages started to come in by crafters begging for the same thing, but for Christmas. You also asked that we keep supplying new inserts. Well, your wish is our command! Introducing 3D Holiday Vignettes plus new Glimmer Designs. If you are not familiar with these popular dies, stay tuned - lots of information follows.

Hi there, today we are sharing with you a great new collection by Becca Feeken of Amazing Paper Grace with a blog hop featuring new Vignettes for the holidays and the new Holiday Glimmer Designs will blow your socks off.  So.....

What's a 3D Vignette?
A 3D Vignette is a dimensional card that folds down flat.  It has a front layer, a back layer and several in between layers that are held stable by slotted side pieces.  These layers allow you to build depth into a diorama or tunnel type card.   We take all of the guesswork out of the equation by giving you mix and match layers, including sentiments to stack into a Vignette.   So far, we've released 3D Vignettes and Shadowbox Vignettes.

What's more, you can use your own supplies to fill them up as well.  The bonus is that each of these layers also works for your other types of cards you make.  A budget crafter from day one, Becca keeps the "mix and match" sensibility alive in Holiday Vignettes so that you get a lot of bang for your buck.  What does that mean?

1.  These vignettes are interchangeable with your other vignettes.
2.  Holiday Designs can be used for non-holiday designs after the season.
3.  You can use these elements to make flat, stand-alone cards too.

About 3D Holiday Vignettes
Layered Die sets were introduced with 3D Vignettes and people quickly realized you could use individual elements in flat cards or you could use them layered together in a diorama.  Shadowbox Vignettes continued the tradition and as you might guess, these new layering sets can be used in both Shadowbox Vignettes and 3D Vignettes.

3D Holiday features three new facades (each including a sentiment) using the same shapes that came in the original 3D Vignettes - Round (snow globe), Arch, and Cabinet.

In addition, there is a new layering set for each - a round set, an arch set and a set to fit the new cabinet.  Join us as we give you a full-on look at all of the new sets.

First up is Spellbinders Glimmer-Merry Filigree Quatrefoil

My Projects For Today:
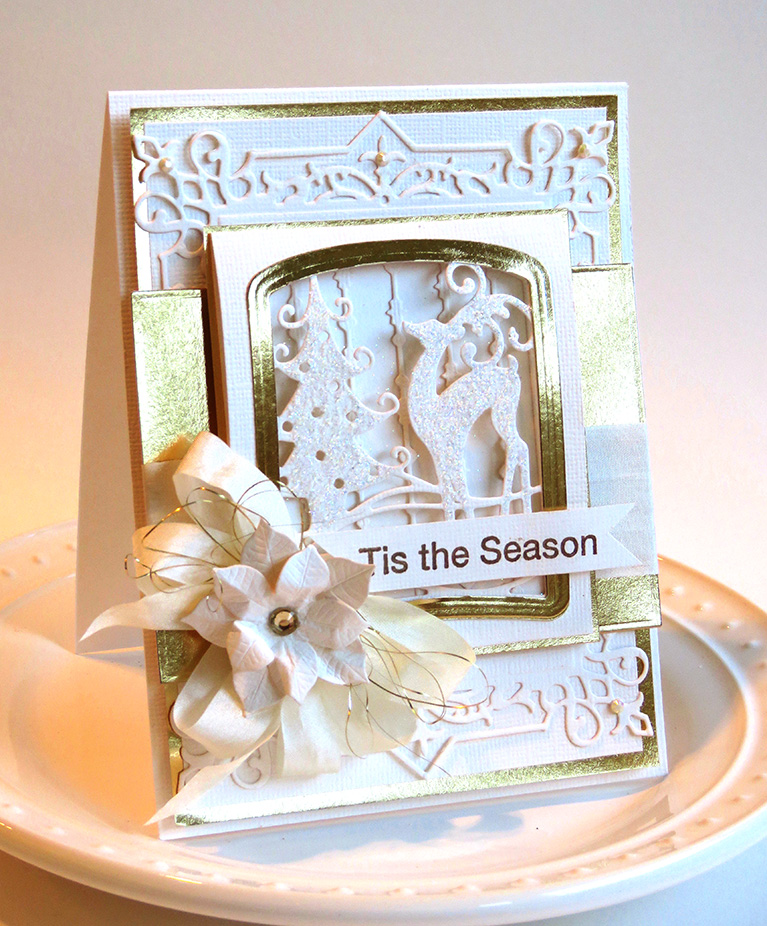
My project for today is using one of the brand new plates from the Holiday Glimmer Collection called Merry Filigree Quatrefoil.  I really wanted to make this christmas card for this year with traditional colors so i found some yummy new papers from Kaisercraft and added a subtle gold paper to match the gold glimmer i used for my new plates.   Since this plate has 3 separate pieces i could add the gold glimmer to the red paper for a base and then cut the other piece from red with the sentiment and pop it up.  I carefully trimmed around my glimmer to give it a nice shape and  make it fit on all the layers under it.

And i wanted to make it just a little bit more like a country christmas card so i also added a layer of kraft under my glimmer piece using one of my favorite dies from the shadowbox collection.  Then a layer of trees and gold followed by wood and gold and then finally more kraft to finish it.  I was really happy how all of these tones and textures melted together so well.  


And the flowers are already made but you can do them with your poinsettia die from our Christmas collection from last summer.  I also found some pretty gold ribbons and those cute little pinecones from Hobby Lobby.  It add the perfect touches to finish off my card.  


As you can see up above this is a really gorgeous plate that can really add so much to a project or maybe like my box below can add just that little touch of detail in just the right shade of foil to make your project look that much more special.  And of course be sure and get out all those other Becca Feeken Christmas dies so you can mix a few of those into it too.  Can you see the shadowbox and
snowflake dies on this one?


Availability:
These plates are available right now on the Spellbinders website —–; HERE

And this month is really special because we have two guest designers joining us for the hop!  Click on the links to each member to be inspired across a broad range of talent:

Visit Joanna   – joannakrog.blogspot.com
Visit Teresa   –  victorianpaperqueen.blogspot.com
Visit Kate       - craft2owls.blogspot.com
Visit Melissa  – keepsakesbymelissa.blogspot.com
Visit Judy       - judyhayesdesign.blogspot.com
Visit Ewelina -  elinaart.blogspot.com
Visit Karan     - karangerber.blogspot.com
Visit Ginny     - pollyspaper.wordpress.com
Visit Becca    – amazingpapergrace.com/blog

Prizes:
In the meantime, be sure you leave a comment on this post and every Creative Team Members and each Guest Designers post for a chance to win an Amazing Paper Grace Die from any previous collection from Becca's Die of the Month offerings.

There are four dies that are being given away.  One name will be randomly picked from comments left on the combination of our eight blogs on the Introducing 3D Holiday Vignettes post between August 12 and August 18, 2018, at midnight US Central Time.  We encourage all of our international friends to participate!  The randomly selected names will be announced on the Amazing Paper Grace Blog on August 19th.  (All giveaways for this hop are managed by and the responsibility of Amazing Paper Grace).

Up for grabs is an Amazing Paper Grace die of your choice Becca's Die of the Month.  These dies are typically only available to club members however you can win your choice of any die that has not already sold out.

There will be a total of four dies and a winner can win once among all the blogs.  If your name is selected, simply claim it within 2 weeks of the announcement by sending your address through the form under the Contact Tab on the Amazing Paper Grace Blog.  There won’t be a reply back but if you leave your choice, we’ll get it, I promise.    The dies will be mailed out from Amazing Paper Grace.  (Please note:  Please be patient, your dies will come, we promise!)


Thanks so much for joining us for the Introducing 3D Holiday Vignettes Blog Hop.   Leave a comment to let us know your favorite is it the new dies or the glimmer?  There is much more inspiration in store today and for the weeks to come.

Friday, August 9, 2019

Back to School Notepads for teachers


Hi friends... thank you for stopping by on this beautiful day in Cali.  We are already into the first week of August and that means for some kids it's time for school to start so how fun would it be to make up some of these little notepads for a teachers gift to start the new year right.  They are super easy to make and you can use all those scraps you have laying around and just mix and match all of them.  For mine up above i mixed some Prima papers for the outside and inside and also cut a piece of the delicate Tendril Border to show off the front.  I added just a touch of brown chalk ink on it and the flowers to antique it a little.  Imagine using some fun vintage embossing powders on the whole piece.  Wouldn't that be fun?


And here is the inside of the pad.  You can make your own pads with layered pieces of paper or order them online for a perfect fit.  The little piece on the side is for a pencil.... they are just so adorable.  And so very, very easy to make.  You could start now and make up a bunch for all the holidays coming up so that you have quick gifts for everyone.  Love, love, love that idea!

And don't forget to stop by our new Guest Designer- Ginny Nemchak and see what fun things she is creating for us this month.  

Have a really wonderful weekend and hope you do something fun and crafty!!

Supplies:

Shapeabilities Adorned Notepad Etched Dies Vintage Treasures by Becca Feeken

Monday, August 5, 2019

Amazing Paper Grace August Die of the Month Blog Hop


We're so excited to get to show you a brand new Amazing Paper Grace Die of the Month for August called Elegant Knots.  Becca's dies don't normally have an abundance of embossing but this one has a ridge throughout the design so that it can be stenciled to add charm.  When released on August 1st Becca showed how easy it was to use for Valentines Day, Christmas and an anniversary - it goes with everything!! Each one of us has taken the die and spun it into a creation.  Please join us today as we bring you more inspiration.


For me this was such a fun die to work with this month.  You can stencil with it, cut it apart and just use parts of it like a puzzle, you can fold it into shapes like Becca did and even just use it like it is to decorate the fronts of cards and other fun projects that you have in mind to do for your friends and family.  I even added a piece of another older die in the center in one of my projects to change it up for a stationery set and it looks so pretty!!

My Project Today:


I love all kinds of flowers for all times of the year so for my first project i used this die in ivory and layered it over a subtle tan dotted print to give it a vintage feel.  And this i layered over a back round that i made of a coordinating print and stripe paper from Pion.  You can see below the pretty lilac print that came with it.  I used the border piece for the inside so that i could create pockets for the embossed cards and envelopes that i put into each of the sides.


And here you can see the die and flowers and the cards for the inside.  There is nothing more special than a beautiful spray of flowers that will last a very long time.

My Second Project for Today:


Is an asian inspired card that i just put on a blocked back round in red, black and gold and then layered the die in gold and ivory and added black rhinestones to add a pop of color to match my stamped image in black.  This was so easy to do and sometimes the simplest things can be the most gorgeous things that you can create.


Supply List:
Stamps: Penny Black
Paper: Pion, Bazzill Basics
Ink: Versafine Ink in Onyx Black
Accessories: Ribbons, Rhinestones, Flowers

More inspiration is just a click away.  Stop by with each Creative Team Member to see how they manipulated this die to come up with a unique project for you to try!

Visit Kate        - craft2owls.blogspot.com
Visit Joanna   – joannakrog.blogspot.com
Visit Teresa   –  victorianpaperqueen.blogspot.com
Visit Ewelina -  elinaart.blogspot.co.uk
Visit Melissa  – keepsakesbymelissa.blogspot.com 
Visit Judy       – judyhayesdesign.blogspot.com
Visit Becca     – amazingpapergrace.com/blog

If you want to find out more about the Club - prices, how you sign up and what's included, please look -------; HERE.
If you missed the introduction and want to know more about what inspired the Die of the Month Club, look ------;HERE.

We can’t wait to see what you make with these exclusive dies – be sure to post your creation on the Amazing Paper Grace Die of the Month page ------; HERE or on Instagram using the hashtag #AmazingPaperGraceClubKit


LinkWithin

Related Posts Plugin for WordPress, Blogger...