Showing posts with label Spellbinders Blog Hop. Show all posts

Tuesday, November 20, 2018

Introducing Glorious Glimmer Blog Hop


All that glimmers may well be gold!  Hi there, today we are sharing with you a wonderful new tool - Spellbinders Glimmer Machine.  In a nutshell, it's an accessory to your die cut machine that will let you add foil motifs to materials from paper to vellum to leather to wood to fabric and more.  The machine employs heat and pressure along with metal stamps (Glimmer Plates) to transfer foil to a surface - like cardstock.  The Glimmer Plates work just like rubber stamps and in addition to transferring foil, they can transfer ink, they can letterpress and they can deep emboss.  Some of the sets feature both plates and dies!

Adding layers of gold or colored foil motifs creates an extra dimension to the sweet cards you send in life. This is a game changer for elegant cards!  Crafters are finally able to get that professional printer look, but at home and for way less than engaging a printer to do foil.  I like to think that the glimmer plates will make instant backgrounds and borders, but now there's a new thing to include in your pretty layers!

About Glorious Glimmer

Becca jumped at the opportunity to create a set of classic, never go out of style plates for the new Glimmer Machine.  Glorious Glimmer has that sweet calligraphic look that has been popular throughout the ages.  Whether used as a background, framed or layered up with a sweet die cut peeking out from underneath, these plates have options that will allow you to highlight them beautifully in any project.

Join us for our blog hop where we will show you some inspiration on crisply transferred foil that spans from a clean look to a more involved elegant look!!  Also today we have the pleasure of introducing a new Creative Team Member.  Please welcome Ewelina Panka - you have seen and have swooned over her work before.  She creates classic beauty on her ----; Blog as well as on her ---; Facebook and on her ---; Instagram.  Please be sure to subscribe to her in each of these areas and watch as she dazzles with her fine eye for detail as well as her magnificent flowers!

My Projects For Today.


Here is what the plate actually looks like.
I really loved using this beautiful set of 3 plates and decided to layer it with some of my other Becca Feeken dies to create a Birthday card.  I used silver foil as my base color and then added the Hemstitch Ovals die between the foiled layers.  I loved how easy it was to heat the foils to the papers and what a beautiful effect it made to the card. And you can use all your other dies to mix in so it makes it even more fun.  You will love using this!


This is what the die looks like: 

I loved creating these simple yet elegant cards with the new Monogram Medallions and the Elegant Monograms plates.  Each of designs has gorgeous swirls and crowns perfect to do any special gift idea that you have.  And the monograms will be wonderful to customize a beautiful set of stationery for a new bride or your BFF's.  

Availability:
These plates are available right now on the Spellbinders website ; HERE

Prizes:
In the meantime, be sure you leave a comment on this post and every Creative Team Members post for a chance to win an Amazing Paper Grace Die from any previous collection.

There are three dies that are being given away.  One name will be randomly picked from comments left on the combination of our six blogs on the Introducing Glorious Glimmer Blog Hop post between November 20 and November 25, 2018, at midnight US Central Time.  We encourage all of our international friends to participate!  The randomly selected names will be announced on the Amazing Paper Grace Blog on November 27th.  (All giveaways for this hop are managed by and the responsibility of Amazing Paper Grace).


There will be a total of three dies and a winner can win once among all the blogs.  If your name is selected, simply claim it within 2 weeks of the announcement by sending your address through the form under the Contact Tab on the Amazing Paper Grace Blog.  There won’t be a reply back but if you leave your choice, we’ll get it, I promise.  Next thing you know, the die will show up at your door.   The dies will be mailed out from Amazing Paper Grace.

Click on the links to each member to help us revel in the Glorious Glimmer

Visit Joanna   – joannakrog.blogspot.com
Visit Teresa   –  victorianpaperqueen.blogspot.com
Visit Melissa  – keepsakesbymelissa.blogspot.com 
Visit Ewelina -  elinaart.blogspot.com
Visit Becca     – amazingpapergrace.com/blog

Thanks so much for joining us for the Introducing Glorious Glimmer Blog Hop.   Leave a comment to let us know your favorite plate.  Do you have questions on the Glimmer Machine?  Post those questions in the comments on Becca's Blog and she will do a Q&A Blog post on November 22nd.  Just remember to come back to get your answer :-)

There is much more inspiration in store today and for the weeks to come.  Just pop down the list of Creative Team Members to see more fabulous ideas!

Sunday, November 4, 2018

Amazing Paper Grace Die of the Month Hop


Good morning!!  Welcome to our inaugural blog hop of the Amazing Paper Grace Die of the Month.  Today we're here to pump you up with some inspiration for the many ways and many colors to use the Die of the Month as well as to give you the skinny on the club.  Stay tuned until the end of the post when I'll point you to the next inspiration stop in our blog hop.

What is the Die of the Month?
The Die of the Month is an exclusive die, crème de la crème, designed by Becca Feeken that are unlike previous collections.  These are the special ones, the ones that have waited for a special occasion!  What better way than to take you on a year-long ride of pleasant surprises!

Where is the Die of the Month available?
The Amazing Paper Grace Die of the Month is available through Spellbinders.  You can buy it -------> HERE.

How much is the Die of the Month?
It's a large die and subscription to the club is $30.00 per month and includes US Shipping.

What's so special about the Die of the Month?
These are dies designed by Becca that are chock full of extra rims and options so that you have a huge amount of flexibility in creating more than one creation from the same set.  It's exclusive and limited, so you won't see it anywhere else and it's available until the subscription quantities are gone.

When is the Die of Month available?
The die of the month is available on the first of every month in quantities to cover subscriptions.  When it is gone, it's gone :-)

Why have a Die of the Month?When most of Becca's dies come out they are themed collections of 12 to 14 dies.  These are the dies that are more specialized that she didn't want to build an entire collection around - they are definitely Becca's style but she's built extra functionality and thought into these sets.  You all have spoken loud and clear to say that you have a monthly budget and that you want Becca dies all year long without breaking the bank.  Well, here you go.  Don't worry, collections are not going away but streaming them out on a monthly basis you'll see one once a month and they are delightful on the budget.

Join other Gracelets
Once you're in, start creating!!  We can't wait to see what you make with these exclusive dies - be the first to post your creation on Instagram using the hashtag #AmazingPaperGraceClubKit
Why post?  You'll be showing Becca how you use the die so that she can fine-tune upcoming months to fit your groove and you'll be inspiring everyone who looked at the die and didn't know all the possibilities - it's a community thing.

Still, need more info?  Be sure you read all the Frequently Asked Questions -------> HERE.

Here's My Die of the Month Make:

This month's die is called  "Christmas Village Vignette Frame Die".  If you look closely you'll notice that it looks a whole lot like the popular 3D Vignette Grand Cabinet.  That's no accident - Becca likes to make things that work together and add value to what's already in your stash.  No worries though, you don't have to have 3D Vignettes to use this die. 


 For my project i decided to create a decorative box that i could fill with little cards to put Holiday pictures and gift cards for a special person in my family.  I used traditional holiday colors and made sure that each of the colors in the different levels of the piece coordinated just right.


To make my box i measured across the bottom of the finished die and then created a short and narrow paper box that was the same width as the die so that i could attach one on both the front and back like you see above.  I made sure that i added a cute holly paper to the box first before the die so it would add another layer.  And for the front i used this adorable red plaid and gold mat cardstock to cut the center piece.   It gave it a pretty holiday feel without being too fussy.  I kept mine simple but there are lots of other fun pieces in the set that you can use to add on the little cards if you want and i think i will go back and make a few of them up with the trees and houses later.


For the cards i measured inside the box and just under the corner of the die front.  Then i doubled it to make folding cards and decorated them with pieces of the die and pretty papers.  You could also make little pockets inside for the gift cards if you had time.

This was such a fun project to make and I hope you get your order in quick so you can make some fun projects with yours for Christmas this year too!!

And we have lots more ideas to share on the hop so be sure and check out everyone blogs, they are really amazing and very special! Have a wonderful weekend and thank you so much for hopping with us.

More Inspiration

There is much more inspiration in store for what you can use this die set for.  Just pop down the list of Creative Team Member to see more!

Visit Joanna   – joannakrog.blogspot.com
Visit Teresa   –  victorianpaperqueen.blogspot.com
Visit Melissa  – keepsakesbymelissa.blogspot.com 
Visit Judy       – judyhayesdesign.blogspot.com
Visit Becca     – amazingpapergrace.com/blog

Hop along with us every month as a new die of the month is revealed.  The line up is pretty awesome!


Monday, May 14, 2018

Introducing Amazing Paper Grace - Romancing the Swirl Collection


Welcome sweet friends, today we are introducing Becca Feeken's new dies.  Welcome to the Romancing the Swirl Collection - you can take a quick peek of the entire collection ---; HERE.

About Romancing the Swirl Collection

The Romancing the Swirl Collection by Amazing Paper Grace for Spellbinders is chock full of calligraphic swirls and elegant, classic dreamy motifs that will be in style for years to come.  Meant to be used together across the collection, every die will be in character with another as they are combined.  Well rounded with squares, circles, ovals, and rectangles - each combination provides the ability to create a layering masterpiece adorned by the extra embellishments in the collection.

Join us as each Creative Team member shares their creations with two dies from the collection.  We'll be sharing creations for weeks to come so you have a continuous source of inspiration!  We are listing all of the creative team below so that you don't miss a beat on the hop.  Don't forget, each of us will be giving away an Amazing Paper Grace die pulled from the comments - one from each blog.  The prize details are at the bottom of my post.  So, without further ado let me talk about the dies I get to introduce:

My Projects Today:

First up is S5-368 Graceful Doily


My first die is a very beautiful and intricate die set as you can see.  There are 3 gorgeous detailed parts in it and for my card i wanted to bring out the best in all of them so i cut/embossed them in a subtle gold card stock and layered and popped them up on an acetate back drop with gold writing.  Since the acetate is tricky to adhere i cut small photo corners in the gold paper and glued them to the base there and under the center of the die that i cut.  I finished it with a sheer golden ribbon and then another looped bow made of gold on top.  It truly adds a bit of elegance to an already elegant card.  


Second up is S4-928 Hemstitch Circles  


My second project uses the new Hemstitch Circles that i absolutely adore.  I am so glad that this release has two of these gems in it.  The are so versatile and you can do so much with them.  I love that this die gives you that feeling of old linen and the beautiful handiwork our ancestors used to make. It's the perfect bit of detail for all kinds of projects. 

So to make my card.... I decided to use a off white printed paper and cut the large circle and then 2 smaller ones.  Then i used some Tim Holtz ink in aqua to give it just a faint tint on each of them and off set the set on the base piece.  The smaller kraft designs come from my first die that i shared in gold.  They were so pretty i had to sneak 3 of them into this card too just to add a little more detail to the card. Then i created a cluster of flowers with one of my favorite older dies called "Isadora Trinkets".  It has the cutest flower die and makes the prettiest flowers.  I added a few roses and some silk ribbons to fill with the leaves.  And all of this was matted on soft layers of kraft, aqua and tan to finish it.  


Availability:
These dies are available right now on the Spellbinders website.  Because there has just been a European launch, I'd encourage you to go ahead and grab those dies that speak to your heart --; HERE.

In the meantime, be sure you leave a comment on this post and every Creative Team Members post for a chance to win an Amazing Paper Grace Die from any previous collection (Romancing the Swirl not included).

Prizes:
There are six dies that are being given away.  One name will be randomly picked from comments left on each of our six blogs on the Introducing Amazing Paper Grace - Romancing the Swirl Collection post between May 14 and May 18, 2018, at midnight US Central Time.  We encourage all of our international friends to participate!  The randomly selected names will be announced on the Amazing Paper Grace Blog on May 19th.  (All giveaways for this hop are managed by and the responsibility of Amazing Paper Grace).

Up for grabs is an Amazing Paper Grace die of your choice from the Vintage Elegance Collection, the Graceful Borders Collection, the Venise Lace Collection, the Chantilly Lace Collection, or the 3d Vignettes Collection; there will be a total of six dies and a winner can win once among all six blogs.  If your name is selected, simply claim it within 2 weeks of the announcement by sending your address through the form under the Contact Tab on the Amazing Paper Grace Blog. The dies will be mailed out from Amazing Paper Grace.

Click on the links to each 
member to see more sweet samples from the Romancing the Swirl Collection:

Also, help us welcome new Creative Team Member Alicia Barry!

Visit Joanna   - joannakrog.blogspot.com
Visit Teresa   -  victorianpaperqueen.blogspot.com
Visit Melissa  - keepsakesbymelissa.blogspot.com
Visit Judy       - judyhayesdesign.blogspot.com
Visit Alicia      - leishasblog.blogspot.com
Visit Becca     - amazingpapergrace.com/blog

Thanks so much for joining us for Introducing Romancing the Swirl!
Leave a comment - tell us, which of these dies is your fav!!

Monday, October 16, 2017

Chantilly Lace introduces Hannah Elise


I have another card to share today that i did using another one of my favorite dies from the new Chantilly Lace collection from Becca Feeken and Spellbinders.  This beautiful die is called "Shapeabilities Hannah Elise".  It's such a gorgeous die set and has such beautiful pieces in it and i paired it with my favorite Hemstitch Rectangles, Cinch and Go Flowers Two and Isadora Trinkets.  


The yummy pink printed papers are from Maja Design and that too is one of my favorite companies to pair these gorgeous dies with.  And the flowers were really easy and fun to make and since i die cut them from the same papers they matched perfectly.  I am going to have to give this to someone really special.... I really like how this card came out.

And....If you haven't joined our hop yet be sure and go to the Amazing Paper Grace blog and check it out.  We have lots of prizes and wonderful inspiration for all the new Chantilly Lace dies by Becca Feeken.  And tomorrow is the last day... so hurry!!

Supplies:

Dies: 

Paper: Maja Design vintage Frost Basics

Stamp: Penny Black Special Wishes

Inks: Versafine Crimson red, Versamagic Pink Petunia

Adhesive: Scrapbook Adhesives by 3L

Thanks so much for stopping over today!!

Thursday, December 10, 2015

Spellbinders CHA Sneak Peek Blog Hop


Welcome to the 5th day of our Spellbinders CHA Roundup.  I have been on the team for 4 years now and am always so thrilled and excited to have an opportunity to share a few of the newest dies that will be coming to you at the CHA show in January 2016.  And you have a chance to win too.

We have been hopping for 4 days now and all the designers have created some amazing projects to share with all of you.  Today the amazing "Seth Apter" is sharing his new line he designed for Spellbinders and i created something from my favorite designer -Stacey Caron.


The new die that i am sharing is called the "Deco Luxe Card Front" and is from Stacey's new line of Art Deco dies. I am a huge fan of the 20's era, I love the Great Gatsby movie and all the glitz and glamour of that time period so I designed a gorgeous card with classy black and white and silver papers.  Each beautiful detail in this die is so amazing and now i can share how i made it.


To make this card you will need black, white cardstock and silver metallic papers.  You will also need a stamp for the center, black ink and clear embossing powder.  You will also need the S4-416 Labels Thirty Four die and the Spellbinders Platinum Die cutting and embossing machine.

1. Start by cutting/embossing the labels die with the silver metallic cardstock.  Cut/emboss the white Labels Thirty Four die and then stamp both the sentiment and then the little flourish on the top and bottom. Add clear embossing powder and heat set with a heat tool.


2. Cut/emboss the Deco Luxe Card front with black card stock.  Also cut the silver paper with only the outside edge of the die.  Cut a piece of white card stock that measures 6 1/8 x 6 1/8 and your card base in black card stock to measure 6 1/4 x 6 1/4 inches.  Cut a small piece of silver metallic card stock to fit on the inside back to measure 1 1/4" x 6 1/4" and glue across the bottom to extend the card to be square.  (Since the paper is only 12 x 12 inches you will need to add a piece)


3. Layer and glue the pieces together as shown and add rhinestones on the outside edge of the card front.  Add 3D foam squares to the back of the sentiment and adhere to the silver label.  Attach to the card with adhesive.


5. Attach a small bow that you created at the bottom of the sentiment and you are all done.  It's super easy, super elegant and would be great for a party or wedding invite too.


Here is another card that i did with the Brand New "Make a Wish" die set.  I had lots of fun with this card and created a base for my card with inks and then cut out the flower design to show the black shadow. Over that i cut/embossed the die and leaves in white and adhered it with 3D Foam squares that i cut very thin.  Then i used the 6x6 Matting Basics A to cut frames that i inked and layered over the back round and the card base.  Then i finished it by splattering some white paint and Goose Bumps spray.  It was super fun and a totally different look with a square card.  

Thanks so much for stopping by and i hope that you got inspired by all of us and we can't wait to share the rest of the new CHA dies with all of you!!  Be sure and enter your name on the links below to enter the contest and check out the other days by visiting our Spellbinders blog and Facebook page.  For more chances to win be sure and visit Seth Apter's blog


--------------------------------------------------------------------------------------------------------------------------

Official Contest Entry Link is HERE... Entries close in 48 hours

Official Contest Rules can be found HERE


--------------------------------------------------------------------------------------------------------------------------

Thursday, July 11, 2013

Spellbinders Shape It Up Sneak Peek and Giveaway Day 1


Hi Everyone, Welcome to the first day of our CHA Summer Sneak Peek!
I am the first stop on the hop and I am so excited to share Spellbinders
latest innovation in die design called-Nestabilities Enhancing Elements.

I have a really beautiful Brand New Die to share with you
called, Gold Squares One (S4-410).  

These unique die templates can be used on their own or mixed
with all of your existing dies to create
beautifully detailed inset designs that enhance without limits.
  They Cut, Emboss, Stencil, and Deboss too!

For my project today, I am sharing with you a special stationery gift set
that I created using the dies both on the front of the gift box and on the
beautiful cards made to put inside of it. And I am sharing the directions
on how to use the dies and how to put it together too.
So grab a cup of tea and lets get started!


First here is a list of things that you will need...

Spellbinders Dies:
      S4-410 Gold Squares One
      LF-018 Grand Decorative Labels One
      S4-380 Decorative Labels Twenty Seven
      S4-375 Scalloped Labels One
      S4-395 Les Papillions Two
      S5-145 French Frills
      GC-015 Junior Magnetic Mat
      GC-001 Grand Caliber® Die Cutting and Embossing Machine

Cross Promotional Partners:
Graphic 45 Secret Garden- Sunkissed, Beautiful Blooms
Bazzill Basics Paper® Ivory Cardstock
Scor-Pal®  1/4" Scor-tape and a Scor-Pal 
SCRAPBOOK ADHESIVE BY 3L™, E-Z Runner, 3D Foam dots
Want2Scrap(C) 72 count adhesive pearls in ivory

Other: Ribbon, scissors, papercutter, polka dot vellum

Instructions:

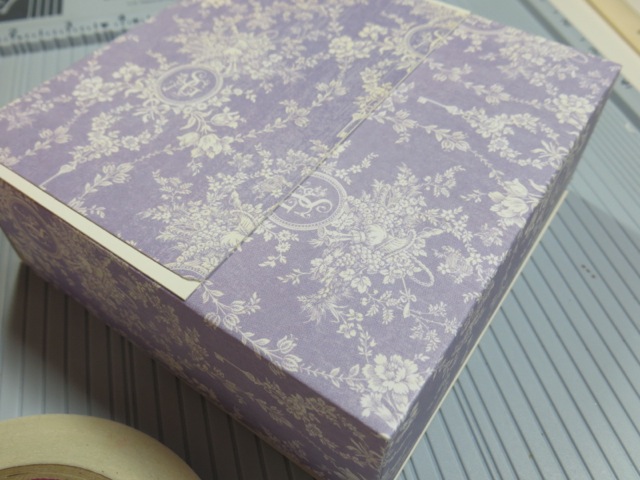
  1. To begin this project you are going to first cut a piece of the lavender printed cardstock 9 ½” x 12”.  Using a Scor pal score the paper on the 9 ½” side at 2” and 7 1/2”.  Turn the paper and score again at 5 and 7”.  Fold the lines in and then cut in on the 5 and 7” sides to the center.  Fold the box up and adhere the sides together with Scor-tape.
  2. For the lid you need to cut another piece of the lavender printed cardstock 5 ¼”x 10 1/2”.  Also cut a piece of the ivory cardstock 5 ½” x 11 inches and adhere the lavender on top of the ivory paper.  Scor  this piece on 5 1/2" and 71/2" too.  Fold on both lines.  Lay your lid on the top of your box to find placement and mark where 2 lines of scor-tape will go to the back to hold on the lid.  Undo the tape and carefully glue in place.  Mark with pencil 2 small dots for the Velcro in the front and add small white Velcro dots to hold the front in place.


3. For the front pieces cut and emboss #1 Grand Decorative Labels
one with the #6 and #7 square enhancing elements
using the magnetic mat on your grey base plate.
 Lay the paper on top and then the cutting mat and run
it through your Grand Caliber.  Replace the cutting plate with the
embossing mat and the pink embossing plate and run it through again.
Don't the enhancing dies just work just beautiful?
 But wait there is more....


  1. Now you can do the same thing with #3 Decorative Labels Twenty-Seven with the #1, 2 and #3 enhancing squares inside of it, this time on an angle as shown using ivory cardstock.

  1.  And lastly cut and emboss the #5 scalloped labels one with the #5 Enhancing element in the center with the purple printed cardstock.  Also cut and emboss 4 of the small corners from the French Frills die set in the same purple patterned cardstock. 


  1. To assemble the pieces for the front adhere the large ivory piece to the front of the box flap.  Adhere the top piece to the purple printed cardstock and then to the labels twenty seven piece.  Adhere this piece to the box with small foam dots to make it pop up more as shown in the photos below.  Adhere the decorative photo corners on with adhesive and add tiny pearls.  Cut and emboss a butterfly cutout and a base and glue them together.  Adhere this to the right side of the box and gently lift the wings and add tiny pearls.


  1. For the inside cards cut ivory cardstock to measure 5 ¼” x 5 ¼”.  Cut 4 for your box.  Cut and emboss the #1 Grand Decorative labels One in ivory for each one.  Cut and emboss the scalloped labels one in lavender cardstock for each one.  Cut and emboss the labels twenty seven in ivory for each one. And finally use the #3 scalloped label and cut and emboss the #1,2,3 and #5 dies in the front as shown at different angles.  To make the designs pop more cut a small label in lavender and adhere under the top piece.  Add tiny pearls on the corners and a pretty satin bow.  Emboss envelopes to match or create your own with vellum.  You can make all of them the same or have fun and mix up the dies to create fun an unique cards made especially by you!  It’s really fun and wait until you see the other amazing dies available soon… you are going to want them all!


So now that you know how they work I have another
simple project to share using the same
Square Enhancing Elements dies and a few of
my other Square Nestabilites dies to make a cute desk
calendar.  When you pair these elements with your existing dies
you can really create some one of a kind designs. 
 It’s really fun and easy to do.


I hope you loved these new dies and you are going
to love all the other amazing products being shown this week!  
Be sure and leave a comment to let us know what you think and
enter the contest for lots of prizes to win this week too.

Giveaway Rules HERE

Enter Giveaway HERE


Your next stop today is the Amazing Becca Feeken
who will share another New Release die for Summer CHA
that you can see right here…..


Questions? calexander@spellbinders.us No entries will be accepted at this email address.

LinkWithin

Related Posts Plugin for WordPress, Blogger...