Showing posts with label altered projects. Show all posts

Saturday, November 3, 2012

Fun with Snowflakes

I just love making things with snowflakes and adding lots
of glitteryness to them!  Last year I did my whole diningroom
with a snowflake theme and it was so fun to have our meals
in the glittery white snowy decorations... so this year I am starting
early with some projects and I made an easy vase using a
piece of white vinyl and a fun card with a beautiful stamp
from Penny Black Christmas Release and of course lots
and lots of fun Spellbinders dies too!


I used lots of the New Spellbinders Snowflake dies that you can 
see here.  They are Create a Flake 3 & 4 and the
Snowflake Pendant dies.  Gorgeous aren't they?


The Oracal vinyl cuts really easy in the Grand Caliber
and then you can just gently pull each of the snowflakes
off and arrange and stick them where you want.  I added
a little bit of extra diamond stickles and I think I am going to 
make a really pretty white pointsettia arrangement with
icy sticks and put in it to decorate this year. The vinyl cuts
from the Spellbinders dies also work great on walls and mirrors too!!


So my next project to share with you today is
a card I made using a Penny Black stamp "Crystal Drops"
and embossed it with Watermark ink and Ranger
Seafoam white embossing powder.  I also used 
a fun new die called Scalloped Labels One S4-375 to
make the borders and popped them up with foam dots.
For the bottom edge I cut and embossed a few little
snowflakes and glued them down to make a border
and then tied a pretty swirly white ribbon from 
Creative Impressions. I also added super tiny rhinestones to
decorate my tree and a bit of stickles too.
 Another amazing die that you
are going to love to have is the Matting Basics S5-132.
This makes card making so easy and the back blue
piece is beautifully finished and embossed now. 

Hope you like my fun little projects today and hope
you try a few for yourself.  I am sure as the season goes
on I will have lots more things to share with this :)

Have a blessed day!

Monday, September 3, 2012

Journal Monday #4

I hope you are all having a great holiday weekend so far!
It is nice to have these days to catch up with life and maybe
create a few things here and there right?  Well today
is Journal Monday and lots of things happened this week
some good and some bad but it got me to thinking how
important each day is in our lives and how we
should step out of our comfort zones and do things...
lots of things that we wouldn't normally do--- just to say 
you tried it once... My book this week is a pocket journal
that I made from a Basically Bare Kraft book from Tattered Angels.
The title is "Just Go" and it was inspired by all those people
in my life that just go... they take life running and enjoy
each and every moment... I hear so many people say
"We are going to do that when we retire" and for me I want
to start now.... and "Just Go".....

So here is the front of my book filled with lots
of fun bits of this and that...


I used some Echo Park and alot of MME papers for it
and as promised there is lots of things that I used
from my stash to use some of it up...
stickers, tags, buttons, ribbons and keys.

I love the book because it has 4 pockets with a card
in each for photos and whatever else you pick up on
your journeys.  And in my case since i am a huge
collector of things I am adding some envelopes that
I am decorating and extra cards to write in and to
put photos in when I get them printed up..


This was such a fun book to do and is going to be
perfect for my next trip to Sacramento and Sequoia.
The pages measure about the same so it was really
quick and if you use a pack of the same collection then
all of it is fun to mix and match on each of the
 pages when you are working.

This book was also inspired because I lost one 
of my very favorite Aunts this last week.  I will
love her always and will miss her alot but I take
great comfort in knowing she is with my Uncle now
and I will always remember to enjoy each and every
moment in life.... because you just never know....

Have a wonderful Monday...
Hugs and Smiles :)

Friday, February 10, 2012

Favorite Color Blue


Sometimes starting a project is from being inspired
by a favorite paper you just bought or sometimes 
by something you get like this notebook my husband
gave me from his work.  It was blue and had business
writing on it but then I thought hey... I have my favorite
papers from Authentique that I could use to cover it
and after rummaging around my room I found lots
of little bits of things to use to make this journal for
my road trips this summer.... Fun, fun, fun.... and now
I am ready and I made a couple of cards too from
the leftover scraps that I had.  


 The flowers and bling I used from
Prima... I soo love these colors...


 Sometimes I know I get a little carried
away with putting things on my projects
but this was quick and easy using one of
their tags and to add to the love theme I
added little heart brads in silver on the 
corners.  The flower and ribbon
 I had in my stash and it worked great.


This card was also inspired by the tag.
It says "The Best and Beautiful Things
cannot be seen... they must be felt within
the Heart"-Helen Keller.  I loved this
so I cut out a Spellbinders die and put it
behind it to fancy it up and added another
tag with the clocks on it to give it a sense of time.
The papers are so pretty all I had to do was
add a fancy bow and some tiny pearls and
that was all it needed.  Hope you like it!

I have lots to do out in the yard this weekend
 so I will have some more things in a few days to
share... but until then... happy creating to you :)

Lots of Hugs,  Teresa

Wednesday, September 7, 2011

Doodlebug Halloween


I am a huge fan of Doodlebug and when I came across
a stamp store in Elk Grove (Stampers Corner) 
that carried all of their products (I was so impressed)
both old and new I stocked up on all the fun things they had!!

I love how everything works together and they have these
adorable little adhesive characters from all the different
collections called doodle pops.  Soooo cute!! I had so much
fun using this line with all the great colors it has in it!!
My first project is this Memo Board-
 For this project I purchased a corkboard with a frame
and painted the edges black and added lots
of fun borders and papers to it in strips.  I used a stamp edged
punch for the rectangles around the top inside edge
and put that cute little bat on the side :)

I always love using the tags for cards and
what not but these went perfect to decorate
the top and bottom of this board...

 If you haven't gotten any baker's twine this is
a must have!!  There are so many colors available
 and it gives your projects that little extra something
that ordinary ribbons can't give to a project... 

 I love this little card.. To make it I cut strips and angled
them for the backround.  Then I added a cute piece of 
the spiderweb paper and matted it in white. I cut 2- 1/4"
stripes and glued them down and added one of the tags
over that.  Next I used one the new little green alien pops
and put him next to the trick or treat bag and added a
cute little happy halloweeen message!!  Whaa la, it's done!
Don't you just love his little jiggly eyes?

These little guys are sooo cute!  I would love to make
these for an invitation because it just screams come
to my party and have a good time right?

For some crazy reason my camera did not do this
page justice but the closeup color is better.  I added
a little distressing on the edges and a few of the tags
for color.  I love the purple and black spider paper,
it is just so very cute!!  Hope you all get some
of this cute paper to do your Halloween pages this
year... It is really fun to work with !!


Thanks for stopping by and have a really great day!

Hugs,  Teresa

Wednesday, August 10, 2011

Fun New projects

 I love this new line from 3 bugs!!  It has some really
fun prints mixed together in some great colors that 
are perfect for teenagers and other fun things like cards
and altered art.  My favorite part is the punch outs 
because you get lots of borders and flags and little fun
tags to use....  it was so fun!!

 I got this inexpensive wood frame and cut out lots of 
pieces from the flower page and the layered
design page to create the backround and pop up
some flowers at the edge.  I added a couple of stickers
at the top and at the bottom and then used
 my white pearl pen to go around the inside
center of the frame.  To finish it- I used a bit of brown
and black chalk ink around the edges and wha laaaa!

 I just used the left over scraps for these 2 cards and added
the stickers for the titles.  I am getting in the habit of using
the scraps so that I don't have lots of little pieces laying 
around and I have cards to give when I need them...


I am working on lots of new cards from my New Lily of the Valley 
stamps too but will have to post those in a couple of days...

Hugs,  Treesa

Sunday, July 24, 2011

Summertime Fun

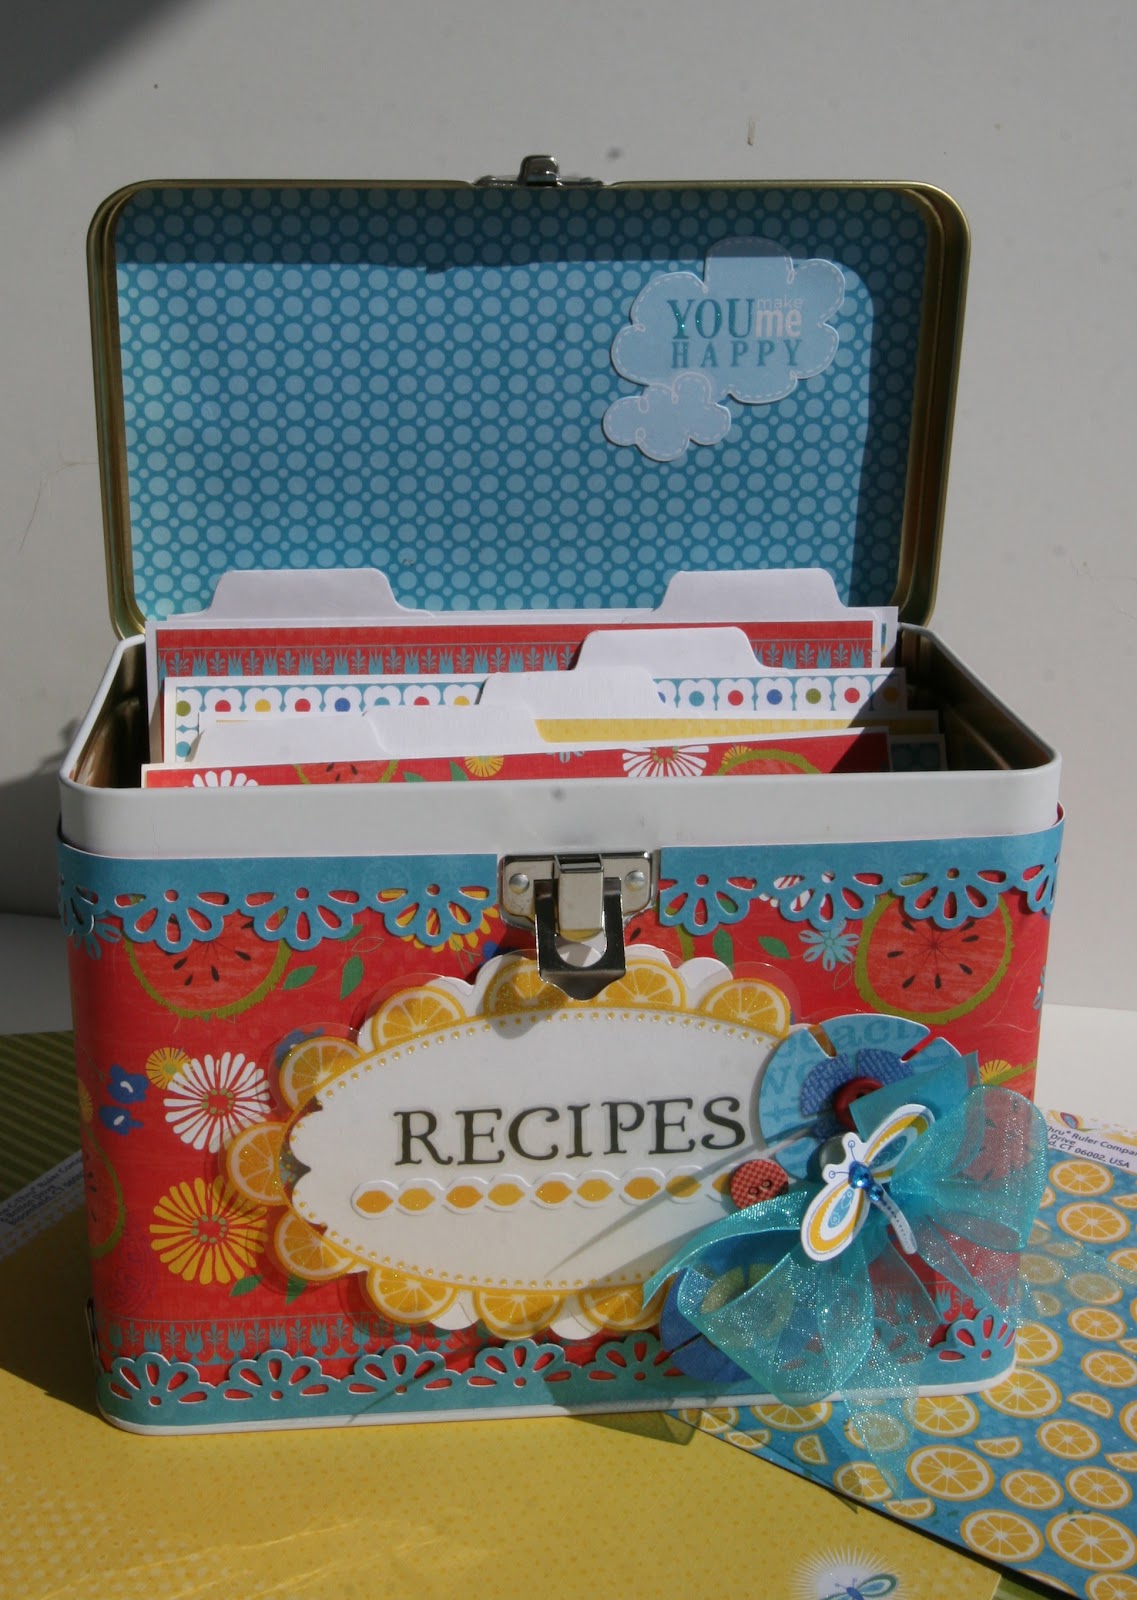
I have lots to add today since I got this idea to use my
new Little Yellow Bicycle to make a Recipe Box
and a few other things.  The colors were super bright and
filled with lemons and watermelons and things that would
be perfect to hold recipes for my summer goodies that I 
make when the temperatures are super hot and I would rather
be cooking on the barbeque or making salads.

For this project I cut 2 pieces of paper 12 x 4 and glued them
together and used my favorite Scor tape to hold it on to the
metal lunch tin box that I purchased.
I cut a white Spellbinders scallop and put the word recipes on it 
and used one of the clear transparencies by LYB over it. 
For the border I used a Martha Stewart punch and glued that on the top and
bottom of the lunchpail and then added ribbons and some of the
 flower stickers and buttons that come with the set.

For the inside I made dividers for my recipes
and decorated them with scraps of paper. I can't 
wait to put in lots of fun recipes now :)

I was in a creative mood and wanted to find
a few cheap things to create with so I hit the $1 store
and found this cute dry erase board so I created
the backround on a flat canvas board for stability
and added lots of chipboard pieces and used my 
handy dandy crop a dile to make holes for a ribbon
at the top to hang it up in the kitchen.  And now here
is a plug for my favorite glue..  I used Scotch quick dry
adhesive to glue all this down and no lie it only took me
about 10 mins to put it together once all the pieces were 
cut... it works awesome for flowers too.

Here are a few cards I made with the scraps from
the first 2 projects.  They are super simple from my
normal things but sometimes you need a quick card
to give and its fun to make things to have ready when
you need them for a gift or just to send......


Thanks for stopping by... 

Hugs,  Teresa

Friday, July 15, 2011

Disney magic

I could not wait to post some of the things that I am
making for our Disney Themed area at the shop so 
here is 2 of them until I can photograph the rest.  
My dream job was designing for disney parades but
being a mom put that on the back burners so this is
the next best thing.... I love making Disney projects and
being so close to that Magical land and the Big Mouse
makes it that much more fun!!!


These are New papers from Creative Imaginations
and they have pirate themes and cars and spaceships 
and lots of my favorite mouse too.  You are going
to love this with all the silver on it.  It is sooooo cute!!


This is a fun catch all or candy box that Margaret Young
from Pine Cone Press designed and I made it with
the new Creative Imaginations papers.  It is from a
12x12 piece of paper folded in thirds and folded in on 
the ends and held together with 2 metal rings.  I also added
some EK puffy stickers and lots of matching ribbons on
the top with a tag that I made.  I love this and it would
be so cute for centerpieces for a party or just to give as
a gift... It has my mind working overtime... I don't know if
that is a good thing or not...

Thanks for stopping by and check back I will have
lots more Disney and some Princess things too!!

Hugs,  Teresa

Sunday, June 26, 2011

Something different...

They have some new dies out for Sizzix and
i made this teacup out of Basic Grey and
this fun little mini suitcase out of Bo 
Bunny yesterday....  They were pretty quick
to put together and fun to give for a gift with
something special inside or maybe candies
or something like that too....  it was really fun!!

 The Teacup only takes one piece of paper
 and chipboard and then you can decorate it anyway
you would like.  The papers are the new Out of Print
from Basic Grey and it had the perfect flower print for this.

 I think I would still like to add some stitching around this
if I did another one and a cute little fold out book inside
but for the first one it's not so bad I think...

You have probably noticed that I don't do white space
pages and am challenged ALOT at this but I tried and
I was pretty happy with it.  I was going to name it something
different but I found this flower that looks like an oyster
and had to rename it my little pearl.... she is still a little 
fishy girl and plans to go into biology to train dolphins and 
those kinds of mammals...  I hope she makes it :)

LinkWithin

Related Posts Plugin for WordPress, Blogger...