Showing posts with label Mixed Media. Show all posts

Saturday, December 5, 2015

Craft Hoarders Hop for December

It's time again for another Craft Hoarders Hop this month just in time for
Christmas and we have lots of fun ideas to share with all of you to make for
the Holidays. If you have been hopping along from the start you should have
come over by Wendi's Blog but you can alway start from the list at the bottom.


 I dug deep into my stash and found some fun things to use
and came up with this Christmas tree to put Grandkids photos. It's so cute and easy!!
So for this project you will need some Christmas paper (mine is from Basic Grey), 
circle dies, ink, adhesive, a pencil, nail file to sand the edges and gold cord and bells.
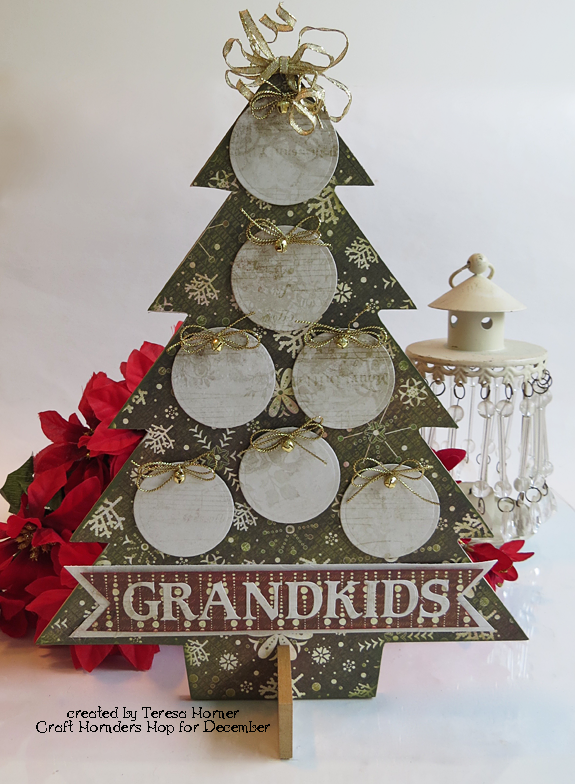

The wood tree is from Kaisercraft and i first traced twice and cut it out and then i glued it
on the base front and back and let it dry.  Then i sanded all the edges and inked them up. 
You can paint all around the edges too if you want to have it match the papers.
The circles i cut/embossed from a Spellbinders "Basic circle die" and glued them on
with 3D Foam squares from Scrapbook Adhesives by 3L.


And finally the grandkids banner was cut/embossed from the Spellbinders "Font One 
uppercase" die set.  I love both the upper and lowers on these because i always have 
enough vowels to use for things... it's wonderful and you can cut whatever 
paper you need too. I really love that part.

So.... that's it for this crafty girl to share and it's time for you to hop on over
to Kathy's blog and see what she has made for all of you.....  Have a wonderful month
and enjoy the holidays and thank you for hopping with us today!!

Merry Christmas everyone!!


Tuesday, October 13, 2015

RRR Blog Hop- Crazy for Christmas

Hi Everyone and welcome to the October Blog hop with RRR.  We have a
fun hop for you this month to get started on Christmas with our new ribbon
assortment called "Crazy for Christmas".  It's gorgeous and there are so many pretty
 ribbons you are going to have lots of fun this year making special homemade things
 for your family and friends to give and decorate....  

So if you started the hop at the beginning you would be arriving here from
Karen's blog....  and---- i guess it's time to get started then :)


This project is for me to give to my niece this year so that she can count down the days 
until Christmas.  She is almost 3 years old and i think she will have fun and make it
really exciting for her.  For my papers i started with Basic Grey's Christmas line to make
a simple layered base for the back and added ribbon to make bands across 
the front and ribbon bows in green for the top to decorate it more.  Ribbon always seems
to make the project that much better doesn't it? And the colors this time are so bright
and cheerful and matched so many of the papers i had it was super easy to make this.


For the stickers i found this Santa at Hobby Lobby and the wood veneer letters
are from Ruby Rock-it.  There were lots so it was simple to write out the whole message.


And here is a closeup of the bows that i did for the top.  I mixed two greens for it.
The bottom is the green satin and the top is a mixed sheer in green.

And now it's time for you to hop on to the next designer... Jenn

Thanks so much as always for stopping over and i always appreciate
the nice comments you leave and your love of ribbon like me!!

Have a really wonderful day :)

Monday, October 5, 2015

Crafty Secrets Challenge and Blog Hop for October


Welcome to the October Crafty Secrets Linky Challenge and Blog Hop.  Our theme this month
is Give Thanks with a Grateful Heart.  The design team was challenged to create a
Thanksgiving themed project or a project that expresses thankfullness and gratitude.  We
hope that you will join us for the hop, and then visit the Crafty Secrets Blog where you
can find a free download and details for entering the challenge yourself.


I have been doing lots of sorting in my craft room lately and found
this huge jar from IKEA that i had bought and got this great idea to do
a Thankful jar for Thanksgiving and before.  I have had this on my to do list
for a long time and finally got one done... i am so happy.


So for my jar i created a pretty band around the center using leaf papers from
 the Halloween #4 CD and lots of ribbons from Really Reasonable Ribbons.
The little Blessed and Grateful tags are from the CS and i cut them
apart and tucked them in the ribbons on the front.  On the top i used tiny
adhesive block letters and wrote 40 days of Thanks and Praise.  And now
i just have to make 40 slips of paper to write on and fill up my jar.  


Here is the order of the Design Team in case you want to hop along with us....

Crafty Secrets Blog

Kathy Clement

Ginny Nemchak

Teresa Horner
Darlene Pavlick
Sheila Rumney
Shantaie Fowler
Diane Hover
Michele Kovack


It's going to be a really good month... thanks so much for stopping
over and be sure and upload for our challenge this month too.
Teresa

Saturday, September 5, 2015

September Craft Hoarders Blog Hop is up today

Welcome to the September Craft Hoarders Anonymous Hop! You should be coming to my blog from Wendi Robinsons Blog.  After visiting me, hop over to Kathy Clements Blog next! To start at the beginning of the hop, and for the full list of Bloggers, go to Gloria's Blog...

We have some fabulous ideas for you today with all the goodies we collect in our stashes, which by the way is a whole lot of good things.


So for my project i started with this Tim Holtz folder made of kraft heavy weight cardstock and i created a kind of family keepsake to hold all the neat things we have of our grandmother that just passed away this summer.  She made it to be 100 and they had an amazing party for her and it was so fun but sadly she will be missed by all of us.  Especially me because she loved to craft too :)

Products for the front: Spellbinders: Oval Floral, Sprigs and Majestic Oval, Prima flowers, Maja papers, Glass Bead Glitter gel from Faber Castell (it's my favorite thing) and the Grove tool to grunge it all up. Oh and i used a little but of white chalk ink in the stencil in the back round too.


Since i wanted to put more than just photos in my book i kept all the pages loose so that i could write things on the back and maybe attach old letters from her and recipes that we found.  I have lots more photos to put in but i thought someday i would love my grandchildren to see a neat book with stories and photos of their great great grandmother so they could learn the amazing things about her too.


 The papers i used for this are from Maja Designs (Sweden) and they are absolutly gorgeous.  I love the quality of them and each set has amazing designs that make it super easy to create an amazing keepsake for your family.  I used the Vintage Autumn Basics set and the Vintage Summer Basics set.
Each of them has beautiful vintage color browns and blues and well i just can't say enough about it.


 And i also threw in some cards for journaling from 7 gypsies that i picked up and the rose die is from Spellbinders and is called .   The butterfly is from Prima and the cute family tag is from Echo Park.


 For this page i used more ribbons from my Really Reasonable Ribbon stash, some paper clips to hold on the page and the Best of Times stamp from 7 gypsies in Versafine ink to match.


 I really love these papers and it made the photo look so good.  This is all five of the sisters together in their house in Salem.  It's neat because the house is still there and we go by every time we visit. I can't wait to finish printing all the photos and ask everyone for their memories of her to put inside.  It's really going to be something neat to have and share with everyone.


The page is really special because i added buttons from her button box.  I wish i new who's shirt or clothes these came off, oh what a story it could tell. The clocks i used to show all the time that she was here on this earth being the wonderful grandma that she was... 100 years is along time and i am so glad that i will have a special page to tell about her party and that wonderful milestone.

Thanks for hopping over to see what i did and be sure and check out the other girls this
month too.  I am sure they will inspire you with what they do :)  Happy Saturday!!


Karen Zueger-Brownell - http://lostcoastscrapper.blogspot.com/


Friday, August 21, 2015

RRR Fall challenge is up today...

Today we have our Really Reasonable Ribbon Fall Challenge up with the new
"Ribbon Club Assortment" and wow is it ever gorgeous.  It's my favorite time of year-
picking pumpkins and apples- so i remade a basket that i had used for decoration
with some new papers and embellishments that i found in my stash.


I always forget to go check my old things but this time I found the perfect little
basket to redo the top.  I made pretty ribbon bows with fall colors to match the
cute country prints.  The colors are so pretty and the ribbons really make the project.


My favorite ribbon in the set is this new little lace.  It's the perfect shade of
ivory and the size is great for cards and other things too.  I am going to have
to order more next time just to have some on hand, it's so cute.


And here is a quick photo of the top.  I used Basic Grey papers and the stickers
that went with it.  The dies are from Spellbinders of course and they fit the
top perfectly and gave it that pretty lacy feel i was going after. 

So that's it for today.... thanks so much for stopping over and be
sure and check out the other projects on the RRR Challenge blog and
maybe make up something to join with us and win!!  

Big Hugs and Smiles from Cali....Teresa

Thursday, August 13, 2015

RRR Blog Hop gettin ready for fall...

It's time again for our blog hope with Really Reasonable Ribbon and another gorgeous ribbon set this month that you can get started with all your fall projects.  It has gorgeous shades of orange, green, gold and browns and the perfect laces to match.  I decided to use a few wooden things i found in my stash to make up some new decorations for my house.  It was super fun and went pretty quick.

 Along time ago in the Scrapbook store i worked at we got this fun product in called Deco Art Metallic Lustre and we had a go with it on all kinds of things.  One of them was wood so i had this idea to mix the greens and the orange and see what happens.  And this is it.  It's an easy product to use because all you need to do is sand the wood really good and then rub it on with an old t-shirt or something soft.  I did the green layer first and then the orange in a few places.  


Here is a closer view of the frame.  I used lots of ribbons, greenery that i cut from
a Spellbinders die and some other fall things i had in my stash.  The fall quote i found
online and thought it looked really good with my $1.50 wood frame.  The outside
frame is Spellbinders Mystical Embrace and the paper is from Basic Grey.


And here is my little birdhouse to got with it.  These are my mother in laws
favorite colors and i think i was channeling something special for her.  I hope
that she is smiling from heaven at what i did :)  Sure miss her alot.

Other things i used for this are: Sandpaper, Stencil for the Birdhouse roof, Glass
bead glitter gel and Beacon 3 in 1 adhesive.  I really love that glue, it really sticks.

Here is the order of our hop this month and if you just started be sure and
go back to the RRR Blog and check out all the other fun things that everyone is
sharing for you this month.  And here is the link for the new


Thanks so much for stopping over and have a wonderful weekend!!

Teresa

Monday, August 3, 2015

Crafty Secrets Blog Hop

It's a beautiful Monday and time for another fun Blog Hop with all of us on
the Crafty Secrets Team.  Today we are all stepping out and doing some fun 
Mixed Media projects so you will have to stop on over to all the girls 
blogs and see all the magical things that they did today.


I really had alot of fun making this beach bag for my money and small items
that i haven when i go to the beach.  I used the "Cotton Scraps Summer Homespun" 
and then found this cute little zipper bag made from Canvas from my local craft
store and it was super cheap.  So i cut out a few things and got some Fabri-Tac and
set to work.  For this project you are going to need a stencil, some paints to match,
glitter, cotton lace and maybe a sewing machine to zig zag around the pieces too.


So as you can see below the first thing i did was to stencil on my circles
with the aqua and green paints using a stipple brush.  This brush is a flat
kind of stiffer brush and makes it so much easier to keep the paint inside
of the lines.  Be sure you get some of the paint off so that it's a bit dryer
on a paper towel before you stencil and most important.... try it on a scrap
piece of fabric first to see how you like it before you work on your good one.


And after i got all the paint on where i wanted it i sprinkled a little glitter into the
paint to make it glisten like the sand does when the sun sets on a sunny day at
the beach where i live.  And then i went ahead and put Fabri-tac on the back of the
pieces and glued them where i wanted them to go.  I think i will go back and do
a quick stitch around all of them just in case but this glue really works good.


And that is all there is too it.  The Cotton Scraps come in all kinds of styles
that you can see here.... and they are so quick and easy to use.

Be sure and follow all the other links to see what everyone else is sharing
today and hope you get some and try this for yourself...

Kathy Clement, Team Leader:   http://www.kathybydesign.com


Shantaie Fowler: http://www.inkingpink.com/


Teresa Horner: http:// victorianpaperqueen.blogspot.com/


Happy Monday...Teresa


Monday, July 13, 2015

It's time for the Really Reasonable Ribbon Blog Hop....

Hi all you ribbon lovers out there...it's time for another fun hop for July with
all of our designers on the RRR Crew.  Today we have lots of fun ideas to share
and i hope that all of you will get a little inspired and make something fun.

So if you started at the beginning on RRR Blog hop--- you should
be arriving from Karen's blog here....

And my project that i am sharing is a piano notebook that you can use
as a journal or whatever else you might need to jot down to keep.


I love this months ribbons because they pretty much go with everything.
I used them to tie on the side for bookmarks.. super easy...


And i had enough paper to make a quick card too.  I use the sheer black
ribbon to make up a bow and added a pretty rhinestone in the center.
The paper comes with the border on it and i trimmed the bottom to give
it a little more pizazz.  For the sentiment i stamped it in black and
cut it out with a Spellbinders oval.  It was super easy and quick!

Thanks so much for stopping over and it's time to hop on over to
Jenn's Blog and see what she has to share this month....

Happy Crafting everyone :)


Monday, June 29, 2015

Crafty Secrets Weekly to do list

Hi Everyone and happy Monday to all of you.  It's that time again to post up
another fun project that i made from Craft Secrets Digital Designs.


  Today i used a cute polka dotted clipboard that i found at Home Goods for $5 
and i added some super cute backround papers and printed these adorable cards to 
add photos or found items that i couldn't live with out.  I have alot of ideas for it
 but couldn't decide.  But i really love the papers for it.  The ribbons are from RRR online.

You can check out all the CD's available here and there is so many fun 
things on each of them to print...even digi stamps.  Thanks for dropping by and
hope to see you again soon.... Hugs and Smiles--Teresa


Monday, June 22, 2015

Crafty Secrets Baby Plaque

Hi Crafty peeps it's another gorgeous Monday here in California and it's time 
to share another fun project this week using the Crafty Secrets Digital CD's.


If you didn't know already Crafty Secrets also carries chipboard products
to buy too and lots of things that are already to cut and out and create with.
Today i used one of the chipboard shapes along with papers from the
Typography CD #3.  The sentiment is from the Words from the Heart- 
Celebrations of Joy Quotes and Expressions book.  All i had to do was
fussy cut it out and add some matching ink to the center and sides of it.

The flowers are a mixture of things that i had in my box of goodies
and luckily i found enough that looked good to really make it fun.  And then
i punched 2 holes in the sides and added a pretty piece of seam binding
ribbon to hang it up with.  I hope you like it and be sure and check out
all the other amazing and fun products on the website here......

Wednesday, May 27, 2015

Alice in Wonderland

Today i have a super cut but overdue post that i did for Crafty Secrets. 
 I love Alice and all of her crazy antics in the movie and have a huge
 collection of things so when i saw this gorgeous paper set i new i had 
to make something to put my goodies in.


For my projects i used the Creative Scraps called Wonderland Tea and it
has lots of fun bits of Alice in Wonderland all over it to use.  I also printed
out my own papers to cover it from the Creating with Vintage Patterns and
they all matched just perfectly with the images.


Here is a closeup of the tags that i used... they are so cute!
And i used lots of fun flowers from my stash to decorate the top.


And of course what tea party is complete without a quick fun
invite to have them all come over and enjoy the goodies you make!

That's all for today and thank you so much for taking the time
to stop over... have a wonderful crafty day :)

Friday, May 15, 2015

RRR Patriotic Challenge for today..

This month on RRR we have lots of fun projects up using our gorgeous new
ribbons with a patriotic theme and it's been really fun creating so far.  Today
i used those colors but did my project with a slight twist and created my new
summer journal using lots of bits of ribbon and lace and some Ruby Rock-it papers.


So for this project i found this neat journal covered in burlap and I used a
few pieces of Ruby Rock-it papers to start the top.  Then i tied on a huge piece of
cream mesh ribbon.  And then i glued on this neat wooden sentiment over it.
The letters and numbers i found in my stash of letters so that part was easy.


and for the side... i love lots of ribbons and charms so i picked some
of my favorites and tied them on with these neat little pins and attached
it to the top side of the book.  Now i have lots of markers to mark special
things on the inside that i really loved to do this summer.  

That's it for today but be sure and check back again as always and don't
forget to make something fun to link up with us on the Challenge blog.

Hope you have a really fun and crafty day!!
Teresa

Wednesday, May 13, 2015

It's a Patriotic Blog Hop for RRR this month...

It's that time of the month again for our RRR Blog hop and it's going to be fun!
The colors and ribbons for this month are so fun, bright and easy to use.
But i have lots to share today so we better get started ...

But first...If you started at the beginning of the hop then you should have
arrived from Karens Blog and wow what a cute project she made....


My first project is decorating this lantern that i picked up.  We love to stay out
late in the summer and barbecue and have candles lit for extra light.  So to start
i wanted to do a little something fun for the candle too so i found
this tall white candle taper to fit inside and wrapped thin natural twine around it
and added a few stars with die cut papers to make it more patriotic looking.


 Here is  a better close-up of the candle and i also made a quick banner with all
the ribbons and a simple cut out banner that i bought and made a mat of blue
to match the ribbons for the back of it.  I love all the bright prints and colors of this!


And for the top ribbons on the lantern i tied a big huge bow with the
wire edge natural ribbon and then layered on both the
red diamond satin ribbon and the bright blue check
ribbon to make it kind of country backyard barbecue styled.


And what barbecue is complete without lots of friends over to enjoy all the good
things that you make, so i created this invite to send out to our friends.  It's made with
the new 6x6 Doodlebug patriotic picnic pad and stickers.  The colors of this were a
perfect match with all the ribbons and it had the cutest things to use for it.


And yep... sometimes i just get carried away with inspiration and just have fun
so i also made this cute little patriotic bird and covered another candle for a
decoration on another table that i have.  For the candle i used paper to cover
the outside first and then added another layer of red jute ribbon over it.  Then I
tied some ivory jute string several times and tied it in a pretty bow.  The stars are
from the sticker sheet but you could also punch them out if you want to do lots
more to decorate other things at your party.


For this card i just layered all the pretty papers and matted them with white
to created a definition between all the layers.  Under the eagle sticker i used
a Spellbinders star die in both red and white to put him on.   I used red jute string
 on the bow and finished it with a cute vintage button from my stash.  I really love
 this one alot.  And it was super easy to do too.

And here is a share and the link to the new ribbon club assortment...


And now it's time to hop on over to Jenn's blog to see what is new and
inspiring from her.  Be sure and leave a comment for a chance to win
some of these beautiful ribbons for you.  I am going to share part of
my stash so that you can have some fun :)

Big Hugs and Smiles...Teresa

LinkWithin

Related Posts Plugin for WordPress, Blogger...