Friday, April 22, 2016

Art Savoy Die Set


To end the week i am sharing one of my most favorite sets that i did with one of my favorite new dies.  This one fit a box that i already had in my stash perfectly so i went ahead and made a card to got with it too. I used just pinks again and ribbon to match so it went together really easy.


The die set for this one is called Art Deco Savoy Decorative Elements and was designed by the 
amazing Stacey Caron herself.  This one has the most beautiful and intricate embossing and debossing in it and i really tried to layer the papers on it to make it stand out.  The dies in her new
sets are so gorgeous and each one has such amazing detail in them of the Art Deco period.


For the box i did a quick wrap around the base and covered the top and sides with layers 
of the dies and some small bits of ribbon that i had in my stash.  This one i can't wait to 
give out for something special.  

Be sure and check out Stacey Carons's other new dies that came out on the website and be sure
and check back again for more from her new collection from me :)  Have a very
wonderful and crafty day and thanks so much for stopping by to see what is new with me.

Teresa


Tuesday, April 19, 2016

Wedding Invitation to share today...


Today i have another quick post to share with you using another of the Becca Feeken
dies from Spellbinders that i love.  This one is a beautiful pocket die and i did a 
very special and old fashioned wedding invite with it.  


The die is called "Cascading Grace Pocket Etched Die set" and you can get it over
on the Spellbinders website super easy.  I wanted to really make the intricate designs
pop on this so i kept it really simple to make and used only pink and white cardstock.  

For the invite i created a fold over card with the top piece of the die in white and that way
i can put information about the wedding inside of the card.  And inside i just did an embossed
pocket without cutting it and used that to layer in the reception cards and directions.

I hope you like it and be sure and check out Becca's other dies here.  You will love them!!

Monday, April 11, 2016

Spellbinders Favorites to share

Recently we were given the go ahead from Spellbinders to share a few of the things that we did for them.  And after 4 years of amazing craftiness i have lots of favorites to put up to share.  Every Tuesday i will share a few things and the dies i used to create them.  Stacey was such an incredible person to be able to work for and i was lucky enough to be picked by them so i think this will be fun.


Some of my most favorite dies in the world are designed by Becca Feeken.  She has an incredible way of designing and creating beautiful things with her dies so it's a little stressful when i set out to make something with them but i think i did ok with this set.  This one is on the website right now I think and since we were always challenged to think outside the box i went for a vellum lantern for this one.

I love the intricate embossing and to make the debossing on the pattern stand out i added a bit of ink to that part of the die while it was still in it.  The corners for this one are the leftover pieces from the inside center of the die.  I cut them in half and then again.  Then i scored them and folded them to reinforce the edges and to glue on the side pieces.  The bottom is another die that i chose because the edges just went perfectly with all of it.  And it looks so pretty with an electric candle inside.


For my frame i used the same die and inking on it but added the center piece with a beautiful sentiment.  I can't say enough about her dies and how gorgeous they can make something look.  Simple paper becomes something amazing just by cutting it with one of her dies.


And lastly this one is a bridal shower card.  I layered the dies in subtle colors of aqua and added some pretty ribbon to match and also a few clear rhinestones.  I really, really love the way this one came out.  And it was fun to make so that makes it even better.

To see more of Becca's dies you can visit here on the SB website.

Thanks for stopping over and be sure and check back again next Tuesday!!

Tuesday, April 5, 2016

Time for the Craft Hoarders April Hop...

It's time again for the Craft Hoarders Hop and i have a fun project to share that i did for one
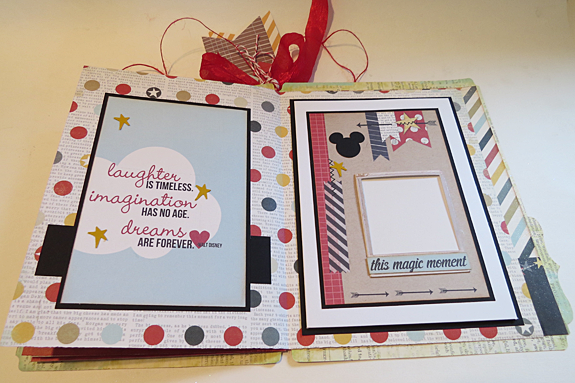
of my bosses at work.  I used to teach these fun little mini books at the store and i found a
bunch of things that i had from one of them so i added a few more stickers and came
up with the Disney Flip book for lots of pictures of the people who work for him.


Here is the front page of the folder.  I used Simple Stories papers and layered them with
a few stickers that i had in my stash.  The folder is also from my stash and the yellowish
color worked perfect for the base of it. It is smaller too than the regular file folders so it
went together pretty quick.


And here is a closeup of the front... If you work for Disney you totally get the part
about the Magic.  It's the most amazing place to work and you meet so many incredible
families from all around the world... i am pretty lucky to be able to work there.


Inside is lots of other mini folders to put photos and fun stories in.  My manager
has been there for over 15 years now and I am sure this will barely cover any of it.  
Guess i will have to make him part 2 when i get a chance :)


And here is another part of one of the folders.  I love to chop up the papers and
mix them and layer them.  You never know what you can create.


And lastly i used a trifold card for some of the insides to give me more space
for the pictures.  And then i added a few of the cards that come in the sets and also
added some punched Mickey's in black from an old punch in my stash.

I hope that you enjoyed my share today and be sure and hop on over to Barbara's 
blog to see what she has to share with you today!! And if you just started here
is the links for all of us today so you can start at the beginning!

Have a very wonderful and creative day!!

Saturday, March 19, 2016

Working at the Castle...

I have been MIA these days so i thought i would do a quick post on where i have been this past month.  I have had the opportunity to do a few quick trips to both Disney World and to Minnesota and my mom has been in the hospital so i haven't had much time to blog lately, but i am slowly catching up with things and getting lots done so i should have more to post soon.


I did have time to make a neat page for a co worker at Disneyland.  She is such an amazing
person and when they had their anniversary she posted this picture and i new i needed to make something special for them.  So since they are both from Hawaii i used some papers that i had in my stash from Kaisercraft and asked her to give me one word that describes the photo in Hawaiian.  Their word was Hiki Ole Ke Na Ha and it means unbroken.  And if you knew the two of them you would know that there isn't a better word that describes the love they have for each other.


The colors of the papers couldn't have been more perfect and when i gave it to them they were so happy.  And crazy enough it went perfect with some of the things they already had up on their wall.
I love doing special things for my family and friends and i think that is what makes what we do so fun and wonderful.


And this page i did for C'est Magnifique kits last month but i wanted to share it too.  These two beauties work with me too and they took this super cute picture with Thor.  It's really fun doing
what we do at the castle and I love working with the amazing people that i do!


So this is Rachel and a sneak peak of our boutique.  Yep we make magic
everyday for all of you that visit... it's the best part of our days.


And this is some of the other girls i work with... they are amazing :)

And that is it for today but i will post some of my other pictures in a couple of 
days so be sure and check back...


Saturday, March 5, 2016

It's the March Craft Hoarders hop today...


It is time again for the Craft Hoarders hop and every month on the 5th we share
projects using all the things we have in our stash.  Yep that's right I am a collector
too and thank goodness because I always have something fun to create with.  
This month we are starting our spring projects so i have a sweet baby wallhanging
that i did to share with all of you.


If you started from the beginning you should have arrived here from
Wendi Robinson's blog...... and i hope you have gotten some fabulous ideas so far.


I am a huge Graphic 45 fan and hoarder and this was one of my favorite baby lines
from them.  To make it i used a chipboard shape that i got at my local craft store
and covered it with the butterfly print on the top and then the polka dot at
the bottom.  Then i cut a border of the babies and I punched another lace border with
the polka dot paper to put across the center of it to cover the space. 
 I love to use bit and pieces of the papers and I tend to cut them up alot into smaller
 pieces to use.  Then i even have some left for cards later on.


For the baby at the top i fussy cut the photo and glued it on.  Then i used my cricut
to cut the Shhh and the baby letters with the shadows.  This way i could use the paper
to match it.  The flower is just circles and i trimmed out the pieces to the center to look
like petals.  It's a super easy way to make them and the chipboard button was perfect to
put on the inside of it.  And then finally i added ribbons to the top to hang on the door and
the tiny bubble letters are from Authentique in ivory.  I have lots of these in my stash but
if you ever needed some you can do them on the computer and then just cut them out.

And that's it for my share for today... Be sure and hop on over to Barbara's blog
and the rest of the girls so you can see what amazing things they have to share today!!

Happy Saturday and have fun crafting!!

LinkWithin

Related Posts Plugin for WordPress, Blogger...