Thursday, April 30, 2020

Happy Mother's Day Card


Happy Thursday ... it's a going to be a nice weekend here in California and finally a little bit cooler so we are looking forward to a nice barbecue this weekend and face timing the family that lives out of state!  What a crazy world we live in these days but thankfully it's going to get better for summer :)

Today i have a very special card that i made for my daughter to send her for Mother's Day this year.  It's her first time as a mom and she is doing such an amazing job at it and i wanted to make something really special for her.  I die cut everything on this card all the way down to the handmade flowers so it's a labor of love for sure.  I used the new " Heart Melange Doily set" from the new "Dimensional Doilies" collection by Becca Feeken for my center doily on my card.   These dies are just amazing for what you can do with them and their versatility and adding them to other dies makes them all the more special.


I wanted to use one of my favorite dies from the christmas collection too so under the doily you can barely see the tiny snowflake hidden under it but it works great!  I chose a very pale palette of lavender and ivory and each layer compliments the next. The details are just amazing with all those die cuts don't you think?  It's what i love about Becca's dies and how incredible that each of them is.  The flower die is from the New Rose Cinch and Go set and then a added leaves and some smaller flowers that i made.  


Here is a better view of the die set and how pretty these little hearts are....

Heart Melange Doily Etched Dies from Dimensional Doilies by Becca Feeken


This picture shows the pretty rhinestones and all the other pretties that i added to make the flower cluster in the center.  The vellum piece slides out from under the doily with the message under it so she will be surprised when she reads it.  I so love making special things for family.

I hope you like my share for today and sadly it will be my last for a little bit.  I am taking a break from design team crafting for awhile to get working on my Ancestry family albums ( I have 8 of them to do) and my new granddaughters books so i will share some of those pages later on with all of you using Becca's dies.  
I was so very blessed to be on the team for so very, very long and work with the Spellbinders Company with so very, very many talented ladies and who knows maybe i will get to go back in the future if i get the opportunity again.  But for now i am just taking a break and catching up with life.....

So enjoy your weekend and have fun making some beautiful things...  thank you to all of you who took the time to leave me such sweet comments about my work while being on this team.  To you all i will be eternally grateful and thank you for making what i do feel so very special.

Hugs and Smiles to all of you around the world,

Teresa


Spellbinders:

Heart Melange Doily Etched Dies from Dimensional Doilies by Becca Feeken

Paper:  Prima Marketing 
Adhesives: Scrapbook Adhesives by 3L


Monday, April 27, 2020

Doily Money Card Holder


Happy Tuesday on this amazing sunny and beautiful day of quarantine.... never thought i would be saying that but I honestly have a million things to do so i am good to stay home and my family is good with all the cooking that i am doing.  They are all happy!

Today i have a new card to share that started with this really pretty red printed paper and one of the newest dies released by Becca Feeken called "Filigree Drop in Circlet Doily".  This is such a pretty die to start as a base for any of Becca's dies actually.  It's the perfect one to layer with her middles of the others too.  But for me i cut the back in a red cardstock that matched and then cut each of the panels to layer over the top of it separately.  For my center i used one of the older dies and cut that out and then adhered it at an angle and then cut that adorable little bow in black to finish the center.

Here you can see the pieces of the die set.  The designs are so unique and gorgeous.


I always love to pop up the layers so that it's more dimensional.  You can't really add a saying to this so i stamped it inside and created a pocket for it to add a gift card too.  
And--- i love lots of  rhinestones so i really fancied this one up and added a big one in the center of the bow for something different.   This would be gorgeous in all white for a wedding card :)  

Thanks so much for stopping by.... I have one more post for the month this Thursday with these dies and i hope that you have a chance to stop over for a peek.  It's really pretty!

Have a wonderfully blessed day and hope you make something pretty!

Hugs..... Teresa


Supplies:

Spellbinders:

Die D-Lites Petite Double Bow with Dimensional Circles Etched Dies from Dimensional Doilies by Becca Feeken

Rhinestones:  Want2Scrap
Adhesives:  Scrapbook Adhesives by 3L Permanent Tape Runner and 3D foam dots

Thursday, April 23, 2020

Just Saying Hello Card


Good Morning.... and happy Thursday.  It's seems like forever since we started staying home around the world but thank goodness we as crafters have lots to keep us busy in the weeks ahead :)   

Today i have a share for you with Becca's new "Dimensional Doily" dies that is just a simple doily that i made using 3 pieces glued together twice and layering it to create a pinwheel.  Lots of time all a card needs is something pretty like a flower or doily to set off the beautiful papers that you use and that's exactly what i did.  It was super quick and easy to do.

This  doily is a really fun doily die set and depending on how you create with it you can use lots of the pieces or just a few like I did with my mini card last week.  I love all the pretty swirls in this die and it always comes out gorgeous in whatever you make with it.  


I also made a matching box for my card because i am going to send a little something inside to my friend with the card.   That cute little stamp that says "Just Saying Hello" is also from Becca's new set and that little pop of orange ink really shows it off.  The flower  in the center of the bow i actually made with Becca's rose die cut set.  It's nice when you have the time to make up your own flowers in all the special colors that you need to create with.  

Thank you for taking the time to stop over today and i hope that you all
stay safe and have fun creating and enjoy the time with your families :)

Teresa

Supplies:
Spellbinders:

All Occasion Sentiments Stamp and Die Set Flourished Fretwork by Becca Feeken

Paper: Graphic 45 and My Minds Eye
Adhesive:  Scrapbook Adhesives by 3L


Thursday, April 16, 2020

Just for you Treat Box and Card


Good Morning and Happy Thursday to all of you.  I hope that your week has been a good and healthy one and hope that you have had a little time to get in some crafting.   If you didn't stop by our hop on Monday we had a APG Team hop to share the brand new line from Becca called Dimensional Doiles.
Each of us created some amazing things so be sure and stop if you have a chance.

Today i have another new project that i created using another new die set called "Pointed Harmony".    You can use these dies to make doilies of all kinds and like in my little card you can do other things too.  I used the inset piece to cut out the shape as a shadow in the center of the card and then i cut 2 more pieces and trimmed the sides so that i could lay those cute little pieces over the center one.  Then i added that adorable new mini bow from the new set called Petite Double Bow and wah la!!  So cute!


Here you can see how beautiful the dies look when you top a box and add that cute little bow on top of it.  I used 2 layers of the bow to create this little cutie and it was easy to make a 3x3 inch box.  I thought these would be really cute for a Wedding or Mother's Day gift that is coming up soon to put a special something inside.  And if you notice I have added in one of Becca's border dies for the top of the box lid.  This was simple because i just added it over the top edge so that it would blend.  


Here is the die set and how it looks when  you get it.  The solid piece you can use for layering. Or you can use that for your doily.


And here is a closeup of the little card that i made.  It only measures about 2 1/2 inches by 2 1/2 inches and these are some of my favorite cards to make.  They are perfect to add with those boxes and other little gifty things that you make for your family and friends.  And you can use the centers of most of Becca's dies to create them.  

I hope you get the chance to check out all of Becca's new dies HERE<<<<

Thank you for stopping over and be sure and stop by next week for more fun ideas ...

Hugs and Smiles,
Teresa

Supplies:

Spellbinders:

Pointed Harmony Doily Etched Dies from Dimensional Doilies by Becca Feeken


Paper:  Bazzill Basic Cardstock in pink and white

Monday, April 13, 2020

Introducing Dimensional Doilies Blog Hop/ Amazing Paper Grace


Things are not always what they appear!  When you look at this die set, you may be hard-pressed to see what it becomes but that's why we're here - bring on the inspiration!  We're so tickled to be introducing a new and unique take on doilies.  Please welcome the Dimensional Doilies Collection.  Hop through with all of our Amazing Paper Grace Creative Team to get a small taste of inspiration as well as see how each of us has used these new motifs!

Inspiration for Dimensional Doilies

Some of the first dies ever to hit the market were doilies.  They gave you a symmetrical base to put your card elements on and they simply frame a creation and draw your eye inward.  By now you probably have many flavors of doilies in your stash.  These doilies are different.   

With one pass of the die, three identical motifs are created.  These motifs have perforations and slits on each edge.  When the perforations are folded and the slits are intersected, it creates a round doily of 6 to nine pieces that has a secondary filigree layer.  The texture, dimension and pure femininity they add to a card front is gorgeous.

My Project For Today:

I'm so excited to introduce S4-1055 Starburst Petal Doily 


I really do love this particular die because I have found there is so much that you can do with it depending on how many pieces that you use.  I made a card with a very fancy flower in the center, decorated a sweet jar with them at the top and also made a butterfly with them.  How fun is that?  And i am sure that you will think of so many more things to create with it ....

For my card above i used each of the die pieces to connect on the upper flower but underneath i wanted to continue the lacy look of the flower so i also cut it in pink paper and trimmed off the sides so that i could lay them out slightly larger and create a second layer of flower.

And then i needed something to finish the center so i cut and embossed the gold paper i used with one of Becca's flower dies and finished that with a pretty rhinestone.   I hope you like it as much as i do.....

Here are the dies in the set.  You can cut three at one time and there is also one that removes so that you can have a solid version to layer under the doily top.


Here is the closeup of my card so that you can see all the gorgeous details in it.


And this is my Butterfly that i created.  I used 4 of the doily pieces and then added that cute APG tag in the center for the body.  The box i made as a slider so that i can open it and fill with some treats or a gift card or maybe even both.  My mom loved Butterflies so this one is in memory of her.  


And then i got to thinking how fun to add these to the top of a pretty glass jar to decorate it.  Mother's Day is coming and you could make up some of your moms favorite treats and put them inside this pretty jar with the card to surprise her.  It kind of looks like fairy wings I think.  So cute!


And this is the top.  Be sure and always pull out your other APG dies to add in to the mix when you create with all the new ones that come out.  They are designed to compliment one another so you can get so much life out of them when you do it.  This circle die is from the Candlewick Collection and i think it works really nice together.

I am so happy that you stopped by and be sure and hop to all the other gals to see what they are sharing with you today.

Availability:
These plates are available right now on the Spellbinders website —–;HERE

Prizes:
Be sure you leave a comment on this post and every Creative Team Member's post for a chance to win an Amazing Paper Grace Die from any previous Die of the Month.

There are two dies that are being given away.  One name will be randomly picked from comments left on the combination of our 6 blogs on the  Introducing Dimensional Doilies post between April 13 and March 17, 2020, at midnight US Central Time.  

We encourage all of our international friends to participate!  The randomly selected names will be announced on the Amazing Paper Grace Blog on April 18th.  (All giveaways for this hop are managed by and the responsibility of Amazing Paper Grace).

Up for grabs is an Amazing Paper Grace die of your choice Becca’s Die of the Month.  These dies are typically only available to club members however you can win your choice of any die that has not already sold out.

There will be a total of two dies and a winner can win once among all the blogs.  If your name is selected, simply claim it within 2 weeks of the announcement by sending your address through the form under the Contact Tab on the Amazing Paper Grace Blog.  There won’t be a reply back but if you leave your choice, we’ll get it, I promise.  The dies are sent out in batches and will be mailed out from Amazing Paper Grace - in view of our world events - we are behind on recent prize winnings but bear with us and we will get caught up.

Creative Team:

Visit Joanna   – joannakrog.blogspot.com
Visit Teresa   –  victorianpaperqueen.blogspot.com
Visit Ewelina -  elinaart.blogspot.com
Visit Kate       – craft2owls.blogspot.com
Visit America - cardsbyamerica.blogspot.com
Visit Becca     – amazingpapergrace.com/blog

Thanks so much for stopping by as we introduce Dimensional Doilies.  Which one is your favorite?  Let us know in the comments.  In the meantime, the entire team hopes we find you well.  Please stay strong, stay safe and stay busy during the pandemic.  Let us know what you are doing to stay engaged.

Sunday, April 12, 2020

It's your Birthday Card


I have another quick share with all of you today for a special birthday card that i created with a fun die by Becca Feeken that includes stamps with it.  It is called the "All Occasion Sentiment Stamp and is part of the newest Flourished Fretwork set.  This beautiful sentiment set can be used by itself like i did with my card or added over other cards to create a vintage masterpiece for someone you love.  I used Mintay papers for my card because they had a beautiful scene on them already and it made this a super easy card to make.

As you can see the Calligraphy on the sentiments is beautiful and the size is perfect for cards.


Here is a closeup of the die set.  I cut 2 pieces of it and glued them together to make the die really stand out.  And then to make the paper pop i cut a tiny mat of black around the outside edge of the paper for the back round and a matching piece for the sentiment.  I think i might make up a bunch of these and add different sentiments to put away in my special box. 


Thank you so much and be sure and come back for our Hop this week to see a brand new set of dies that Becca designed .  You will love these .... they are over the top unique!!

Hugs and Smiles... Teresa

Supplies:

Spellbinders Dies:

All Occasion Sentiments Stamp and Die Set Flourished Fretwork by Becca Feeken

Papers:  Mintay
Ribbon: white double sided satin 1/4"
Pink Roses:  Prima

Friday, April 10, 2020

It's your wedding card


It's the end of the week already and if you are like me the days all seem to blend together these days.  But not to worry we have lots of things that we can make to fill the time until all is well again.  

Today i made up a Wedding Card to put in that box of cards to be ready for Birthdays and other events in the coming year.  I decided to make it a little bit fancier and i used black, grey and some silver papers that i had in my 6x6 paper stash.  I have always loved these tiny pads because you get so many pieces in them and the prints are so much smaller for cards.   The silver paper is more of a matte finish and i think that it really shows off the dies wonderfully.  

I used the Richelieu Square Etched Die for my card and i love this die because of all the pretty swirls and that gorgeous medallion center that looks like a flower.  I might have to do another one so that the center looks like a sunflower... wouldn't that be beautiful?


Here you can see the pieces that you get in this set.  I love that it also has the shadow dies included so that you can layer them and pop them up if you wanted to.


Most of my cards that i am sharing for this month are using just one die so you don't have to order a bunch to make them.  The stamps are from the same set i used last week so if you had the chance to order it then you are in luck.   So many fun cards to make still.....

Have a wonderful Sunday and enjoy life where you are in the world and take care!

Teresa

Supplies:

Spellbinders Dies:

All Occasion Sentiments Stamp and Die Set Flourished Fretwork by Becca Feeken

Shapeabilities Richelieu Square Etched Dies Flourished Fretwork by Becca Feeken


Monday, April 6, 2020

April Die of the Month Blog Hop


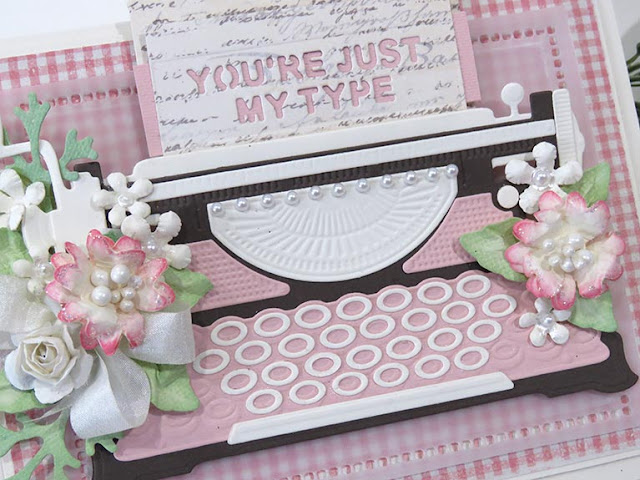
The typewriter is a vintage icon of our civilization and our march towards print freedom and in recent years, a collectors item.  Far from being a relic of the past Becca wanted to recreate a desktop version with a place to say what you want to say.  Isn't it just adorable?  Introducing our newest die of the month for April the Pop up 3D Vignette Typewriter. 

It goes together just like all other 3D Vignettes, yet it is open at the top.  It still folds down flat so that you can mail it!  It comes with die-cut word inlays yet you can stamp your message on the front page or all the pages.  

Here are the dies included in the set:


Each of the pieces cut like butter and it's super simple to put together and there are easy directions if you need them so no worries on this cutie :)


My Project Today:

There have been so many amazing 3D versions of this die set out already so i am sharing  an easy flat version of the card in a cute gingham check paper that i found and made lots of handmade APG flowers to decorate it.


The color palette I chose is chocolate, pink and white and I don't honestly think that there isn't a bad color way that you can do with this die set.  The instructions are super easy and once you get the hang of it then you can make them to send out to all of your friends to have.  Who wouldn't want this adorable little card up on a shelf to make you smile.  And if you look behind the typewriter on my card you can see a small piece of vellum that i added with one of our favorite die sets.  Don't forget to add some of your other favorites to create a back ground on your cards.  Love, Love, Love this die :)


And here you can see the flat version on how i set all of this out.  One of my favorite parts of this is all the texture that each of the little pieces have.  It really makes this one- amazing- set!

Teresa

Supply List:
Paper: Graphic 45 Baby paper
Accessories: Ribbons, Cinch and Go Flowers, Adhesive Pearls, Scotch Quick Dry Glue


If you want to find out more about the Club - prices, how you sign up and what's included, please look --------; HERE.
If you missed the introduction and want to know more about what inspired the Die of the Month Club, look -------;HERE.

More inspiration is just a click away. 
Stop by each Creative Team Member's Blog to see how they manipulated this die to come up with a unique project for you to try!  

Visit Teresa   –  victorianpaperqueen.blogspot.com
Visit Ewelina -  elinaart.blogspot.com
Visit Kate       – craft2owls.blogspot.com
Visit America - cardsbyamerica.blogspot.com
Visit Becca     – amazingpapergrace.com/blog

We can’t wait to see what you make with these exclusive dies – be sure to post your creation on the Amazing Paper Grace Die of the Month page -------; HERE or on Instagram using the hashtag #AmazingPaperGraceClubKit

Thursday, April 2, 2020

Thanking you Card


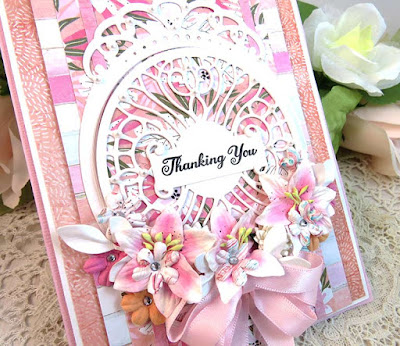
Hi Everyone and thanks so much for stopping by today.  I have another new card to share with all of you and this was fun in that i used Hawaiian papers to make it with Becca's new dies.  You only need one die to make this card and i know that all of you that want to make quick cards so this one will be super simple and you can use lots of other papers to sub in for the design.

When i do cards-- i always start with my backround papers and lay out the colors that i am using and separate them so that i can see how i will cut out my dies to put over it.  I used a new paper with bright pink and corals and used white as an accent so that i could cut my dies in white for the front.  


To make the center of the die pop out more i actually cut the center part of the die twice in white card stock and glued it together to give it a thicker look and then popped it up with tiny pieces of 3D foam tape.  The little flowers I found in my stash that went together perfectly mixed in with some tinier ones that i had that also matched.  This was so fun and so very easy to make.  And that cute little stamp is from Becca's new stamps that you will love because there are so many sentiments that you can use. 


So--- since we all have lots of time on our hands these days,  it's a great time to get started making up some cards to send out for the rest of the year and be ready for all those birthdays and holidays you have!


Hugs and Smiles and be safe everyone,
Teresa

Supplies:

Spellbinders Dies:

Shapeabilities Oval Coronet Etched Dies Flourished Fretwork by Becca Feeken

All Occasion Sentiments Stamp and Die Set Flourished Fretwork by Becca Feeken


Papers: Mintay
Adhesives: Scrapbook Adhesives by 3L 

Tuesday, March 31, 2020

A very special Congratulations!


Good Morning and thank you so much for stopping over today for a little bit of die cut inspiration.  Today i am using another two of Becca Feeken's newest dies from her Flourished Fretwork Collection.  To try a little something different i used some new papers from Mintay that i bought and tried to mix in a little bit of fussy cutting.  As always it was really fun to do and i think that the beautiful details in these two dies really do the card justice. 

The die that i used for the back frame is called Sentimental Finery and is a good base to layer under the other die i used called Oval Coronet.  The swirls in these dies really compliment each other and  the beautiful florals in the papers really give it that vintage look that i am always looking for.


The papers come with a sheet of little bits and flowers so you can see i tucked in a few of all of them.  Something different for me and very fun.  I am a huge fan of Mintay papers and Karola :)

I hope you are doing well and staying safe and crafting wherever you are in the world. 

Be sure and check back for more inspiration Thursday!! 

Enjoy you day,  Teresa


Supplies:

Shapeabilities Oval Coronet Etched Dies Flourished Fretwork by Becca Feeken

Papers:  Mintay by Karola ( order at FrankGarciaStudio.com)
Adhesives:  Scrapbook Adhesives by 3L 
Silk Ribbon

Thursday, March 26, 2020

For you with Roses Card


Today i am sharing one of my most favorite cards that i have made and it's simply because of this gorgeous new die that "Becca Feeken" designed and also because of the papers that i used.  If you look really close there are some gorgeous roses in this new die set and all the details really set off the whole project!

The die set is called "Rosa Diamante" and comes with 5 pieces in the set.  I always try and give you all some inspiration to use things other ways so i cut the die with the inner and outer pieces for the top and then overlapped them with 3D foam squares to pop them up like you see above.

There are so many ways that you are going to be able to use this set.  Wedding,Graduation and Mother's day cards will be so beautiful with this die.


And here is a close up.  The back piece is just the outside die with a solid center so that the top piece that is cut with the decorative center will stand out more when you layer it.  There is a tiny diamond for the center too and for that i used one of Becca's new stamps that say for you and stamped it in brown ink and popped it up with 3D foam dots so that it would be more dimensional.  When i put it all together i criss crossed my ivory ribbon that i had to match and made a pretty bow and added a pink rose with a little bit of glitter to finish it all off. 

It actually went together really easy using just layered squares so you will have to try this one too!

Enjoy your day wherever you may be and i hope that you stay safe and healthy!

Hugs and Smiles.... Teresa

Supplies:

Spellbinders Dies:

Shapeabilities Rosa Diamante Etched Dies Flourished Fretwork by Becca Feeken


Adhesive:  Scrapbook Adhesive by 3L Permanent Tape Runner and 3D Foam squares

Thursday, March 19, 2020

Rainbows and a little pot of Gold


Good morning to all of you and i hope that this week has been a good one so far.  I have lots of time these days to craft so i am sharing a card today that i made with a little Irish inspiration.

My die is from the new set of Becca's Flourished Fretwork sets.  This one is called
"Sentimental Finery".  I found an old piece of paper that looked like a rainbow with little specks of gold in it and thought it would be perfect to add the die cut pieces over it in gold metallic paper with layers of gold and green.  As you can see the back panel of the die i cut into the rainbow paper and layered it over another gold piece.  My great grandmother would so have loved this card i am sure.


This is just a simple one die card and would be really easy to make up in an afternoon or in a set even with different sentiments on them.  The flowers i bought for time reasons but you can easily make them to match with some of Becca's other cinch and go flower dies.  We will have flower tutorials on our APG Blog soon so you might want to check those out.

Thank you for stopping today and be well and have fun crafting this week.  I have another share next week for Monday so be sure and stop back if you get the chance.

Hugs and Irish Smiles to all of you,
Teresa

Supplies:

Spellbinders

Shapeabilities Sentimental Finery Etched Dies Flourished Fretwork by Becca Feeken

Paper: Gold Metallic paper from Hobby Lobby
Adhesives: Scrapbook Adhesives by 3L Permanent Tape Runner and 3D foam dots
Flowers:  Prima

LinkWithin

Related Posts Plugin for WordPress, Blogger...