Saturday, December 19, 2015

New Beginnings for 2016

It's been a fun and interesting year this year with lots of challenges and really good
times with my new job at Disneyland and but it's time to start a new year.  I have
good news to share in that i have been asked to join a new page team called
C'est Magnifique!!  I will be doing lots of pages again and the products for the
kits are amazing so it should be fun and exciting to start this new adventure.

This month our basic kit looks like this:


The papers and extra goodies have been fun to create with and
we will have lots to share with you on the first of January so be ready!!


Here is a sneak of all the papers that we get to use... awesome aren't they! The
papers this month are from Blue Fern Studios....


And this is the mixed media ... I love all those fun textured goodies in this one.
And I can't wait to use it to make some fun pages and cards with all the 
papers and other things i got in the basic kit....

Be sure and check out the C'est Magnifique website to order your
kits and then get ready to create some fun things this new year with us.

Store: http://www.cestmagnifiquekits.com/cart/

Blog: http://cestmagnifiquekits.blogspot.com/

Happy Holidays everyone and have a wonderful weekend... Teresa

Thursday, December 10, 2015

Spellbinders CHA Sneak Peek Blog Hop


Welcome to the 5th day of our Spellbinders CHA Roundup.  I have been on the team for 4 years now and am always so thrilled and excited to have an opportunity to share a few of the newest dies that will be coming to you at the CHA show in January 2016.  And you have a chance to win too.

We have been hopping for 4 days now and all the designers have created some amazing projects to share with all of you.  Today the amazing "Seth Apter" is sharing his new line he designed for Spellbinders and i created something from my favorite designer -Stacey Caron.


The new die that i am sharing is called the "Deco Luxe Card Front" and is from Stacey's new line of Art Deco dies. I am a huge fan of the 20's era, I love the Great Gatsby movie and all the glitz and glamour of that time period so I designed a gorgeous card with classy black and white and silver papers.  Each beautiful detail in this die is so amazing and now i can share how i made it.


To make this card you will need black, white cardstock and silver metallic papers.  You will also need a stamp for the center, black ink and clear embossing powder.  You will also need the S4-416 Labels Thirty Four die and the Spellbinders Platinum Die cutting and embossing machine.

1. Start by cutting/embossing the labels die with the silver metallic cardstock.  Cut/emboss the white Labels Thirty Four die and then stamp both the sentiment and then the little flourish on the top and bottom. Add clear embossing powder and heat set with a heat tool.


2. Cut/emboss the Deco Luxe Card front with black card stock.  Also cut the silver paper with only the outside edge of the die.  Cut a piece of white card stock that measures 6 1/8 x 6 1/8 and your card base in black card stock to measure 6 1/4 x 6 1/4 inches.  Cut a small piece of silver metallic card stock to fit on the inside back to measure 1 1/4" x 6 1/4" and glue across the bottom to extend the card to be square.  (Since the paper is only 12 x 12 inches you will need to add a piece)


3. Layer and glue the pieces together as shown and add rhinestones on the outside edge of the card front.  Add 3D foam squares to the back of the sentiment and adhere to the silver label.  Attach to the card with adhesive.


5. Attach a small bow that you created at the bottom of the sentiment and you are all done.  It's super easy, super elegant and would be great for a party or wedding invite too.


Here is another card that i did with the Brand New "Make a Wish" die set.  I had lots of fun with this card and created a base for my card with inks and then cut out the flower design to show the black shadow. Over that i cut/embossed the die and leaves in white and adhered it with 3D Foam squares that i cut very thin.  Then i used the 6x6 Matting Basics A to cut frames that i inked and layered over the back round and the card base.  Then i finished it by splattering some white paint and Goose Bumps spray.  It was super fun and a totally different look with a square card.  

Thanks so much for stopping by and i hope that you got inspired by all of us and we can't wait to share the rest of the new CHA dies with all of you!!  Be sure and enter your name on the links below to enter the contest and check out the other days by visiting our Spellbinders blog and Facebook page.  For more chances to win be sure and visit Seth Apter's blog


--------------------------------------------------------------------------------------------------------------------------

Official Contest Entry Link is HERE... Entries close in 48 hours

Official Contest Rules can be found HERE


--------------------------------------------------------------------------------------------------------------------------

Saturday, December 5, 2015

Craft Hoarders Hop for December

It's time again for another Craft Hoarders Hop this month just in time for
Christmas and we have lots of fun ideas to share with all of you to make for
the Holidays. If you have been hopping along from the start you should have
come over by Wendi's Blog but you can alway start from the list at the bottom.


 I dug deep into my stash and found some fun things to use
and came up with this Christmas tree to put Grandkids photos. It's so cute and easy!!
So for this project you will need some Christmas paper (mine is from Basic Grey), 
circle dies, ink, adhesive, a pencil, nail file to sand the edges and gold cord and bells.


The wood tree is from Kaisercraft and i first traced twice and cut it out and then i glued it
on the base front and back and let it dry.  Then i sanded all the edges and inked them up. 
You can paint all around the edges too if you want to have it match the papers.
The circles i cut/embossed from a Spellbinders "Basic circle die" and glued them on
with 3D Foam squares from Scrapbook Adhesives by 3L.


And finally the grandkids banner was cut/embossed from the Spellbinders "Font One 
uppercase" die set.  I love both the upper and lowers on these because i always have 
enough vowels to use for things... it's wonderful and you can cut whatever 
paper you need too. I really love that part.

So.... that's it for this crafty girl to share and it's time for you to hop on over
to Kathy's blog and see what she has made for all of you.....  Have a wonderful month
and enjoy the holidays and thank you for hopping with us today!!

Merry Christmas everyone!!


Monday, November 23, 2015

Sentiments of the Season Blog Hop


Welcome to the Quietfire Sentiments of the Season Blog Hop! We’re celebrating the season with some gorgeous projects using our favourite Quietfire sentiment stamps and dies.  Today is the first day of the hop and Yogi and i are your first stops.... 

We’re giving away a prize on each of the Sentiments of the Season blog posts.  The posts will be on Designers’ personal blogs and one on Quietfire Creations.  All you have to do is leave a comment on the Sentiments of the Season blog posts and you will be entered for a chance to win a Quietfire stamp or die from that blog.  Each designer will randomly choose the winner from their comments. 
Here is our schedule:

Day 1- Monday November 23 : Teresa and Yogi
Day 2 -Tuesday November 24KathyJo and Judi Kauffman
Day 3 - Wednesday November 25Wanda and Yvonne
Day 4 - Thursday November 26Robyn and Selma
Day 5 - Friday November 27Diana and Suzanne


If you get lost, just hop back to the Quietfire Creations blog to find all the links!
The deadline for leaving comments is Sunday November 29, 2015 at midnight PST.  Winners will be posted shortly afterwards here the Quietfire Creations blog. 
Good luck and have fun!


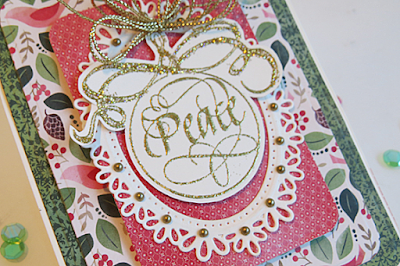
For my card and ornament i chose the new set of stamps called "Flourished Ornaments".  This is such a beautiful set and there is so much that you can do with it i think.  It comes with the calligraphy ornament and 3 different inserts, Peace, Love and Joy.  And each is a beautiful masterpiece done by Suzanne Cannon's own hand.  I love that she can create such amazing designs and there are lots more that we are going to share with you this week so don't forget to check back tomorrow. My papers for this card are from Basic Grey... I really love the colors for it.


I also made a quick ornament that you can do with your kids as a family holiday time project.  I just stamped the image and then added glitter to fill in the ribbon space at the top and cut it out.  Then i cut 2 of the ovals and added a small dot of glitter and then glued in the ornament.  And then just tie
a gold ribbon on the top and you are done.  You could even fill in the ball with a color if you like.

Thanks so much for joining us and hopping along today :)

Wednesday, October 28, 2015

Crafty Secrets Halloween card up today

I had some time this morning before i went off to the castle and whipped up this cute
 Halloween card using some of my favorite papers tags from Crafty Secrets. I really
loved the cute images on the CS Halloween Vintage cuts and all the papers went great!! 
They have so many cute things that you can use to decorate and do all those scrapbook
pages of your holiday afterwards too.  You can find them here so take a peek.....


So-- for the papers you will have to print some from the Halloween CD and the 
Topography CD.  I matted all the layers and popped them up with 3D Foam dots 
so that it would make each layer stand out more.  And i also chalked all the layers
with Gingerbread chalk ink to give it a more rustic feel.  The flowers i had in my
stash of things and i mixed lots of styles and colors to go with the colors in the picture. 


It's definitely not a mailed card but i am sure i can find someone to give it to with
some sweet holiday treats this year.  I found an wonderful recipe for pumpkin 
cheesecakes in a jar so I guess i better get everything and make up a batch.

Thanks so much for stopping over and have a wonderful day!

Sunday, October 18, 2015

Believe in yourself...

Today over at Quietfire Design we are sharing quick projects that we did with 
some of the new stamps and dies.  I have a friend that needed a bit of cheering up
so i thought of combining the new Believe die and the If you don't believe
in miracle stamp set to make her a quick card.  


I wanted it to be feminine so i chose pretty papers from a Basic Grey 6x6 pad and then used
a few SB dies for the backround.  Then i cut the "Believe" die in silver foil and popped
it up with some 3D Foam dots to make it stand out.  I chose ivory and pink flowers
to match the colors in the print and finished it with a few leaves that i die cut. 

Here is the Stamp Set so that you can see what is on the inside of the card.

Anyone of them would work great for it.  Thanks so much for stopping
by and be sure and go to the Quietfire blog to get more ideas on how
to use this die from the other designers on the team.... Have a good Sunday!!

Teresa


Friday, October 16, 2015

Really Reasonable Christmas Challenge

It's time for another Challenge up on the RRR Blog today and wow it seems
like time is rushing by really fast these days.  Our weather is super hot still
here in California so it feels more like July but I know that Christmas is
going to be just around the corner for us all.  So... all of us at RRR are doing
some fun projects with the new Christmas ribbons to share....


So roaming around Micheal's i found these neat metal ornaments and 
thought how fun to decorate them up for Christmas this year.  They already
have the cuts in them so i really didn't have to add much at all.  The ribbons
i used to hang them are from the new "Christmas Monthly Ribbon Club" and
went perfect with my papers from Simple Stories.  


For this one i thought it would be fun to add it straight on to a tag and
make a card out of it.  This line has some fun things already done so
it makes it quick and easy to create.


And for my ornament i used some of the stickers and added 3D foam
squares on the backs and made a little snow scene.  I am a huge snow
man fan so i really love this one.  He is so cute!


And since ribbon makes everything so much better i added some
to these napkin rings i had for the holidays and now they are
ready for a fun festive evening during the holidays....

Thanks for stopping by and don't forget to check out all the other
projects for the challenge and be sure and enter yourself....

Have a really wonderful day!!  Teresa


Tuesday, October 13, 2015

RRR Blog Hop- Crazy for Christmas

Hi Everyone and welcome to the October Blog hop with RRR.  We have a
fun hop for you this month to get started on Christmas with our new ribbon
assortment called "Crazy for Christmas".  It's gorgeous and there are so many pretty
 ribbons you are going to have lots of fun this year making special homemade things
 for your family and friends to give and decorate....  

So if you started the hop at the beginning you would be arriving here from
Karen's blog....  and---- i guess it's time to get started then :)


This project is for me to give to my niece this year so that she can count down the days 
until Christmas.  She is almost 3 years old and i think she will have fun and make it
really exciting for her.  For my papers i started with Basic Grey's Christmas line to make
a simple layered base for the back and added ribbon to make bands across 
the front and ribbon bows in green for the top to decorate it more.  Ribbon always seems
to make the project that much better doesn't it? And the colors this time are so bright
and cheerful and matched so many of the papers i had it was super easy to make this.


For the stickers i found this Santa at Hobby Lobby and the wood veneer letters
are from Ruby Rock-it.  There were lots so it was simple to write out the whole message.


And here is a closeup of the bows that i did for the top.  I mixed two greens for it.
The bottom is the green satin and the top is a mixed sheer in green.

And now it's time for you to hop on to the next designer... Jenn

Thanks so much as always for stopping over and i always appreciate
the nice comments you leave and your love of ribbon like me!!

Have a really wonderful day :)

Friday, October 9, 2015

Halloween Potions from Crafty Secrets

Hi Everyone... it's me again with a fun off the page post that i did to 
make up a few Halloween potion bottles to decorate the house this year.
In the Halloween CD #4 from Crafty Secrets there are some cute labels
that you can print out and i thought how fun to make them
up and put them on bottles.


So i went down to Hobby Lobby and bought a few and set to work.  The labels
i printed on ivory card stock and then fussy cut them out and chalked them.
Then i cut a Spellbinders label die in black and glued on the word labels.  Each
of them has a band going around the bottle so that i could attach them and to 
finish them i added ribbons, black eyelash yarn and some fun spider charms
that i had in my stash.  This was alot of fun and fit in well with the other things
i have to decorate this year.

Thanks so much for stopping over for a little spooky inspiration!

Monday, October 5, 2015

Craft Hoarders Blog Hop for October

It's time again for the Craft Hoarders to share lots of projects with an anything goes theme
this month.  Each of us has created something special from all those crafty things we
have in our stashes to give you a little inspiration to create something for yourself.
Today i have a really fun project i made for me.  It's a Starbucks recipe book
with cards from all my friends and their favorite drinks and goodies they like to eat.
I have gone in so many times and listened to their orders but i can't remember
a single one... so an idea was born.


I used the Barista paper line from Basic Grey and it was perfect for this project.
The stickers had fun little coffee images and i filled the other in with some
letter stickers from Ruby Rock-it and bits of their Wood Veneers
with words on them.  So over the moon excited about this!!


Each of the pages is different and has places to slide the recipe cards in for
the coffee and tea ideas and some yummy goodies to bake to go with them.


The tiny letters were some of my favorite things to use and are from
Ruby Rock-it.  They have lots of sizes in each pack and are the perfect
size to use for cards and other fun things like this book.


 My Supply List is:
Pine Cone Press Calendar, Basic Grey Barista 6x6 pad and stickers, brads; Ruby Rock-it
Alpha Stickers and Wood Veneers; Scrapbook Adhesives 3D Foam Squares and E-Z Dots
permanent tape; Really Reasonable Ribbons seam binding and twine; scissors, paper
trimmer and other little goodies i found tucked away :)

So if you are here and haven't started the hop you are going to go back to Gloria's
blog and then hop along with the other's list below.  Have fun and enjoy...

Gloria Stengel 
Vicki Robertson
Debbie Seyer
Ginny Nemchak 
Pam Bray
Jacquie Southas
Glenda Brooks
Amber Milone
Tracey Sabella
Donna Idlet
Bonnie Garby
Nancy Dynes
Wendi Robinson
Teresa Horner
Barbara Rankin
Marisa Job
Christy Houser


                                                     Thanks so much for stopping by today...

Crafty Secrets Challenge and Blog Hop for October


Welcome to the October Crafty Secrets Linky Challenge and Blog Hop.  Our theme this month
is Give Thanks with a Grateful Heart.  The design team was challenged to create a
Thanksgiving themed project or a project that expresses thankfullness and gratitude.  We
hope that you will join us for the hop, and then visit the Crafty Secrets Blog where you
can find a free download and details for entering the challenge yourself.


I have been doing lots of sorting in my craft room lately and found
this huge jar from IKEA that i had bought and got this great idea to do
a Thankful jar for Thanksgiving and before.  I have had this on my to do list
for a long time and finally got one done... i am so happy.


So for my jar i created a pretty band around the center using leaf papers from
 the Halloween #4 CD and lots of ribbons from Really Reasonable Ribbons.
The little Blessed and Grateful tags are from the CS and i cut them
apart and tucked them in the ribbons on the front.  On the top i used tiny
adhesive block letters and wrote 40 days of Thanks and Praise.  And now
i just have to make 40 slips of paper to write on and fill up my jar.  


Here is the order of the Design Team in case you want to hop along with us....

Crafty Secrets Blog

Kathy Clement

Ginny Nemchak

Teresa Horner
Darlene Pavlick
Sheila Rumney
Shantaie Fowler
Diane Hover
Michele Kovack


It's going to be a really good month... thanks so much for stopping
over and be sure and upload for our challenge this month too.
Teresa

Tuesday, September 29, 2015

Fun little Halloween Banner from CS

Happy Tuesday and thank you for taking the time to stop over.  I am getting in the mood
here for Halloween and fall since we finally changed seasons and i made up another
cute little banner to decorate the house.  


It's always hard to get a good photo so i did a few closeups too so you can
see all the cute papers and other goodies that i used for it.  I mixed lots of 
Halloween prints and colors to match the little pictures and lots of ribbons
to tie on the tulle that i laced it with.  I wanted to make something bright
and different and i really like the way this came out.


All of it was done with the Halloween CD #4 from Crafty Secrets and i used
a few dies to cut the papers to give it a little more pizazz!!  The cute little images
are from the CS Creative Scraps that i cut apart.  Then i added lots of cute ribbons
from Really Reasonable Ribbons new halloween set and that was it.  I hung it
it up by the door with lots of other fun goodies to be ready for trick or treaters.

Hope you have fun making something for your house too and thanks
so much for stopping by... have a wonderful day :)

Tuesday, September 22, 2015

Fun Crafty Secrets Halloween Set

I love the fall season with all the gorgeous colors and everything else that goes
along with it.  And since Halloween is just around the corner i decided to make
up a few of the fun little treat boxes and a wall hanging from the CS
Halloween CD #4 that you can print out yourself for family and friends.


So my first project to share is the cute little pumpkin girl door hanger
that i created.  It's just layered paper and ribbons but it's a fun little festive
piece of art i can add to my house to make it more festive.  All the papers
and the image was printed from the CD i added a little bit of orange and
green stickles to make it shine more.  


And this cute little house is already printed with all those cute little
images on it and all you have to do is scor it and cut it out.  It's super cute!


And this little treat box is the same... and it was so easy to do.  The best
part is you can print lots of them so that you can pass them out to everyone.


Friday, September 18, 2015

Really Reasonable Ribbon Challenge for September

It's time again for another fun challenge over on the RRR challenge this month.  This
time the theme is "Orange you glad it's Autumn" and it was super fun and easy
with all the amazing ribbons they have to sell in the store.


I used two of the new ribbons that you get in the September Ribbon club Assortment 
as my oranges and papers from Crafty Secrets Halloween CD #4.  It
was fun to layer all the papers and that cute little image i printed and
since i did my own papers i can make lots of them to send out this year.

Be sure and check out all the other cute samples up on the 
Really Reasonable Challenge this month and enter one of yours
for a chance to win some of these amazing ribbons too.

Have a wonderful day...Teresa

Sunday, September 13, 2015

Really Reasonable Ribbon Blog Hop for September

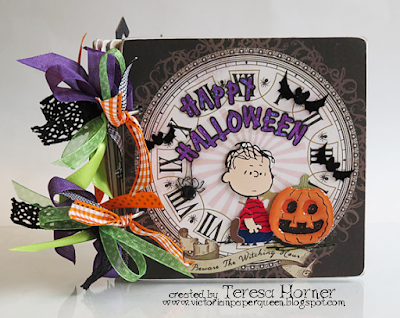
It's time again for a fun peek into Halloween this year with all the girls from the RRR Design Team today.  I have a cute little book that i made up for this year to put some fun photos of our adventures.

So if you are following the hop than you should have arrived from "Karen's blog"....
and now we can get started on my project for today


I dug deep in my stash for a few things to create this little book with these stickers
with Linus from the Great Pumpkin show.  I used papers from a We R  6x6 paper pad and
decorated each page to add photos in.  It's alot of different bits and pieces but the ribbons 
from the "Ribbon Club Assortment" really set it off on the side.


Here is a quick closeup of the clock and the stickers.


And here is a photo of the ribbons that we have this month!


All of them were so fun to use and I know that you will find lots
of fun candy wraps and boxes to use your extra ribbons up too...

Be sure and hop on over to "Jenn's blog" to see what she did and i hope
you get lots of fun ideas from our hop this month to do for your family!


LinkWithin

Related Posts Plugin for WordPress, Blogger...