Tuesday, January 5, 2016

January Hoarders Hop... are you ready?

It's the beginning of a brand new year and time to find and get out all those projects
that you have stored in your scrap room to make something fun!

Today i have a new journal to share that i made with a Simple Stories release
from last year called I AM.  I love to make up journals to post about things that
happen throughout the year and i love this paper line so it went together pretty well.


For the book i used one that i found on sale at Hobby Lobby.  It has clear pockets
inside and i picked it up for less than $8 so that was wonderful.  On the front I used
some of the 12 x 12 papers in the "I AM" collection and layered on some of the 
journaling cards and stickers.  Then i added words from the other adhesive sheet
that matched it and a few frames from the chipboard set too. It was nice that i had lots
of things for this line and kept it all together to find when i needed it. 


And... with everything else that i do i added some little whipped spackle dots with a Prima
stencil that i had in my stash.  Don't you love all the pretty colors in this set?  Me too!


Here is a quick photo of the inside that i created.  Besides the clear acetate pages i added 
white card stock pages that i can add journaling and photos as i go through the year.  I hope
that i will have enough space... I have lots of adventures planned in 2016.  Can't wait :)


And here is what some of the stickers and letters look like in the set.  Most
of it is precut cards so it's easy to create places for photos and journaling. And 
that is it for me.  I will have lots of fun things each month to share so be sure 
and check back again next month ......

So you should have arrived from Wendi's blog but if you didn't and want
to check out all the other things we did check the list at the bottom ok!

And now it's time to hop to the next designer on our team... 
the amazing Barbara Rankin :)

Teresa Horner- http://victorianpaperqueen.blogspot.com/  this is me!!
Karen Zueger-Brownell - http://lostcoastscrapper.blogspot.com/

Happy New Year everyone and hope you see alot of you this year!

Teresa

Saturday, January 2, 2016

C'est Magnifique for 2016

The new year has started with lots of fun new adventures for me and today
i want to share our first post is up for the new kits coming out
 this month for C'est Magnifique.

You can check out the link for it here to find out what our first contest
with our new Mood Boards to inspire you:


There are lots of gorgeous colors in the kits and add ons and we all can't wait
to share the fun pages we did for you to get the year off to a good start!!

Thanks for stopping by today and I hope you New Year will be amazing!

Teresa

Saturday, December 19, 2015

New Beginnings for 2016

It's been a fun and interesting year this year with lots of challenges and really good
times with my new job at Disneyland and but it's time to start a new year.  I have
good news to share in that i have been asked to join a new page team called
C'est Magnifique!!  I will be doing lots of pages again and the products for the
kits are amazing so it should be fun and exciting to start this new adventure.

This month our basic kit looks like this:


The papers and extra goodies have been fun to create with and
we will have lots to share with you on the first of January so be ready!!


Here is a sneak of all the papers that we get to use... awesome aren't they! The
papers this month are from Blue Fern Studios....


And this is the mixed media ... I love all those fun textured goodies in this one.
And I can't wait to use it to make some fun pages and cards with all the 
papers and other things i got in the basic kit....

Be sure and check out the C'est Magnifique website to order your
kits and then get ready to create some fun things this new year with us.

Store: http://www.cestmagnifiquekits.com/cart/

Blog: http://cestmagnifiquekits.blogspot.com/

Happy Holidays everyone and have a wonderful weekend... Teresa

Thursday, December 10, 2015

Spellbinders CHA Sneak Peek Blog Hop


Welcome to the 5th day of our Spellbinders CHA Roundup.  I have been on the team for 4 years now and am always so thrilled and excited to have an opportunity to share a few of the newest dies that will be coming to you at the CHA show in January 2016.  And you have a chance to win too.

We have been hopping for 4 days now and all the designers have created some amazing projects to share with all of you.  Today the amazing "Seth Apter" is sharing his new line he designed for Spellbinders and i created something from my favorite designer -Stacey Caron.


The new die that i am sharing is called the "Deco Luxe Card Front" and is from Stacey's new line of Art Deco dies. I am a huge fan of the 20's era, I love the Great Gatsby movie and all the glitz and glamour of that time period so I designed a gorgeous card with classy black and white and silver papers.  Each beautiful detail in this die is so amazing and now i can share how i made it.


To make this card you will need black, white cardstock and silver metallic papers.  You will also need a stamp for the center, black ink and clear embossing powder.  You will also need the S4-416 Labels Thirty Four die and the Spellbinders Platinum Die cutting and embossing machine.

1. Start by cutting/embossing the labels die with the silver metallic cardstock.  Cut/emboss the white Labels Thirty Four die and then stamp both the sentiment and then the little flourish on the top and bottom. Add clear embossing powder and heat set with a heat tool.


2. Cut/emboss the Deco Luxe Card front with black card stock.  Also cut the silver paper with only the outside edge of the die.  Cut a piece of white card stock that measures 6 1/8 x 6 1/8 and your card base in black card stock to measure 6 1/4 x 6 1/4 inches.  Cut a small piece of silver metallic card stock to fit on the inside back to measure 1 1/4" x 6 1/4" and glue across the bottom to extend the card to be square.  (Since the paper is only 12 x 12 inches you will need to add a piece)


3. Layer and glue the pieces together as shown and add rhinestones on the outside edge of the card front.  Add 3D foam squares to the back of the sentiment and adhere to the silver label.  Attach to the card with adhesive.


5. Attach a small bow that you created at the bottom of the sentiment and you are all done.  It's super easy, super elegant and would be great for a party or wedding invite too.


Here is another card that i did with the Brand New "Make a Wish" die set.  I had lots of fun with this card and created a base for my card with inks and then cut out the flower design to show the black shadow. Over that i cut/embossed the die and leaves in white and adhered it with 3D Foam squares that i cut very thin.  Then i used the 6x6 Matting Basics A to cut frames that i inked and layered over the back round and the card base.  Then i finished it by splattering some white paint and Goose Bumps spray.  It was super fun and a totally different look with a square card.  

Thanks so much for stopping by and i hope that you got inspired by all of us and we can't wait to share the rest of the new CHA dies with all of you!!  Be sure and enter your name on the links below to enter the contest and check out the other days by visiting our Spellbinders blog and Facebook page.  For more chances to win be sure and visit Seth Apter's blog


--------------------------------------------------------------------------------------------------------------------------

Official Contest Entry Link is HERE... Entries close in 48 hours

Official Contest Rules can be found HERE


--------------------------------------------------------------------------------------------------------------------------

Saturday, December 5, 2015

Craft Hoarders Hop for December

It's time again for another Craft Hoarders Hop this month just in time for
Christmas and we have lots of fun ideas to share with all of you to make for
the Holidays. If you have been hopping along from the start you should have
come over by Wendi's Blog but you can alway start from the list at the bottom.


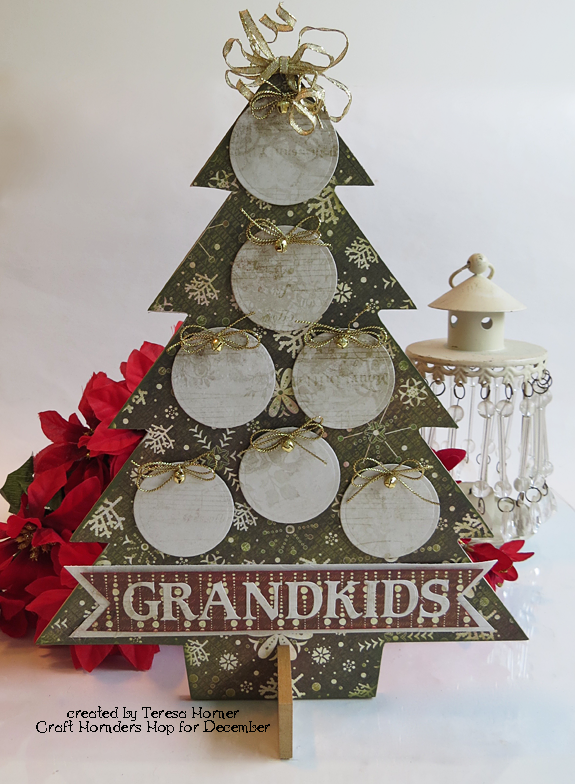
 I dug deep into my stash and found some fun things to use
and came up with this Christmas tree to put Grandkids photos. It's so cute and easy!!
So for this project you will need some Christmas paper (mine is from Basic Grey), 
circle dies, ink, adhesive, a pencil, nail file to sand the edges and gold cord and bells.


The wood tree is from Kaisercraft and i first traced twice and cut it out and then i glued it
on the base front and back and let it dry.  Then i sanded all the edges and inked them up. 
You can paint all around the edges too if you want to have it match the papers.
The circles i cut/embossed from a Spellbinders "Basic circle die" and glued them on
with 3D Foam squares from Scrapbook Adhesives by 3L.


And finally the grandkids banner was cut/embossed from the Spellbinders "Font One 
uppercase" die set.  I love both the upper and lowers on these because i always have 
enough vowels to use for things... it's wonderful and you can cut whatever 
paper you need too. I really love that part.

So.... that's it for this crafty girl to share and it's time for you to hop on over
to Kathy's blog and see what she has made for all of you.....  Have a wonderful month
and enjoy the holidays and thank you for hopping with us today!!

Merry Christmas everyone!!


Monday, November 23, 2015

Sentiments of the Season Blog Hop


Welcome to the Quietfire Sentiments of the Season Blog Hop! We’re celebrating the season with some gorgeous projects using our favourite Quietfire sentiment stamps and dies.  Today is the first day of the hop and Yogi and i are your first stops.... 

We’re giving away a prize on each of the Sentiments of the Season blog posts.  The posts will be on Designers’ personal blogs and one on Quietfire Creations.  All you have to do is leave a comment on the Sentiments of the Season blog posts and you will be entered for a chance to win a Quietfire stamp or die from that blog.  Each designer will randomly choose the winner from their comments. 
Here is our schedule:

Day 1- Monday November 23 : Teresa and Yogi
Day 2 -Tuesday November 24KathyJo and Judi Kauffman
Day 3 - Wednesday November 25Wanda and Yvonne
Day 4 - Thursday November 26Robyn and Selma
Day 5 - Friday November 27Diana and Suzanne


If you get lost, just hop back to the Quietfire Creations blog to find all the links!
The deadline for leaving comments is Sunday November 29, 2015 at midnight PST.  Winners will be posted shortly afterwards here the Quietfire Creations blog. 
Good luck and have fun!


For my card and ornament i chose the new set of stamps called "Flourished Ornaments".  This is such a beautiful set and there is so much that you can do with it i think.  It comes with the calligraphy ornament and 3 different inserts, Peace, Love and Joy.  And each is a beautiful masterpiece done by Suzanne Cannon's own hand.  I love that she can create such amazing designs and there are lots more that we are going to share with you this week so don't forget to check back tomorrow. My papers for this card are from Basic Grey... I really love the colors for it.


I also made a quick ornament that you can do with your kids as a family holiday time project.  I just stamped the image and then added glitter to fill in the ribbon space at the top and cut it out.  Then i cut 2 of the ovals and added a small dot of glitter and then glued in the ornament.  And then just tie
a gold ribbon on the top and you are done.  You could even fill in the ball with a color if you like.

Thanks so much for joining us and hopping along today :)

LinkWithin

Related Posts Plugin for WordPress, Blogger...