Wednesday, January 30, 2013

Media Mixage from Spellbinders

I finally get to share a fun project that I did for CHA
this past month!  Spellbinders is partnering with two
amazing artists-Susan Lenart Kazmer and Jen Cushman
and offering some amazing jewelry pieces to design with.  
We had the opportunity to create too and one of the projects 
I made was this fun Wild West Belt that you can see here...
on the Spellbinders Gallery!!  

 For this project I used lots of the New Bezels that they 
designed and created and filled them with embossed papers
 and colored resins and sparkly crackle polish.

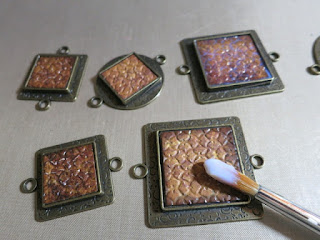
Here is a closer view of the resin and the faux leather
that I created using papers and one of the brand
New Metal Embossing plates from Spellbinders.

To make this project you will need ICE Resin,
enough Bezels to fit around your waist or hips,
embossing plate, square dies and re inkers to dye
the resin with, PPA Gloss and brown distress ink.

First you will cut and Emboss the papers and chipboard and
ink around the leather looking pieces to distress each of them
a little bit more.  You are going to glue the chipboard
pieces in the square bezels first just enough so that
when you put the textured piece of paper in it will
be level with the top.  Add a thin coat of a glossy
coating like PPA when it is dry as shown to fill the bezel.


For the round Bezels I started with a tinted batch
of ICE Resin in each and let them dry.  Then I painted each 
with crackle polish and let them dry again.  Then I wiped each
of the bezels off with a soft cloth and polish remover to 
get a distressed look.  When it was dry I coated it one more time 
with ICE Resin and let it dry for 24 hrs.
When all the pieces were dry I attached them together with a fancy
bead and wrapped thin wire between each bezel about 3-4 times.


For the ends I added a chain and a large clasp to
attach it together to wear it with my favorite jeans
or over a blouse.  It was really fun to create and
I think I would love to make another maybe filling
each bezel with resin to look like turquoise.. but
that's another project down the road and I hope that 
you try some of these when they come out in stores
and create something special for yourself!! Be sure 
and check out the other Media Mixage Projects from
Spellbinders in the gallery here.....

Have a wonderful day and happy crafting!

Monday, January 28, 2013

Cardabilites #67 up

There is a new sketch up on Cardablities and I 
had some time after doing my housework to whip
up a card for Valentines.  The sketch has lots of possibilites
and I decided to use the sticker tag and work around
that with all the gorgeous papers from the
We R Valentine Collection that I just got.


One of my favorite new Spellbinders dies is the Matting Basics
and I used 2 of these around the outside edges to give
the edges a really pretty embossed edge to finish 
them off.  The die behind the sticker is part of a
New Set called Butterfly Corner S5-165 and it
is so versatile and you can create lots of projects with it.

Thanks again for the wonderful sketch Karan
and be sure and check out the other entries here...
I have lots of Valentine projects to do so that
is all for today... Have a wonderful day and
happy creating to all of you!

Friday, January 18, 2013

New File Folders for January

Well first I am going to go on a bit about the CHA show.. There 
was so many awesome things there with Mixed Media, New papers,
New Dies, chipboard, wood and card products and I cannot
wait to start making up things for display and for classes in
the store!  And of course for Spellbinders too!  Stacey got the
Attendee's Choice Innovation Award for the New Gold Imperial dies
that were just released and the booth was really hopping with excitement
for the whole show!!  Soo that means there is going to be lots of
exciting things coming your way from all of us for inspiration!  Yay!

But meanwhile back to reality.. I have 2 more File Folders to
share today which fills up our Heidi Swapp file folder with 7 and it will
be time to start another set next month for new classes with new themes. 


 I can't say enough about what a fun project this is
to do and my class only takes about 2 hours to complete 
this whole folder!  How fun that you have a place to
put soooo many photos and journaling and you
still have time for other things with your family
like going out and taking photos for more folders?  LOL!


Inside i created lots and lots of fold outs and little
pockets for goodies that you might have!  This file
is made with the New Basic Grey Valentine line.
It is beautiful and has the prettiest prints to use
and stickers too... I so loved creating this folder :)


And my second file that I want to share for this Saturdays
class at Hearts N Crafts is for a fun trip to California Adventure 
or any Theme Park that you might visit.  These papers
are from October Afternoon and are they ever
adorable.  You get the cutest stickers and it
really went together in a snap!

 Aren't the stickers just so very, very cute?

 and...There is lots of places to put photos on this one!


We even traced and cut out our own custom folders
to use until the new Heidi Swapp folders come out
next month with lots of new prints. It is going to
be so fun for the next couple of months ahead.

Well that's it for today and I hope you try and create
some of these folders to get caught up this year
and be sure and stop back for some other fun
projects with the new Spellbinders dies..
Hugs and Smiles,
Teresa

Saturday, January 12, 2013

CHA 2013 started today!

Yay-- the show started today so finally we can share
the excitement with all of you about all the New
Amazing dies, embossing folders and jewelry making products
 that Spellbinders is releasing!
They are gorgeous and there is so many to chose from,
it is going to be a creative heaven for us for months
and months ahead!!  How exciting to finally get to share!! 

Today I made a card using the Filigree Delight die S5-177
that was shown in our sneak peaks last week.  I 
 used the new Valentine line from Bo Bunny for the papers
and some cream colored cardstock and chalk inks from Colorbox.

 All of the dies that are being released at the show
are so detailed and so beautiful.  I really love this
set because it has the fine detailed backround, the oval, a tag
and another piece you can use to adorn a project.
To make the tag I cut one of their tags out with
our die and layered it over the filigree die and tied
a few short pieces of ribbon around to the back.
And to finish it I cut out a red heart on the paper
and inked around it with lipstick red colorbox chalk
and then coated it with clear glossy accents.


I really love the colors and the beautiful dies 
make it easy to create with. I can't wait to show you more 
projects with all the new dies so be sure and check back and see!
Thanks so much for stopping by and visiting.
Hugs and Smiles,
Teresa


LinkWithin

Related Posts Plugin for WordPress, Blogger...