Showing posts with label Amazing Paper Grace. Show all posts

Saturday, March 3, 2018

Pretty in Pink Happy Birthday card


Hi and thanks so much for stopping by today to get a little die inspiration for the weekend.  Today i have a shaker card to share that i did with some of the newest release of the 3D Vignette dies.  All of our team gets to create one so i chose the Birthday die for mine because everyone needs birthday cards to give and you could do so much with this die set.


Here is a closeup of all the pretty goodies that i put in my shaker.  I found lots of glass glitter and sparkles and you can even put in sequins if you have them in your stash.  Anything goes for shakers :)


And making a shaker card is really easy.  You need the top Happy Birthday piece.  A circle of clear acetate to hold it all in.  A circle piece of pink card stock for the back and i cut the balloon layer in vellum to put in between.  You will also need small foam squares or dots and of course lots of glitter.


So first glue down the vellum layer to the back pink circle.  Then lay out the foam squares that you have cut in half very tightly around the circle to seal the edges and pop it up to put glitter in it.  Then add the sparkles inside (however much you want).  Glue the top piece to the clear circle of acetate like you see on the top left and when it is dry you can attach it to the bottom layer of your shaker card.  


And it should look like this.  So pretty and filled with beautiful shiny goodness when you shake it.


The flowers i also created with the Cinch and Go flowers 3 die set and the tiny ones are from the Petite Double Bow set.  It was really fun and now i am ready to give it to a very special family member for her birthday soon.

And just in case you need a supply list... here is mine :)

Supply List:


Papers: Bazzill and DCWV shimmer 6x6 pad, vellum, clear acetate

Adhesive:  Scrapbook Adhesive by 3L tape runner, 3D foam squares 

Thank you so much again for stopping by....


Wednesday, February 7, 2018

INTRODUCING AMAZING PAPER GRACE – 3D VIGNETTES


Welcome friends, today we are introducing a brand new die collection by Becca Feeken for Spellbinders called 3D Vignettes.


3D Vignettes is a series of dies that can be included in a Grand Base die to create 3D upright cards that folds down flat to go into an envelope - a collapsible tunnel card!  You can see it in action in the 1.5 minute video -----; HERE.  


Where these Vignettes are unique, is the ability to die cut or not die cut each and every layer for an ethereal see through dimensional creation.  The collection was designed to cut out whole or to be cut out inlaid for inclusion in a Grand Base.  The collection centers around three themes - baby, love and birthday, and today we show you traditional uses but a little dreaming, only the sky is the limit.

The dies and elements can be used as standalones or in the Grand Base there is a good degree of mix and matchability across the entire collection.  I've made three cards to show you how easy it is to isolate different sets or combine them all into one, they are:


  • The Simple Card - There are two layering dies which can be used as inserts or used on their own in regular cards.
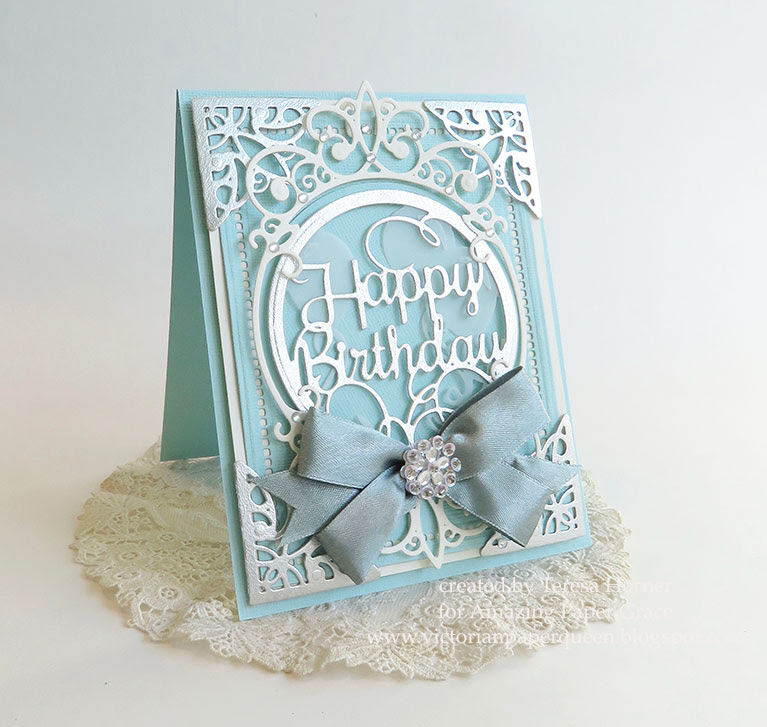
  • The Embellished Card - There is a set of shaped dies, these add drama or can be used on their own in regular cards.
  • The Decked Out Card - There is a 3D Grand Card, standing, yet collapsible, made for use with purchased inserts or to use with dies from your own stash


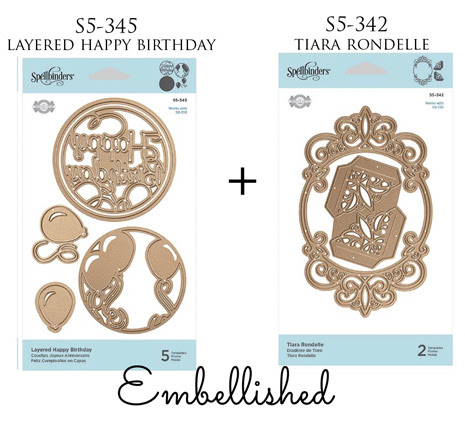
The sets I'm introducing today are S5-345 Layered Happy Birthday, S5-342 Tiara Rondelle, S6-136 Grand Dome

 My Simple Card


  My Embellished Card


 My Decked Out Card

Extra Embellishments I used on my cards:


        I really loved working with all these new Happy Birthday themed dies that Becca designed and had such a good time with each of them.  In keeping with the themes I kept my first card simple and let the Happy Birthday Medallion be center stage on a simple squared backround with a soft and flowing silk bow.
       On the second card i added that beautiful "Tiara rondelle" die set over the top with foam dots and the victorian corners were perfect to add even more detail to the card.  And for each of the cards i added vellum behind the Happy Birthday die to give the shadow of the balloons a sweet and cloud like look.
       For my decked out card i went all the way with simple to do flowers, layering with clear acetate to see through all the layers and used the little extra dies with swirls on the tops to make it that much more glamorous!!  And aren't the colors just scrumptious?  And to think you can fold it down and send it in an envelope... it is truly amazing!!
                                                            
These dies are available on February 13, 2018 - get email notification the moment they are loaded by clicking on the die set and putting your email address and clicking on Notify Me ---- HERE.

In the meantime, be sure you leave a comment on this post for a chance to win an Amazing Paper Grace Die from the Chantilly Lace Collection.


Prizes:
There are six dies that are being given away. One name will be randomly picked from comments left on each of our six blogs on the Introducing 3D Vignettes post between February 7 and February 11, 2017 at midnight US Central Time and our international friends can participate!  The randomly selected names will be announced on the Amazing Paper Grace Blog on February 12th.  (All giveaways for this hop are managed by and the responsibility of Amazing Paper Grace)


Up for grabs is an Amazing Paper Grace die of your choice from the the Chantilly Lace Collection; there will be a total of six dies and a winner can win once among all six blogs.   If your name is selected, simply claim it within 2 weeks of announcement by sending your address through the form under the Contact Tab on the Amazing Paper Grace Blog. The dies will be mailed out from Amazing Paper Grace.

Click the links to get to more sweet samples:
Visit Joanna   - joannakrog.blogspot.com to see her 3D Vignettes Cards with the Love Theme.
Visit Teresa   -  victorianpaperqueen.blogspot.com to see her 3D Vignette Cards with the Birthday Theme.
Visit Jo           -  prettypaperpearls.blogspot.com/ to see her 3D Vignette Cards with the Baby Theme.
Visit Melissa  - keepsakesbymelissa.blogspot.com  as she shows off Large Filigree Numbers
Visit Becca     - amazingpapergrace.com/blog to show what she's doing with Layered Rosettes
Visit Judy      -  judyhayesdesign.blogspot.com/ with a clever project using one of the 3D Bases

Thanks so much for joining us for Introducing 3D Vignettes!

Leave a comment - tell us, which of these dies would is closest to your heart?


Sunday, September 10, 2017

So very Thankful for you


Hi everyone and thanks so much for dropping by today.  I have a another sweet card to share that i made for a friend in fall colors from the New Echo park Fall Reflections line.  It was perfect to add the gorgeous borders from Becca Feekens Graceful Fans die set and also the Graceful Brackets die. 

I wanted to give my friend something pretty that she could put on her desk so i created a simple easel card and did simple layering on it.  For the borders i used one in dark brown to give it a nice lacey look across the bottom and then the smaller edge border i put all around the sentiment.  It really gave it the pop i was looking for and it was nice to be able to cut the lacy pieces in the paper i needed to.


Here you can see how pretty the designs in the border is.  I love the fans and the other border in the set is even cuter so you have double the creativity if you use both of them.  

Be sure and check out all the other girls this week on their blogs for more ideas using the border dies this month.  We have lots of ideas to spark your creativity!!  

Hugs and Smiles... Teresa

Supply List:


Echo Park Fall Reflections paper
ribbon, button
Scrapbook Adhesives by 3L My Stik and 3D Foam squares


Tuesday, August 15, 2017

The Amazing Paper Grace Thinking Outside of the Box Blog Hop


We're so excited!  For months we've been bringing you creative ways to use your dies to make stunning cards.  Not today!!  Today, we're showing you how to make anything but a card.  Becca issued us the challenge that our creative team could pick any die and not use it in the way in was originally intended. What that means for you is everything we are showing today is pretty much outside of the box.  Dies are meant for this kind of inspiration and as you hop around, you'll be amazed at some gorgeous creations that will have your head shaking.  Yes there are prizes, but but have your gift list sitting by so that you can pick out the next gifts you might be making for someone special.

I'll tell you a little bit about my creation and will share a link list below so that you can see the creations of each person on the Creative Team as well as information on how three lucky people can win Amazing Paper Grace Dies.


Here's where I tell you about my creation.  I love border dies, any kind and any style.  For my project today i wanted it to just be a subtle embossing effect in the paper.  So i cut thepaper and the die cuts in the same color and wow did it ever come out amazing.  It took my simple recipe box to a whole new level.  The gorgeous paper colors are from the recipe cards that actually came with the box so when you open it you will see not only the recipe cards but the pretty index cards with the die cuts too.


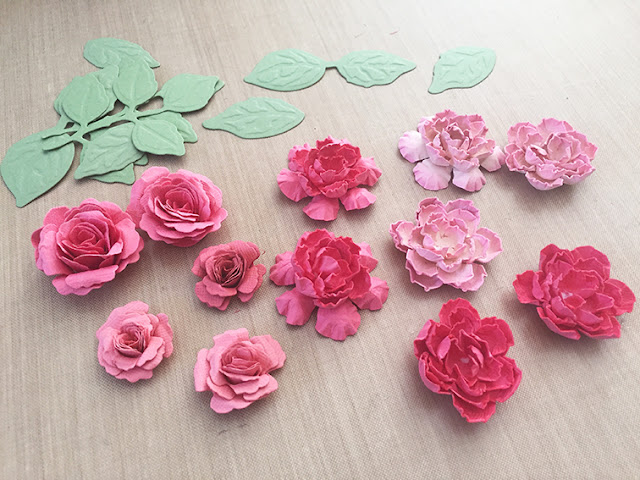
And of course i had to make up some flowers in matching colors to go on it.  For this i used the Cinch and Go die set and cut them in light pink and a darker pink.  Then i inked them with Distress inks and Versacolor inks because when i spray them with water to curl the edges i wanted the ink to bleed.


For each of my flower sets i sprayed them with just a bit of water and then used the ball tools in sizes to fit to press and curl the edges of each.  When they were completely dry i put a small amount of glue in the center of each and glued them together.  Then i added a pretty pearl in each.


And this is how they all came out.  And i made lots of them since i wasn't sure how many i would need in my flower spray for the top.


Since i adore roses this was really fun to make.  


Here is a quick view of the embossed die i used for the front, back and side panels.


And here is a view of the box and the inserts.  Since the dies are so intricately made and have so much incredible embossing on them i ran a darker pink chalk pad over the raised part of the index cards to make the design pop more.  There is another way to do this but i will share it later.


How to Win:
Hop around to each Creative Team Member and leave a comment on each blog, three lucky winners will win a die of their choice from the Amazing Paper Grace Vintage Elegance Collection.    In making the rounds, a comment should be left on the August 15th Blog Post of each Creative Team member - in your comments let us know if there is a project you would consider making.  

When to Check Back:
We'll pick and post the winners on Saturday August 19th on the Amazing Paper Grace Blog.

How to Claim:
The winner has two weeks from the time the blog post is published to claim their die.  Simply click on the contact tab at the top right hand corner of the Amazing Paper Grace blog, leave your mailing address and type the name of the die you'd like.  Becca will be sending out the winning die.  Please give us a month, we'll get it to you, promise!

Who can Play:
Any of our lovely readers including our international friends.

To start thinking Outside of the Box, hop to:

Visit Becca      -  at amazingpapergrace.com/blog/
Visit Melissa  – at keepsakesbymelissa.blogspot.com
Visit Teresa    -  at victorianpaperqueen.com
Visit Anita      – at craftingforever-anita.blogspot.com
Visit Kristi      – at kristispapercreations.blogspot.com
Visit Joanna   – at joannakrog.blogspot.com

P.S.  These are all gifts you can make, yes you!! Please feel free to ask questions of all the designers in their comments because we all love to mentor readers through making wonderful gifts for their families.
Supplies:

Paper: Bazzill Cardstock
Dies:  Graceful Floral Lace, Cinch and Go Flowers, Bitty Blossoms, Foliage
Recipe Box: Hobby Lobby
Inks: Distress ink (worn lipstick), Versacolor Petal Pink/Pink, Prima Old Rose
Adhesive pearls: Want 2 Scrap
Ribbon, glue dots, adhesive, paper trimmer, scissors

Thanks again for stopping by and have lots of fun on our hop!!

Big Hugs.... Teresa

Tuesday, July 11, 2017

Amazing Paper Grace Blog Hop with Borders


Good morning and thanks for joining us!  We have a blog hop going on today and the entire Amazing Paper Grace Creative Team spent the week creating with the Graceful Borders collection.  Lots of us spun it into a mitered frame or mitered frame backgrounds for use on a card and a couple of us had other creative thoughts to use it.  These beautiful little borders are designed to use with a new product called the Graceful Frame maker.  It's super easy to use and just in case you haven't seen how to use The Graceful Frame Maker with the border dies you can see a step by step tutorial ----- HERE and a video --- HERE.  

And me-- well i went in a totally different direction with my borders.  I used to do alot of wedding cakes back in the day and my border die set "Graceful Scallops"  just screamed at me to make a mini wedding cake box.  I cut them into the paper, embossed them and also used all those cute little borders like piped wedding icing to decorate my cake.  It was so fun and you can take off the top layer and put in a gift card or some cash for the new bride and groom.  And of course you can make a matching card to got with it.


To make this project easier i used small chipboard circle boxes and cover them with mixed media paper.  This has a really nice weight and the die pieces really embossed well with it.  For each layer of my mini cake i added little details into the paper with the dies.  The sizes were perfect to use for those little bits of detail and would be so amazing to use with the frame maker die.  For the top i created some flowers using white paper, chalk ink and the "Cinch and Go 2 Flower Die set"  I just gently folded them and added the leaves and flowers between them to make a pretty arrangement on the cake.

And if you missed my other posts using the new borders dies be sure and hop on over to here and here to see more card ideas with these amazing and beautiful border dies by Becca Feeken.


I also used Graceful Eyelets on my cake as well....


At the bottom of this page there is a link list so that you can see the creations of each person on the Creative Team as well as learn how to win a free Amazing Paper Grace Venise Lace Collection Die.

How to Win:
Hop around to each Creative Team Member and leave a comment on each blog, one lucky winner will win a die of their choice from the Amazing Paper Grace Venise Lace Collection. In making the rounds, a comment should be left on the July 11th Blog Post of each Creative Team member - in your comments let us know if there is a border or two that tickles your fancy.

When to Check Back:
We'll pick and post a winner on Saturday July 15.  The winner will be posted on the Amazing Paper Grace Blog.

How to Claim:
The winner has two weeks from the time the blog post is published to claim their die.  Simply click on the contact tab at the top right hand corner of the Amazing Paper Grace blog, leave your mailing address and type the name of the die you'd like.  Becca will be sending out the winning die.  In fact, she's currently all caught up on mailing out winning dies :-)

Who can Play:
Any of our lovely readers including our international friends.

Off We Go!
Visit Becca      -  at amazingpapergrace.com/blog/
Visit Melissa  – at keepsakesbymelissa.blogspot.com
Visit Teresa    -  at victorianpaperqueen.com
Visit Anita      – at craftingforever-anita.blogspot.com
Visit Kristi      – at kristispapercreations.blogspot.com
Visit Joanna   – at joannakrog.blogspot.com

Supplies:

Paper: Mixed Media paper pad
Ink: Tsukineko Versa Magic Ink
Accessories: stamens, ribbon, round chipboard boxes

Hey there, do you have creations you'd like to share with us?  Tag your Instagram cards made with Amazing Paper Grace Dies with #amazingpapergrace and your creation may be featured during our next creative team round up.  If you're a die collector, be sure to help a fellow collector and review your dies, how they cut and what you use them for on Amazon.com or Scrapbook.com - you can upload your creations right there as well.

Thanks so much for stopping by and have fun and enjoy the hop today!!  

Tuesday, June 13, 2017

Amazing Grace Blog Hop with Venise Lace

Hi there, welcome to the Amazing Paper Grace Creative Team Blog Hop. Today we are introducing a new die collection by Becca Feeken called Venise Lace.  I'll list all of the creative team so that you don't miss a beat but don't forget, each of us will be giving away an Amazing Paper Grace die pulled from the comments left on each of the Amazing Paper Grace Creative Team blogs - details at the bottom of my post.   We thought it would be awesome to introduce the dies along with samples to show what you can make.  So, without further ado let me talk about the two dies I get to introduce:

First up is Spellbinders S6-125 Venise Lace - Victoriana Crest by Becca Feeken of Amazing Paper Grace in the Venise Lace Collection.


    For my project I really wanted to show this die off so i created a shaped card.  To make it i had to create a base so i did that in navy and white for the inside back and i attached them at the top. Then i cut/embossed the front in silver and glued it to the front of the card and I also cut the oval floral piece and the outside ring and glued them on a white base.  I stamped it in navy to make it match the ribbons i used and added a few pearls and rhinestones to really make it vintage looking.  


     I loved that this die set has so many pieces that you can mix and match to make other styles of cards. It is filled with amazing details from the outside grand victorian base piece to the tiny little tag that fits in the center and I am sure that you will love to create something with this one too.


The second up is Spellbinders S4-790 Venise Lace - Bella Clair Border by Becca Feeken of Amazing Paper Grace in the Venise Lace Collection.


     For my project I wanted to try and create a border for one of the clear acetate boxes that i love to do for gift cards and mini card sets.  It was super easy and all i did was die cut the die on a measured piece of paper on both the top and bottom and this is how it came out. There is a piece for both the front and the back and i overlapped them on the sides and glued them.  Then  I tied a pink ribbon around the center to bring out the colors in the paper i used to wrap the box and then added an extra bow in ivory and gold to compliment the whole thing.  I also found this pretty adhesive bling piece in my stash so i used that to finish off my bow.  For the inside i am going to make a card to give a gift card so be sure and check my blog for another post to see what i did.


     I loved this die because i can think of a million things to decorate with this border.  I make lots of boxes and bags and other little gifty things so this would be perfect to add with a few flowers and ribbon to make very special things for my friends. 


And i also have another quick card to share that i did with just the centers of the Victoriana Crest die.  Here in the states we will be celebrating our 4th of July so i made up a quick card to send out in red, white and blue.  I kept it really simple and added just a bit of silver in the center.


Availability:
These dies have just arrived and are indeed available.  For a peek at the whole collection head over to Becca Feeken's Blog.

Prizes:
In the meantime, be sure you leave a comment on this post for a chance to win an Amazing Paper Grace Die from the Vintage Elegance Collection.
There are five dies that are being given away. One name will be randomly picked from comments left on each of our five blogs on the APG Creative Team May Blog Hop post between June 13 and June 16, 2017 at midnight US CST and our international friends can participate!  The randomly selected names will be announced on the Amazing Paper Grace Blog on June 17th.

Up for grabs is an Amazing Paper Grace die of your choice from the Vintage Elegance Collection; there will be a total of five dies and a winner can win once among all five blogs.   If your name is selected, simply claim it within 2 weeks of announcement by sending your address through the form under the Contact Tab on the Amazing Paper Grace Blog.  The dies will be mailed out by me, once I’ve received your winning info and choice.

More Eye Candy:
Visit Melissa  - keepsakesbymelissa.blogspot.com  to see her take on Emmeline Treillage and Franchesa Label.
Visit Kristi  - kristispapercreations.blogspot.com to see her take on Isabella Frame and Isadora Trinkets
Visit Teresa - victorianpaperqueen.blogspot.com to see her take on Victoriana Crest and Bella Claire Border
Visit Joanna - joannakrog.blogspot.com to see her take on Cinch and Go Flowers II and Hemstitch Rectangles
Visit Anita - craftingforever-anita.blogspot.com to see her take on Marchine Plume and Cinch and Go Flowers II
Visit Becca -  amazingpapergrace.com/blog to see her take on Gossamer Knot Ensemble & Mini Card/Booklet Gift Box

Thanks so much for joining us for Introducing Venise Lace!
And be sure to leave a comment - tell us, which die is tugging at your heart?

Friday, June 9, 2017

Congratulations Graduate

Hi everyone and welcome to my blog today.  I have another share using Becca Feeken's new Vintage Elegance dies and this time i used some gorgeous papers from my stash to create a Graduation gift card for a co worker.  I actually used 2 dies to over lap for this one so read on to see how i did it.


Sometimes when i make something the inspiration comes from the paper that i use.  I had this really pretty printed piece of black and silver foil paper so i thought i would see if i could create something special with it.  So i used it for the back round and added a silver piece of foil paper to cut both the 
Amazing Paper Grace Vintage Elegance Curled Grace Oval and the Amazing Paper Grace Vintage Elegance Giving Occasions Stamp and Die Set.  Both of these die sets are gorgeous and there is so many fun things you can do with them on their own but it was fun to combine them.  The best part was it was really quick to make... the dies really make cardmaking easy!


Here is a view of the card closeup to see how the two dies interlock.  The stamp set is wonderful too in that you get so many different sentiments in the set.  Be sure and check out the links above on the dies so you can see all of them and maybe order a few to make up your special cards that you need this summer.  It's going to be a fun and crafty one for sure!!

Have a wonderful and blessed day!  Teresa

LinkWithin

Related Posts Plugin for WordPress, Blogger...