Showing posts with label Blog hop. Show all posts

Wednesday, December 11, 2019

December Die of the Month Blog Hop


Every now and again you need easy, right?  We've become a huge fans of slip-in cards.  They are cards that are cut partially inlaid so that you can simply slip a decorative panel into place and you're done.  This months Die of the Month is called Rose & Filigree Duo Slip in Card.

Your panel can be decorative, textured or simply a sentiment.  The partial inlay can be positioned just where you want it on your card from one side to another or midway.  It can even be used to make a gatefold card or an actual belly band.


You are all going to love using this die to make cards and fun things to send and give to your friends.  The dies are so delicate and you can use them so many ways and i so love that part of this set.  I used both of the decorative pieces on my card... one for the base and the other as a belly band to go over the center of it.  So easy and yet so pretty!

Here are the pieces of the die set above.  You get the slip in base and 2 decorative pieces that both have the backround pieces for them to use as a shadow or as belly bands.  The ends of them don't cut completely so they are fun to just cut out and wrap around something like what i did for my next project.

My Second Project for Today is:


For my second project i used the dies to cover a pre-made box that i had in my stash.  I thought this would be a perfect gift for Valentines or even a Mother's Day brunch to give a gift in for all your favorite moms and grandmothers. I just used both of the decorative pieces... one for around the base and the other to add more detail to the top of my box.... Again-- this was really easy to do too.


Supply List:  
Stamps: Penny Black
Paper: Bazzill Basics cardstock
Ink: Versafine Ink in Black
Accessories: Flowers, Ribbons, Adhesive

If you want to find out more about the Club - prices, how you sign up and what's included, please look --------; HERE.

If you missed the introduction and want to know more about what inspired the Die of the Month Club, look -------;HERE.

More inspiration is just a click away.  Stop by with each Creative Team Member to see how they manipulated this die to come up with a unique project for you to try!

Visit Kate        - craft2owls.blogspot.com
Visit Joanna   – joannakrog.blogspot.com
Visit Teresa   –  victorianpaperqueen.blogspot.com
Visit Ewelina -  elinaart.blogspot.co.uk
Visit Judy       – judyhayesdesign.blogspot.com
Visit Becca     – amazingpapergrace.com/blog


We can’t wait to see what you make with these exclusive dies – be sure to post your creation on the Amazing Paper Grace Die of the Month page -------; HERE or on Instagram using the hashtag #AmazingPaperGraceClubKit
                            

Tuesday, November 5, 2019

November Die of the Month Blog Hop


Christmas is on the horizon and of course, as makers, made Christmas Cards are our hallmark during the holidays.  This month's APG Die of the Month is Winters Solstice Snowflake.  It is a delicate doily looking snowflake done in a regal way to usher in the Holiday Season.

The Snowflake was designed by Becca but if you know her well, as a budget crafter, she intends for you to use the design year-round.  Her holiday offerings always can be dressed up for Holidays and dressed down for any other occasion and the same is true with Winters Solstice Snowflake.  


Our new die for the month of November is truly exceptional and as you can see above and will be able to see as you hop through all of our blogs.  There are so many gorgeous pieces that you can use in a lot of different ways.  Always think about separating them for other crafty endeavors or mixing them with your other APG dies too.  

My Project Today is a Winter Snowflake Calendar for your desk:


If you work in an office of any kind --a wonderful gift to get or give would be a pretty calendar to brighten up your desk for the season.  You will need a small calendar and 2 pieces of the largest piece of the die for the top and bottom for this project.  I did the top piece really fancy and kept the bottom simple since i have to add the calendar to it.  Be sure and add a piece of chipboard or thicker layer of cardstock to reinforce your piece to last.  And for the back create an easel with chipboard to help it stand up.  These would be really fun to make for each of the holidays too and just change the paper and theme.

My Second Project is a Vintage Thank you card:


And like i mentioned above-- just use one piece of the set to create an accent for a card or a box.  I only used the center piece for my card and created a little border to go across the center and then i wrapped it with peach silk ribbon to match and a few flowers and a sentiment.  The beautiful papers are from Graphic 45 and the simple cottage prints make the border look so pretty and vintage looking.


Supply List:
 
Paper: Graphic 45,
Ink: Tsukineko Vintage Sepia
Accessories: Silk Ribbon, small 2020 calendar, adhesives by Scrapbook.com, rhinestones

If you want to find out more about the Club - prices, how you sign up and what's included, please look -------; HERE.

If you missed the introduction and want to know more about what inspired the Die of the Month Club, look -------;HERE.

More inspiration is just a click away.  Stop by with each Creative Team Member to see how they manipulated this die to come up with a unique project for you to try!

Visit Kate        - craft2owls.blogspot.com
Visit Joanna   – joannakrog.blogspot.com
Visit Teresa   –  victorianpaperqueen.blogspot.com
Visit Ewelina -  elinaart.blogspot.co.uk
Visit Melissa  – keepsakesbymelissa.blogspot.com 
Visit Judy       – judyhayesdesign.blogspot.com
Visit Becca     – amazingpapergrace.com/blog

We can’t wait to see what you make with these exclusive dies – be sure to post your creation on the Amazing Paper Grace Die of the Month page -----; HERE or on Instagram using the hashtag #AmazingPaperGraceClubKit


Thursday, September 12, 2019

Introducing Candlewick Sampler /Giveaway


If you're a "Gracelet" or by chance happened by the Amazing Paper Grace website over time, you have no doubt wondered how Becca comes up with her names and inspiration.  Today, we're excited to give a little peek into a new collection and the inspiration.  Join us as we share lovely creations made using Candlewick Sampler

Since the age of 12 Becca has loved fiber - she quilts, knits, crochets, does cross stitch and before becoming a Licensed Die Designer sewed most of her own clothes. Fascinated with intricate textures and the look of laces, fabrics, and embroidery, Becca tried to replicate the look and feel of those textures in dies.  Candlewicking has such a distinct look and Becca thrilled at the prospect of getting that look and feel into a die.  If you've loved her lace look collections or that elegant look of Hemstitch, you'll love Candlewick Sampler. 

The Inspiration Behind Candlewick Sampler
Candlewicking is a type of whitework embroidery normally done on cream or white fabric embellished with cream or white french knots.  The series of french knots create the outlines of the pattern giving it a unique look while adding a touch of elegance.  In these dies, you can see rounded motifs that hint at the texture of dots.  Without overpowering, it's a sweet little detail present on all the dies in the collection.  Plus, it just happens to be the perfect spot to place a pearl.  Google candlewicking and you'll see exactly what we mean.
  
My Projects For Today
I'm introducing  "Candlewick Grand Pocket"
Here is what the plate actually looks like. 


For my project today I made an invitation.  I love to throw parties and do wedding invitations so this was the perfect die to make a pretty pocket with and add a simple but vintage invite on vellum.  I cut 2 corners with matted silver paper and overlapped them at the bottom.  Then i layered the silver and blue papers under it and tied it with a matching  grey satin bow.  I would be so excited to get this invitation and I am sure it would be a party to remember and get me intrigued to come all the more.


Availability:
These plates are available right now on the Spellbinders website —; HERE

Prizes: 
In the meantime, be sure you leave a comment on this post and every Creative Team Members for a chance to win an Amazing Paper Grace Die from any previous collection from Becca's Die of the Month offerings.

There are two dies that are being given away.  One name will be randomly picked from comments left on the combination of our blogs on the Introducing Candlewick Sampler post between September 12 and September 17, 2019, at midnight US Central Time.  We encourage all of our international friends to participate!  The randomly selected names will be announced on the Amazing Paper Grace Blog on August 19th.  (All giveaways for this hop are managed by and the responsibility of Amazing Paper Grace).

Up for grabs is an Amazing Paper Grace die of your choice Becca's Die of the Month.  These dies are typically only available to club members however you can win your choice of any die that has not already sold out.

There will be a total of two dies and a winner can win once among all the blogs.  If your name is selected, simply claim it within 2 weeks of the announcement by sending your address through the form under the Contact Tab on the Amazing Paper Grace Blog.  There won’t be a reply back but if you leave your choice, we’ll get it, I promise.    The dies will be mailed out from Amazing Paper Grace.  (Please note:  Please be patient, your dies will come, we promise!)

Visit Joanna   – joannakrog.blogspot.comVisit Teresa   –  victorianpaperqueen.blogspot.comVisit Kate      -  craft2owls.blogspot.comVisit Melissa  – keepsakesbymelissa.blogspot.comVisit Judy       - judyhayesdesign.blogspot.comVisit Ewelina -  elinaart.blogspot.comVisit Becca    – amazingpapergrace.com/blog

We're honored to have a Guest Designer creating with us this month so as soon as you're done with the hop, pop over to leave a comment on Sheri Holts Blog for a chance to win - we'll pull from comments on her most recent APG post too.  Her newest Amazing Paper Grace creation is --------HERE

Thanks so much for joining us for the Introducing Candlewick Sampler.  Leave a comment to let us know which die is your favorite.  Are there any hobbyist in the house that enjoy needlecrafts or sewing?  We'd love to know which ones are your passion!!   There is much more inspiration in store for you today and for the weeks to come.

Supplies:

Paper:  Hobby Lobby
Adhesive: Scrapbook Adhesives by 3L
Rhinestone jewel: Ruby Rocket 

Thursday, September 5, 2019

Amazing Paper Grace September Die of the Month Blog Hop


Another month has come and gone and this month for September all of us on our APG team have been marveling at all the ways you can use this amazing new die set for the September Die of the Month called "Snip It Flowers".

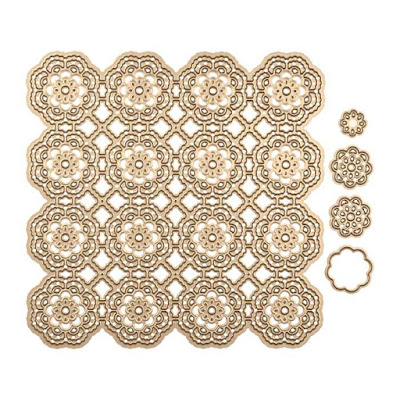
At first glance, it looks like a background die; but it is anything but a background die.  It was designed so that each of the flowers can be snipped out to create a panel, frame or element.  Whether you want the 4 x 4 frame, the 3 x 4 frame, a one layer border, a two-layer border or a corner, all you have to do is "snip".  Each one of us has taken the die and spun it into a creation - we hope to inspire you as you hop through all of our blogs today !!


This was another really fun die to use so for my first project i used the whole die and cut it in muted gold paper to put on a vintage back round papers with black to make it pop.  It was really simple to make and the rhinestones really added an elegant feel to it.  You are going to love trying some of those gorgeous papers in your stash with this die..... you really have so many options with it.  You could craft all day long .....


Here is the die as you will get it in the set and it also comes with those tiny flowers on the sides so that you can layer the pieces if you should decide to cut them up.
How fun will that be to do?

  To download the flyer showing 12 different configurations of Snip-it Flowers, click HERE.  

My 2nd Project Today:

My second project is a pizza styled gift box that i created using just 9 of the pieces to make a square.  I cut and embossed this piece and then layered the other elements around it and added a pretty bow and flower.  This was super fun and easy and i even had extra paper to create this tiny gift card to go with it.  This only has 4 of the flowers and measures 3x3.  There is so many ways you can snip this and make gorgeous cards and other things... you are going to love having this die in your collection.  I think it's one of my favorites so far!


And here is just a closeup so that you can see the gift card better.  I just love this!

Supply List:
Stamps: Penny Black
Paper: Bazzill papers from Hobby Lobby
Ink: Versafine ink in onyx black
Accessories: Ribbon and rhinestones from Ruby Rocket

If you want to find out more about the Club - prices, how you sign up and what's included, please look ------; HERE.
If you missed the introduction and want to know more about what inspired the Die of the Month Club, look -----;HERE.

More inspiration is just a click away.  Stop by with each Creative Team Member to see how they manipulated this die to come up with a unique project for you to try!

Visit Kate        - craft2owls.blogspot.com
Visit Joanna   – joannakrog.blogspot.com
Visit Teresa   –  victorianpaperqueen.blogspot.com
Visit Ewelina -  elinaart.blogspot.co.uk
Visit Melissa  – keepsakesbymelissa.blogspot.com 
Visit Judy       – judyhayesdesign.blogspot.com
Visit Becca     – amazingpapergrace.com/blog


Monday, August 12, 2019

Introducing 3D Holiday Vignettes Blog Hop and Glimmer


Way back when 3D Vignettes were introduced, messages started to come in by crafters begging for the same thing, but for Christmas. You also asked that we keep supplying new inserts. Well, your wish is our command! Introducing 3D Holiday Vignettes plus new Glimmer Designs. If you are not familiar with these popular dies, stay tuned - lots of information follows.

Hi there, today we are sharing with you a great new collection by Becca Feeken of Amazing Paper Grace with a blog hop featuring new Vignettes for the holidays and the new Holiday Glimmer Designs will blow your socks off.  So.....

What's a 3D Vignette?
A 3D Vignette is a dimensional card that folds down flat.  It has a front layer, a back layer and several in between layers that are held stable by slotted side pieces.  These layers allow you to build depth into a diorama or tunnel type card.   We take all of the guesswork out of the equation by giving you mix and match layers, including sentiments to stack into a Vignette.   So far, we've released 3D Vignettes and Shadowbox Vignettes.

What's more, you can use your own supplies to fill them up as well.  The bonus is that each of these layers also works for your other types of cards you make.  A budget crafter from day one, Becca keeps the "mix and match" sensibility alive in Holiday Vignettes so that you get a lot of bang for your buck.  What does that mean?

1.  These vignettes are interchangeable with your other vignettes.
2.  Holiday Designs can be used for non-holiday designs after the season.
3.  You can use these elements to make flat, stand-alone cards too.

About 3D Holiday Vignettes
Layered Die sets were introduced with 3D Vignettes and people quickly realized you could use individual elements in flat cards or you could use them layered together in a diorama.  Shadowbox Vignettes continued the tradition and as you might guess, these new layering sets can be used in both Shadowbox Vignettes and 3D Vignettes.

3D Holiday features three new facades (each including a sentiment) using the same shapes that came in the original 3D Vignettes - Round (snow globe), Arch, and Cabinet.

In addition, there is a new layering set for each - a round set, an arch set and a set to fit the new cabinet.  Join us as we give you a full-on look at all of the new sets.

First up is Spellbinders Glimmer-Merry Filigree Quatrefoil

My Projects For Today:
My project for today is using one of the brand new plates from the Holiday Glimmer Collection called Merry Filigree Quatrefoil.  I really wanted to make this christmas card for this year with traditional colors so i found some yummy new papers from Kaisercraft and added a subtle gold paper to match the gold glimmer i used for my new plates.   Since this plate has 3 separate pieces i could add the gold glimmer to the red paper for a base and then cut the other piece from red with the sentiment and pop it up.  I carefully trimmed around my glimmer to give it a nice shape and  make it fit on all the layers under it.

And i wanted to make it just a little bit more like a country christmas card so i also added a layer of kraft under my glimmer piece using one of my favorite dies from the shadowbox collection.  Then a layer of trees and gold followed by wood and gold and then finally more kraft to finish it.  I was really happy how all of these tones and textures melted together so well.  


And the flowers are already made but you can do them with your poinsettia die from our Christmas collection from last summer.  I also found some pretty gold ribbons and those cute little pinecones from Hobby Lobby.  It add the perfect touches to finish off my card.  


As you can see up above this is a really gorgeous plate that can really add so much to a project or maybe like my box below can add just that little touch of detail in just the right shade of foil to make your project look that much more special.  And of course be sure and get out all those other Becca Feeken Christmas dies so you can mix a few of those into it too.  Can you see the shadowbox and
snowflake dies on this one?


Availability:
These plates are available right now on the Spellbinders website —–; HERE

And this month is really special because we have two guest designers joining us for the hop!  Click on the links to each member to be inspired across a broad range of talent:

Visit Joanna   – joannakrog.blogspot.com
Visit Teresa   –  victorianpaperqueen.blogspot.com
Visit Kate       - craft2owls.blogspot.com
Visit Melissa  – keepsakesbymelissa.blogspot.com
Visit Judy       - judyhayesdesign.blogspot.com
Visit Ewelina -  elinaart.blogspot.com
Visit Karan     - karangerber.blogspot.com
Visit Ginny     - pollyspaper.wordpress.com
Visit Becca    – amazingpapergrace.com/blog

Prizes:
In the meantime, be sure you leave a comment on this post and every Creative Team Members and each Guest Designers post for a chance to win an Amazing Paper Grace Die from any previous collection from Becca's Die of the Month offerings.

There are four dies that are being given away.  One name will be randomly picked from comments left on the combination of our eight blogs on the Introducing 3D Holiday Vignettes post between August 12 and August 18, 2018, at midnight US Central Time.  We encourage all of our international friends to participate!  The randomly selected names will be announced on the Amazing Paper Grace Blog on August 19th.  (All giveaways for this hop are managed by and the responsibility of Amazing Paper Grace).

Up for grabs is an Amazing Paper Grace die of your choice Becca's Die of the Month.  These dies are typically only available to club members however you can win your choice of any die that has not already sold out.

There will be a total of four dies and a winner can win once among all the blogs.  If your name is selected, simply claim it within 2 weeks of the announcement by sending your address through the form under the Contact Tab on the Amazing Paper Grace Blog.  There won’t be a reply back but if you leave your choice, we’ll get it, I promise.    The dies will be mailed out from Amazing Paper Grace.  (Please note:  Please be patient, your dies will come, we promise!)


Thanks so much for joining us for the Introducing 3D Holiday Vignettes Blog Hop.   Leave a comment to let us know your favorite is it the new dies or the glimmer?  There is much more inspiration in store today and for the weeks to come.

LinkWithin

Related Posts Plugin for WordPress, Blogger...