Showing posts with label Bazzill Basics. Show all posts

Thursday, October 3, 2019

Just a simple Thank you


It's been really fun this month showing you all the new dies that Becca created for her brand new Candlewick Collection.  Each of them has amazing details and this newest die is no exception.  The die i used to create my card  today with is called "Candlewick Canopy".  For me this die can be used to frame sentiments or be cut up and used as both a top or bottom on say an oval die. 

For my card I am sharing,  i mixed this new die with one of the older Shadowbox ovals called "Lisette Oval Shadowbox die".  This started me with a pretty base to add my new die on top of.  I cut and embossed it 2x to make it thicker and stand out really nicely.  The base is a printed vellum with tiny flowers in ivory and on top of that i added a simple border of peachy pink and ivory to match.  The simple base of the card makes the details in the die stand out that much more and it needs only a simple sentiment and a flower to finish it.


 I love this die so much and you could use the smaller piece to shadow underneath the top or bottom or even add it to the sides.  It's so pretty and delicate and it cuts so good!.


Be sure and stop by on our blog hop this Sat to show the newest Die of the Month and also you can see designs from our newest Guest Designer Rajni Chalwla.  She is sharing lots of gorgeous projects on Becca's blog this week so be sure and stop over for a peek if you get the chance!


Thank you for stopping by to see what's new...
Teresa

Supplies

Spellbinders:

Shapeabilities Lisette Oval Shadowbox Frame Etched Dies Shadowbox by Beeca Feeken


Paper: Bazzill Basics Paper - Vellum
Adhesive: Scrapbook Adhesives by 3L
Ink: Tsukineko Versafine Onyx Black Ink

Saturday, August 31, 2019

Away in the Manger card


Hello and thank you so very much for stopping by today.  With our new release out of Christmas dies from Becca Feeken and Spellbinders last week i have had so much fun to putting together new cards for the holidays this year.   Each of the dies that she designed in the set can be used for flat cards or these amazing 3D cards that we showed you on the hop last week.  The choice is up to you on how to use all of the pieces and there really is so much that you can do with them.  

My card today is using the 2 die sets that you see below.  I  found some blue snowflake paper that looked like stars so that is where i started and then chose colors to compliment it.  I used a really dark navy, silver and white to cut out all the pieces and then layered them simply on the front of the card.  Pop dots help make all the pieces show up really great and a few rhinestones helped give it that holiday glow and sparkle i wanted.


You all know that my favorite part of these dies is that fact that you can use them separate too.  I made my card flat so i just used the outside edge and then added the star from the nativity set and the Away in the Manger piece.  I was really happy with how it came out and it was super easy to make.


Here is my closeup to see all the gorgeous detailing in the die set.  I love that all the dies compliment each other so well and make such beautiful cards when put together.  I hope that you get a chance to order a few from Becca's new line of 3D dies.  You will not be disappointed and you can have them ready if you start now to pop in the mail in December.  

And our Guest Designer Ginny Nemchak has her last post on Becca's blog and hers so be sure and stop over to see all the inspiration that she shared this month.  She did such an amazing job!!


Thank you for stopping and be sure and stop back for more ideas with these all month.

Hugs and Smiles....Teresa

Supplies List:

Spellbinders

Shapeabilities Grand Christmas Lattice Arch Etched Dies 3D Holiday Vignettes Collection by Becca Feeken


Paper by Bazzill found at Hobby Lobby and online at Scrapbook.com

Monday, October 5, 2015

Craft Hoarders Blog Hop for October

It's time again for the Craft Hoarders to share lots of projects with an anything goes theme
this month.  Each of us has created something special from all those crafty things we
have in our stashes to give you a little inspiration to create something for yourself.
Today i have a really fun project i made for me.  It's a Starbucks recipe book
with cards from all my friends and their favorite drinks and goodies they like to eat.
I have gone in so many times and listened to their orders but i can't remember
a single one... so an idea was born.


I used the Barista paper line from Basic Grey and it was perfect for this project.
The stickers had fun little coffee images and i filled the other in with some
letter stickers from Ruby Rock-it and bits of their Wood Veneers
with words on them.  So over the moon excited about this!!


Each of the pages is different and has places to slide the recipe cards in for
the coffee and tea ideas and some yummy goodies to bake to go with them.


The tiny letters were some of my favorite things to use and are from
Ruby Rock-it.  They have lots of sizes in each pack and are the perfect
size to use for cards and other fun things like this book.


 My Supply List is:
Pine Cone Press Calendar, Basic Grey Barista 6x6 pad and stickers, brads; Ruby Rock-it
Alpha Stickers and Wood Veneers; Scrapbook Adhesives 3D Foam Squares and E-Z Dots
permanent tape; Really Reasonable Ribbons seam binding and twine; scissors, paper
trimmer and other little goodies i found tucked away :)

So if you are here and haven't started the hop you are going to go back to Gloria's
blog and then hop along with the other's list below.  Have fun and enjoy...

Gloria Stengel 
Vicki Robertson
Debbie Seyer
Ginny Nemchak 
Pam Bray
Jacquie Southas
Glenda Brooks
Amber Milone
Tracey Sabella
Donna Idlet
Bonnie Garby
Nancy Dynes
Wendi Robinson
Teresa Horner
Barbara Rankin
Marisa Job
Christy Houser


                                                     Thanks so much for stopping by today...

Sunday, June 24, 2012

Sneak Peek-Spellbinders Summer Spectacular Day 5

Welcome everyone to your first stop on day 5 of our Spellbinders™ 
Summer BlogFrenzy 2012. I hope you are as excited as I am 
about all the new dies coming out for Summer CHA 2012!!  
There are so many new and amazing styles of dies and 
embossing folders that you will be able to choose from and-- 
we still have 3 more days of fantastic projects and videos to go.....
so let's get started!!

All my projects today are featuring our 
New Puzzle Effect Cut Fold Tuck Die.  
These fun and unique dies can be used in lots of different
ways and you can use one or all the parts to create beautiful
works of art for your friends and family.


S5-139 Puzzle Effect
MSRP US$29.99
Approximate Die Templates Sizes:
Weaving Strip: 1 7/8 x 1/8”
1: 1 ¼ x 1 ½”
2: 1 7/8”
3: 3 7/8” (emboss area)
4: 4”

Supply List:
*Spellbinders Cut Fold Tuck Puzzle Effect S5-139 

Cross Promotional Partners
*Bo Bunny/ Liberty and Dot
*Scrapbook Adhesives/ Foam Squares and EZ Runner
*Elmers Glue Spots
*Bazzill Basics Cardstock/ Red, White, Light Pink and Lavender 
* Sparkle and Sprinkle/ Dimensional Glue and Gold Glitter

Other Products
Ribbons, Pebbles and Authentique papers, Fresh Scents potpourri, 
featherweight iron on pellon, wooden skewers and straight pins.

My first set of projects is my 4th of July party decorations. My favorite 
part of Spellbinders dies is their unique styles and their versatility. Just by 
changing the parts of the dies, the papers and how you mix them-- you can 
create completely different designs as you will see in my first project 
compared to my second.  I had so much fun thinking of different things I
could make to decorate for a party and you could even make a banner to 
go with all of this for your party too!


The project I will be highlighting is my gift card/ invitation for the party. 
For this you will need white and red card stock, blue star print, red double 
dot from Bo Bunny, and a tiny dark blue print. You will also need ribbons, 
double sided adhesive and gold glitter and Dimensional Glue from 
Sparkle and Sprinkle.


Are you ready?

First you are going to cut the white card stock 4" x 11" and score
in the center and fold in half. Cut the top right and left sides 
to look like a tag and add a silver eyelet with a small circle 
in the center on the front about ½" from the top.

Now you are going to cut and emboss the large die
with the Cut Fold Tuck pieces in Red and one of the outside 
star in just the solid form in white cardstock using your Spellbinders™
 Grand Calibur®. You will also need to cut and emboss
the small Cut Fold Tuck Puzzle Effect piece in both the white
 cardstock and the blue star print.  If you find it hard to get your dies 
out you might use a bit of wax paper between the die and the paper 
and cut and emboss like always. This will make it so easy 
for the pieces to pop out from the die with little or no effort. 


After you have cut all your pieces of the dies in the solids 
and patterns you can start assembling them. Gently fold all the 
cut pieces in the opposite direction and tuck them under the open sides.


All of the tiny pieces in the dies can be folded over and
 slipped under the opposite open space or you can leave them flat 
or push them up if you like… You can also use a bone folder 
on the back to make sure that your project is flat and smooth. 
Glue the pieces on top of one another and add tiny foam
dots between the large and small layers to make the colors stand out.

For the front of the card you will cut a piece of red dot 4x 3 ⅜", 
blue starprint 4 x 2 ⅞",  and white print 4 x 2". Layer these on each 
other ½" from the bottom of the front of the card. Now you can add 
your star firework from the Puzzle Effect Cut Fold Tuck Die 
you made and add glitter as desired.  Tie a ribbon and glue to the top
 or put through the eyelet and tie.  Add the invitation words inside 
and you are all done....


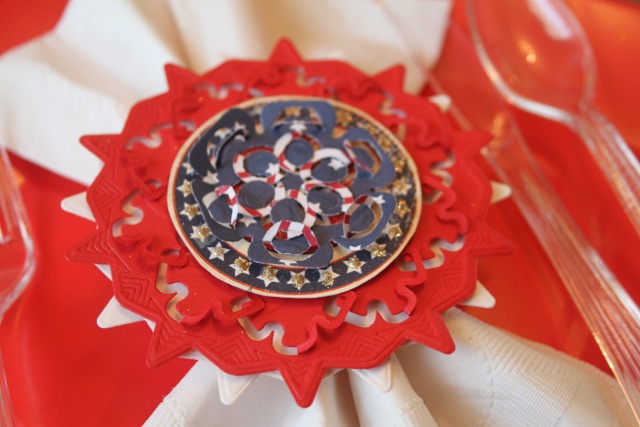
I also created a napkin ring holder, cupcake pick and a cute 
little table decoration that you can put on your table to make 
your celebration that much more festive! You can add Spellbinders Stars, 
and other dies to make the pieces more elaborate and maybe printed pieces
from the papers like this Bo Bunny print shown below.
I also added glitter to make it more shiny.


The Sneak Peek: Spellbinders™ Summer Spectacular! Begins on
 June 21st and will end on June 28th, 2012. It consists of 24 
individual prizes and one grand prize drawing. Enter the 
Sneak Peek: Spellbinders™ Summer Spectacular 
by visiting the participating blogs each day.

At the end of each blog post, click on the "Enter HERE" to open the 
entry form. You may only enter once from each blog each day.

Spellbinders™ will randomly draw one winner from each participating
 blog to receive that blog’s newly revealed dies. The Grand Prize Winner 
will be randomly drawn from the pool of entrants who sent entry forms 
from each and every participating blog during the 48 hours each
blog was open. For the full list of official rules please click RULES.


“This contest is now closed.”


I hope you loved the projects I created to inspire you
 with the New Spellbinders™ Cut Fold Tuck Puzzle Effect die
and hope that you are filled with amazing ideas 
from the other talented designers on the hop so far…. 

You have 2 more designers today for lots more sneak peeks and
lots more inspiration so be sure and hop on over to their blogs 
and be sure and register to win lots of wonderful prizes!!

Your next stop is…


and then on to Donna Salazar's Blog

If you just started today be sure and go back on the blog
for the original list and see what all the other amazing 
designers created out of their beautiful dies...

Have a wonderful day and don't forget to
leave me a comment too!  Love to hear from all of you :)


LinkWithin

Related Posts Plugin for WordPress, Blogger...