Showing posts with label Penny Black Stamps. Show all posts

Thursday, February 20, 2020

Bible Verse Mini Book


Good Morning and Happy Thursday to you all.  Thank you for stopping by to see my newest share with Becca Feeken's newest mini book dies.  By now i hope you had the chance to pick up a few of them and now you can hop with our team each week for inspiration to use them.

This week i made a tiny little book that only measures 41/2 x 41/2.   Sometimes it can be fun and quick to use a pre-made chipboard book and fill it with lots of the die cut goodies.  For this book i used Candlewick Squares to start the base of the front and layered other dies and fussy cut pieces of the designer paper to create the front of it.  This was alot of fun to do and i loved the paper and dies together. 


This is the corner die that i am focusing on this week.  I decided to use it for a pocket and add small pieces of a diecut stamped with Verses from a Penny Black set that i had. But if you want to make it more personal you can copy out your favorite verses and print them out and then add them in each page to read when you need it most.  I had a favorite book that i used to read alot and that is where i got this idea only mine is a bit more fancy.


Shapeabilities Woven Trellis Corners and Border Etched Dies 


This is just a view from above to see all the pretty layers of the dies and the papers.


And here is a picture of one of the pages.  The die cuts make such a beautiful addition to each of the pages.  You could also add another one on a corner on a decorative piece to add and make it totally different kind of pocket. (For the verses i used just the die cut base of the Thankful Blessed die set).   I really love this one and hope that you do too.

    Have a wonderful weekend and i hope you all do something fun!

Teresa

Supplies:

Shapeabilities Woven Trellis Corners and Border Etched Dies 3D Vignette Mini Album Collection by Becca Feeken


Papers:  Mintay by Karola (Available at FrankGarciastudio.com) to order online

Adhesive: Scotch Quick Dry Adhesive

Mini Book: Frank Garcia by Prima


Wednesday, June 26, 2019

Enjoy every Moment Card


Today i have a post to share with you using Becca Feeken's newest glimmer foil plate called "Petite Looking Glass".  This plate is from the brand new Royal Flourish Collection that was just released.  I wanted to see how it would mix with one of the Vintage Treasures dies and i think it added the perfect touch to it.   Just a bit of glimmer to make it sparkle....


To make the glimmer plate piece stand out more i actually cut out the Vintage Treasures Nobel Chatelaine die into the top piece of ivory paper and then used my Glimmer Machine to add the foil to the Looking Glass Plate and then i fussy cut it out.  I tucked that glimmer piece under the Hemstitch oval and added the smaller pieces of the die in ivory to the sides.  Adding 3D foam dots will give it more depth and show off all those pretty pieces more.


I even went and added a few corners from another of Becca's dies in ivory just to give it more of a lacy feel to match the inner die cut.  It was a really fun card to experiment with these new glimmer plates.  There is so many ways to use them.... wait until you see my card for Sunday :)

Have a wonderful day..... Teresa


Spellbinders:

Petite Looking Glass Frame Glimmer Hot Foil Plate Royal Flourish by Becca Feeken


Stamp: Penny Black
Ink: Tsukineko
Ribbon:  Really Reasonable Ribbon.com

Saturday, May 4, 2019

Two Small words of Thank you


I hope that all of you stopping by today had a really good week... here in California the weather is great and all the flowers are blooming everywhere, especially my roses.  All the water really made them gorgeous this year so making cards with lots of flowers and vintage dies is truly my inspiration.

Today i have a card that i made with the new "Antiquities Square from Becca Feeken"  This is one of my favorite dies from the new collection just released and as you can see by the one i did below with the gold that this die set can be very versatile.  Gold is always amazing but add an embossed base that you can do yourself and a bit of pink and it changes the whole thing.  I just love pink and white :)

What i love about this die set is that you can add so many other dies in your stash over this huge square base.  You can do hemstitch ovals or any of the other fancier circles to add a sentiment to it.  And how fun to make tags from just that center piece that you get.  It's so gorgeous!!


Here is a closeup so that you can see the details from the embossed part of the die.  I cut up some of the pieces from the center and added them under my sentiment piece and of course pearls scattered around.  The sentiment is from a new Penny Black sentiment set i just got.  It's the perfect size and the perfect words for this card.

And as to making it I just did simple layers on the base to balance out the pink square die over the top of all of it and then added the white for the sentiment to balance out the embossed white in the back.  And the bow is a simple double bow with a cute pink pearl brad in the center.  I really love this one.

Thank you for stopping over and hope to see you back again soon.  We are having a blog hop for our new Die of the Month inspiration next Sunday... be sure and stop over to see all the amazing projects.

Hugs and Smiles....Teresa

Supplies:

Spellbinders dies: 
Shapeabilities Antiquities Square Etched Dies Vintage Treasures by Becca Feeken

Papers:  Bazzill Basics in pink and white
Adhesive:  Scrapbook Adhesives by 3L permanent tape runner and 3D Foam Squares
Ink: Versafine

Saturday, May 19, 2018

A Grateful Heart


Hi everyone... i hope that you had the chance to join us for our hop this week to preview Becca Feekens newest line of die called Romancing the Swirl.  Each of us had the chance to use a few of the new dies to create something special to share with all of you, and wow was it ever fun!  And now we all get to mix and match and create even more inspiration for you.  

My die i chose for this week is called "Card Creator A2 Corner Cotillion Etched die set".  In this set you get this beautiful swirled back round die and the center oval and also some brand new flower dies.  I wanted to do something a little different with this one so i used muted tones of ivory and yellow and then added in some tan card stock to match a bit of print that i used for the base of the card behind the sentiment.  This really popped out the colors.


And then for the sentiment i used a matching brown ink to stamp the beautiful sentiment and inked the inside rim of the die ever so slightly with tea stained ink and a sponge dauber to give it more depth.  All the flowers are handmade so the colors for them matched perfectly with all the other gorgeous pieces in the set.  This is one of my favorites and i have lots more to share in the weeks ahead so be sure and check back soon!

Have a wonderful day .....  Teresa

Supplies:

Papers: Bazzill Basics cardstock and Prima 
Stamp: Penny Black
Ribbon: Really Reasonable Ribbon.com

Monday, January 8, 2018

Just a little love note


Hi and welcome to my blog this wonderful Monday morning.  Today i have a pretty card to share starting off my obsession this month with Valentines cards.  I love all the pretty shades of pink in cardstock you can use and lots of hearts so this is a favorite holiday of mine.  And you don't have to use lots of hearts on the card, sometimes the sentiment will tell the story for you.

For my card today i had fun layering 3 dies in coordinating pinks all from Becca Feeken's new dies and since there wasn't any space on the final die on top to add the sentiment i just stamped it on vellum in black ink and made a band to fit around and over the center.  This way you can still see all the gorgeous details from the dies.  And don't forget to add 3D Foam squares between some of the layers to show off those pretty details in the dies too!!


And to finish my card and to add just a touch more detail i matted it on a rectangle from Hemstitch Ovals and added a few tiny white pearls just enough to make it more feminine.  I really love this card.

Thanks so much for stopping by today...   Teresa

Supplies:


Bazzill Basics cardstock in pink
Scrapbook Adhesives by 3L
Vellum

Tuesday, January 2, 2018

Wishing you Love and Laughter


Happy New and how wonderful it is to be starting a brand new year full of new exciting adventures.  This year i am wishing for good health and happiness in my life and lots of fun filled days with my family and friends.  And.... of course create lots of beautiful things to share with all the fun crafty things i get this year!

Today i am sharing a classic card made with one of my favorite new lacy corner dies from Becca Feeken called "Eliza Lace Corners" Etched die.  You get 2 of the dies in each set so you can emboss or cut the die out to create lots of beautiful projects.  I used just a subtle white paper on taupe for my card and to make the dies stand out just a little bit more i rubbed a white chalk ink pad over those beautiful etched lacy corners to make them pop.  It's subtle but makes all the white look really clean and gorgeous.

The center die is one of my favorite go to dies from Spellbinders called Standard Circles large.  It fit perfectly in the center of my square card and the Penny Black stamp popped nicely in brown ink.

And that's my share for today and don't forget to stop over to Becca's blog today too and all the rest of our team to see what new things they have for you for this brand new year!

Happy, Happy New Year to you all :)
Teresa 

Saturday, October 14, 2017

Introducing the Chantilly Paper Lace Collection Blog Hop


Welcome sweet friends, today we are introducing a new die collection by Becca Feeken for Spellbinders called Chantilly Paper Lace - you can take a quick peek of the entire collection-> HERE.

Have you ever rummaged around in your grandmothers attic, through memories of the past to find sweet letters and cards romantically tucked away for safe keeping while preserving sweet acquaintances and conversations of the past?  Letters adorned with the finest decorations, now tattered and ripened with age, impress what an honor it was to receive these treasures.  Becca reached into the past to restore some of these treasures, preserving the fine detail, the elegance and the pure femininity into modern day romantic die cuts that are at home on any card.  The collection is reminiscent of petticoats, fine lace and adornments and are designed so that each die works with the other.  In fact, the card front dies are designed so that they can be used alone or two can be layered over each other.  Join us as each Creative Team member shares their creations with two dies from the collection.  

We are listing all of the creative team so that you don't miss a beat but don't forget, each of us will be giving away an Amazing Paper Grace die pulled from the comments - one from each blog and hint-hint you'll want to make sure you leave a comment on the Spellbinders Blog too.  The prize details are at the bottom of my post.  So, without further ado let me talk about the dies I get to introduce:


When i saw this collection of dies i was so excited to create lots of vintage styled cards that i so love to do.  For my card i am sharing i used simple but rich colors of fresh crisp linen and kraft and layered the dies to create a sweet and thoughtful Thank you card for a dear friend.  This die has so much incredible detail i had to create a shadow so that you wouldn't miss but a one. 


My favorite part of this die was the ease of how the paper popped out of it with all that amazing detail in it.  This has so many fun parts in the set I can see lots of other layered cards with the rest of the collection in the weeks to come.  It's really gorgeous!!


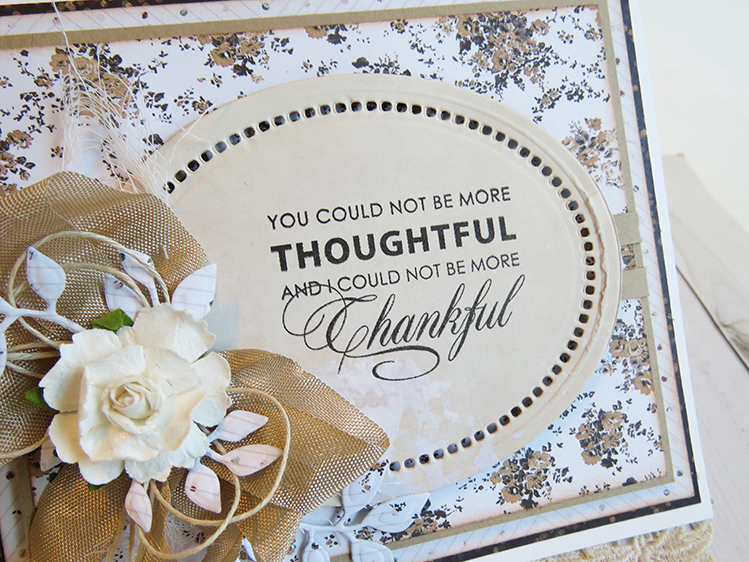
The hemstitch oval is also one of my favorite dies and will surely be in with my go to's for everyday projects.  For this card i only used the largest die and stamped my image and then layered it over a pretty vintage floral paper from Prima.  This card reminds me so much of a country cottage or farmhouse and i really love how this one came out.


With the Hemstitch Oval die you get 3 sizes of ovals in the set and with the hemstitch design you can use or not use it so that is a real plus. Creating beautiful projects will be so easy.  And this would be a wonderful die to pick up to layer on some of the other new dies in the Chantilly Paper Lace Collection.


But wait--- i have one more to share :)


And because it was so easy to use i had time to create another style of card using the same die but using it as a frame to add my Christmas trees and holly that i fussy cut from the paper.  I found these pretty papers in my stash while cleaning and thought how fun to make a pretty holiday card using the set.  I used 2 frames and the hemstitch design and cut this pretty glitter paper from Ruby Rock-it.  It cuts like a dream and i can see lots more projects in my future for this one too.


I just love that pretty hemstitch design in the dies and it gives it such a beautiful detail to my project but not too overwhelming to add other things into the mix.  

And now its time to share about the prizes and where you can get the new dies!


Availability:
These dies have just arrived and are indeed available on the Spellbinders Website ---; HERE

In the meantime, be sure you leave a comment on this post for a chance to win an Amazing Paper Grace Die from the recent Venise Lace Collection.

Prizes:
There are five dies that are being given away and each winner that left their comment on Saturday gets an early bird bonus. One name will be randomly picked from comments left on each of our five blogs on the Introducing Chantilly Paper Lace post between October 14 and October 17, 2017 at midnight US Central Time and our international friends can participate!  The randomly selected names will be announced on the Amazing Paper Grace Blog on October 18th.  (All giveaways for this hop are managed by and the responsibility of Amazing Paper Grace)
Up for grabs is an Amazing Paper Grace die of your choice from the Venise Lace Collection; there will be a total of five dies and a winner can win once among all five blogs.   If your name is selected, simply claim it within 2 weeks of announcement by sending your address through the form under the Contact Tab on the Amazing Paper Grace Blog. The dies will be mailed out from Amazing Paper Grace.

Click the links to get to more sweet samples:
Visit Joanna   - joannakrog.blogspot.com to see her take on Lunette Arched Borders and Lily Pearl Flat Fold Flowers
Visit Teresa   -  victorianpaperqueen.blogspot.com to see her take on Coralene's Chemise and Hemstitch Ovals
Visit Melissa  - keepsakesbymelissa.blogspot.com  to see her take on Tallulah Frill and Breanna's Corset
Visit Kristi      - kristispapercreations.blogspot.com to see her take on Annabelle's Trousseau and Vintage Pierced Banners
Visit Becca     - amazingpapergrace.com/blog Here, showing Bella Rose Lattice along with Hannah Elise
Visit Becca     -  spellbindersblog.com for your first Chantilly Paper Lace Project including step by step photo instruction.

Thanks so much for joining us for Introducing Chantilly Paper Lace!
Leave a comment - tell us, which of these dies would is closest to your heart?


Tuesday, June 6, 2017

Especially for you

It's been a few days and today i get to post another new die from the Vintage Elegance collection that was just released from Spellbinders called Braided Grace Square.  Everyone on our team has created lots of cards using this die set and it's amazing how many ways you can use this.  


This is one of my favorite style cards to do because it only uses the dies in the set but it's how you use the paper that makes it different.  For my card i used both light aqua and a med aqua and cut the larger die with the center in out of both.  Then I stamped and embossed the sentiment on light aqua paper and cut it out with the die from the center.  This way i can make sure that the Penny Black  sentiment is straight on and fits perfect.  

For the base of the card i cut a square piece of aqua just a bit smaller than the dies and just embossed it with 2 square dies to make the frame.  I added a mat in dark aqua to fit and then created the card to go under all of it with light aqua again.  For the medallion I glued on the dark aqua die to the card and then attached the second layer with a foam square.  The little bit sticking out from the sentiment is another piece of the die but i cut it into little photo corners kind of and glued it under the center sentiment piece.  And finally i attached the sentiment with glue dots to make it pop out too.


Here is a closeup of the medallion and the little ribbon bow i added to finish it.  Oh and i also added a few tiny rhinestones to make it a little more sparkly.  I love sparkly so might see alot of my things that way in the months ahead.  

Be sure and check out Becca Feeken's blog today for all the ideas from our design team this week.  There is lots of beautiful inspiration for the new dies and you can see all of Becca's dies
here in the Spellbinders store just in case you need to order a few!! 

Happy Tuesday and happy crafting to all of you :)


Sunday, January 22, 2017

Getting ready for Valentines...

I am so happy for the start of this new year and thankfully one of the first holidays is Valentines and it's my favorite one.  I love all the papers and other goodies you get to create with and it's been fun creating for my DT with all of their gorgeous products too.  So today i have a pretty card that i 
made with a stamp set I got from Penny Black last year.  It's filled with lots of fun sayings so i am sure i will have more to share in the next couple of weeks.  


The papers are from Graphic 45's Mon Amour set and the flowers are a mixture of things in my stash that went really good with this really gorgeous paper line.  I love the muted colors and prints, they are the perfect size and colors to mix and match.


The dies i used are of course from Spellbinders.  I used the basic circle and lacy circles to cut the paper and the tiny doily is from Ruby Rock-its new fundamentals.  The stamp fit perfectly in the center of it.  I hope that you like it.  

Thanks for dropping by and i hope that you have a really nice weekend!!

Teresa


Wednesday, December 3, 2014


I just couldn't wait to share this card i did with one of the new Spellbinders
Victorian dies that were just released and some of the new ribbons from
the Winter Wonderland ribbon assortment from RRR.  I just love the reds, greys
and silver together in this card and the intricate details in the die really set it off.


This die is called Victorian Medallion Two and it has 3 pieces in the set so
that you can cut the beautiful piece out in the center and separate them to 
stamp on and create the intricate pattern that i did.  


Here you can see the pretty ribbons from Really Reasonable Ribbons 
new Winter Wonderland set.  The grey's went perfect with it and the
silver string added just the right touch that i wanted. The papers are from
the Pink Paislee Merry and Bright 6x6 paper pad. I really love this set.

So.....Thanks for stopping by and be sure and come back i have lots more
Christmas cards to share this week and next with the new Victorian dies.

Have a really great day... Big Hugs and Smiles :)

Monday, December 1, 2014

Card Club Christmas Ideas

Hi Everyone.. today is a very happy Monday for me and I hope that you
all had a really wonderful weekend with all your families and had
lots of yummy things to eat on Thanksgiving.  Our's was good and we
watched the Macy's parade and of course lots of football games.  We
spent the rest of the weekend catching up around the house for the
rain that finally started today and some Christmas decorations
up in the house too.  I am almost done and everything looks so pretty!

Today i am sharing a few of the cards i did for my class last weekend
that we stamped and used lots of Stampendous glitter on.  We had lots
of fun since i did 2 days of back to back classes and it was so good to
get together with all the Card Club ladies before the holidays.  


My first card is using a beautiful stamp from Stampendous
that you can see here.  This one sold out fast and they all had alot
of fun adding the glitter and snowflakes to make it look like a beautiful
snowfall at Christmas. (I used the Frantage Treasures glitter set)


This was a really elegant and fast card that is just done with
the new Victorian release dies that you can see here.  It's called
Heirloom oval and it's really beautiful cut out in white. We just 
stamped with gold and embossed it with Stampendous detail
gold powder and added a bow and some stickles to it.  


This stamp set is from Penny Black and the girls had a good
time creating a scene with lots of colored inks and glitter.
For this one i used a new Stampendous snow glitter called
Shaved Ice and everyone loved it!! 


This cute reindeer stamp is by Hampton and it was super easy
 to use and we just added a little bit of glitter on the antlers
and the scarf... I love this one and it went together really quick.


My last card is using a new poinsettia stamp set and we created
a watercolor effect by using sponge daubers to add shading and 
more color into the flower and of course lots of glitter by 
Stampendous.  They have lots of new products that you can see
here and it makes all your things that much more gorgeous!!

New products i used in class are:


Thanks for stopping by and have fun making your
Christmas cards... guess i better get started too- only 25 days to go :)


Friday, October 3, 2014

Just for Fun

Someone asked me once what my style was and my first thought
was "All over the place".  I love the thought of digging in
and trying something new and working at the store for all
those years really had me learning and trying everything that
i could get my hands on.  So where am i going with this.  Well
Spellbinders and others are doing Simple and Trendy style 
projects and going back and doing a few quick projects
is both refreshing and fun at the same time.  Today i have
2 cards to share that i am doing in my class for Sunday.


For this card I used 2 colors of pink ink to create a shadow
for the back and front with a beautiful stamp by Stampendous.
 That cute little bee stamp in black i had in my stash
and the Happy Birthday is from Fun Stampers Journey.
It's super easy to do and I think would be great as a set to
maybe give as a gift for something.. maybe another class right?


And this card is with a Penny Black stamp and i used the 
new Chevron Border die.  For my card i wanted to see that
pretty dark turquoise through the die so i cut the white front
out with it and then stamped it and added that flower with glitter.
 This is my favorite color so you know i love this one alot.

Well that's it from here in California today.  The weather is
hot again and i cannot wait for fall to really be settling in for us.
No more summer heat for this girl, but it's good for crafting 
inside to beat the heat.  Thanks for stopping over and don't 
forget to leave a message so i can stop over to visit you too :)

Have an awesome weekend!!

Wednesday, October 1, 2014

Halloween Challenge for RRR


This month we have a fun challenge on the RRR Blog to create fun
projects and cards for Halloween.  Today i have 2 things to share 
with all of you, a super cute card and a banner to decorate my house.


My first project is this card i did with a new Penny Black stamp
and some Graphic 45 papers that i had.  I created a simple backround
for it with fun oranges and blacks and then stamped the image on
white cardstock and colored it with chalk and colored pencil.
The beautiful orange ribbon goes perfect and has the tiniest bit of gold 
on the sides of it.  I just love how this one came out.


For my banner i found this neat pad of banner sheets at my local 
craft store.  All i had to do was tear them off and cut the purple 
backround that you see.  I used a stencil and some Studio G gesso
to create a backround and then i cut out some fancy circles with
one of my favorite Spellbinders dies and glued that on.


Then i inked around all the edges with orange and black chalk
ink and glued on these huge adhesive letters i found.  (If you 
have a cricut you can do them that way too).  To finish it
i tied a piece of the purple swirl ribbon through the whole
thing and tied lots of pretty ribbons from the
September ribbon assortment this month in between them all.  


I had lots of fun stickers from Doodlebugs Halloween collection
so i created these fun little scenes on the ends and a few in the
center with the letters.  It's a little more fun and not so scary but
i like it and can't wait to add more things around it on my fireplace.


Thanks so much for stopping by and be sure and share with
us what you create for the challenge and maybe you will win!!

Have a great day... Teresa

Friday, June 21, 2013

New Penny Black Dalia stamp


I had some time today to do a quick card to send and
I used one of my new Penny Black stamps and
colored it with Copics and some Distress inks.


I really need to color more and get back into
practice but it was fun to do to play...
The stamp is called Sweet Dalia and is one
of the new releases they just came out with.
.. This would be a fun card to change up and 
do the flower in different colors and backrounds too.

Next weekend is card club so I will have lots to
share this week so be sure and check back to
see some more fun ideas.

Have a nice weekend... Teresa


Wednesday, February 6, 2013

XOXO Card


Good morning everyone!  I have the day off today so I wanted
to play with a fun embossing folder that I have and create
a card with a new stamp from Penny Black..


Sometimes... something catches your eye (heart folder) and then the
creative juices start to flow and that is how I got started today!

To make this card I embossed a piece of white cardstock with
this beautiful Spellbinders m-bossing folder called Hearts EL-008.
The design is so pretty and is perfect to use for lots of
different projects for Valentines next week!  I also used Penny Blacks
new stamp "Long Stem Cuties" on the Grand Decorative Ovals One
smallest die #1 and my favorite Versafine black ink with a little
bit of clear embossing powder to pop it up.  The papers I 
used are from Doodlebug and the tiny pearls I made with 
a pearl pen in cream. For the little mice I just used my chalks
and shaded them with matching colored pencils and a little
bit of marker.  Sometimes I like using chalk because 
it is easy to blend and looks more subtle.
 And lastly for the tag I added the xoxo in black.
(The finished card is 5x5 just so you have an idea for size)

Here is a close up of the pattern in the folder.  It is 
really pretty and I guess you can tell this is my favorite holiday
with all the hearts and love goodies out there.

That is it for today 
and thanks so much for stopping by!


LinkWithin

Related Posts Plugin for WordPress, Blogger...