Showing posts with label Christmas. Show all posts

Tuesday, November 5, 2019

November Die of the Month Blog Hop


Christmas is on the horizon and of course, as makers, made Christmas Cards are our hallmark during the holidays.  This month's APG Die of the Month is Winters Solstice Snowflake.  It is a delicate doily looking snowflake done in a regal way to usher in the Holiday Season.

The Snowflake was designed by Becca but if you know her well, as a budget crafter, she intends for you to use the design year-round.  Her holiday offerings always can be dressed up for Holidays and dressed down for any other occasion and the same is true with Winters Solstice Snowflake.  


Our new die for the month of November is truly exceptional and as you can see above and will be able to see as you hop through all of our blogs.  There are so many gorgeous pieces that you can use in a lot of different ways.  Always think about separating them for other crafty endeavors or mixing them with your other APG dies too.  

My Project Today is a Winter Snowflake Calendar for your desk:


If you work in an office of any kind --a wonderful gift to get or give would be a pretty calendar to brighten up your desk for the season.  You will need a small calendar and 2 pieces of the largest piece of the die for the top and bottom for this project.  I did the top piece really fancy and kept the bottom simple since i have to add the calendar to it.  Be sure and add a piece of chipboard or thicker layer of cardstock to reinforce your piece to last.  And for the back create an easel with chipboard to help it stand up.  These would be really fun to make for each of the holidays too and just change the paper and theme.

My Second Project is a Vintage Thank you card:


And like i mentioned above-- just use one piece of the set to create an accent for a card or a box.  I only used the center piece for my card and created a little border to go across the center and then i wrapped it with peach silk ribbon to match and a few flowers and a sentiment.  The beautiful papers are from Graphic 45 and the simple cottage prints make the border look so pretty and vintage looking.


Supply List:
 
Paper: Graphic 45,
Ink: Tsukineko Vintage Sepia
Accessories: Silk Ribbon, small 2020 calendar, adhesives by Scrapbook.com, rhinestones

If you want to find out more about the Club - prices, how you sign up and what's included, please look -------; HERE.

If you missed the introduction and want to know more about what inspired the Die of the Month Club, look -------;HERE.

More inspiration is just a click away.  Stop by with each Creative Team Member to see how they manipulated this die to come up with a unique project for you to try!

Visit Kate        - craft2owls.blogspot.com
Visit Joanna   – joannakrog.blogspot.com
Visit Teresa   –  victorianpaperqueen.blogspot.com
Visit Ewelina -  elinaart.blogspot.co.uk
Visit Melissa  – keepsakesbymelissa.blogspot.com 
Visit Judy       – judyhayesdesign.blogspot.com
Visit Becca     – amazingpapergrace.com/blog

We can’t wait to see what you make with these exclusive dies – be sure to post your creation on the Amazing Paper Grace Die of the Month page -----; HERE or on Instagram using the hashtag #AmazingPaperGraceClubKit
                                                          

Sunday, October 27, 2019

APG Santa Mini Box and matching card


Today i have something a little different to share.  I found a pad of Prima Holiday papers and just fell in love with this cute little Santa Claus image on one of the pages.   Soooo-- i picked out a few of my favorite Becca Feeken dies and set to work to make this cute little card and a matching gift box.


I can never say enough good things about this adorable little box die and if you remember last season we all made a bunch of these in different papers to show how versatile it is.  If you haven't had the chance to pick this up they are having a big sale at Spellbinders so now is your chance....


And this other die for the card is from the Vintage Treasures die set and is called Cannetille Rectangle.  If i only use the outside of the die as a frame it fits perfect to let the image peek through.  Then i can add lots of flowers and ribbons and other bits of things to make it super festive and this is what came out.  I am so happy to get a few more things made up for the holidays and couldn't be happier with this one.  I hope you have a chance to get started early too!!

And if you have a chance be sure and stop by our guest designer for this month Rajni Chawla from India.  She is amazing and really hit the ball out of the park this week.  
Click HERE to see what she did....

Have a very wonderful and crafty week

Teresa

Shapeabilities Charming Cottage Box Etched Dies A Charming Christmas Collection by Becca Feeken

Shapeabilities Cannetille Rectangle Etched Dies Vintage Treasures by Becca Feeken


Paper: Prima Christmas
Adhesive: Scrapbook Adhesives by 3L ( my favorites)

Friday, October 18, 2019

APG Holiday Gift Giving Notepads


Hi Everyone... i have another Christmas project to share today and this time i used the notepad die from our release this year called "Vintage Treasures".  These are a gorgeous set of dies that you can mix in with so many other things and as you can see it makes a very sweet little notepad to give to co-workers and little hostess gifts for other events.  For mine i found some Bazzill swiss dotted paper in red and added that festive Holly paper as the accent pieces and on the front I added some little tags i had to match.  Its easy enough that you can make a bunch of these at one time and have fun little gifts for everyone on your list.....


You can also personalize them with little tags or even do special ones with their names on them.  How fun would that be?  My mom really loved red birds so this is in remembrance of her this year :)

As you can see with the die set above--it comes with all you need to make adorable notepads in all kinds of themes or holidays.  It even comes with little flower dies. These would be great to make up  for Valentines and Mother's Day too.  


And I also used the papers i had left over to make a cute little gift card holder with the "Filigree Book" Die that you see with the Joy Glimmer plate.  This is another one of my favorites and you can customize this adorable little book too with all kinds of cute flowers and tags and other bits of cuteness that you have in your stash.  I used a Glimmer Plate and cut and oval to finish the front of mine and if you haven't tried the Glimmer you need to... it's so fun and easy to make cards and other fun crafty things.

Check below for the links to the Spellbinders store just in case you don't have these cuties in your stash already...


I hope i inspired you to start making up a few fun and festive things to give for gifts this holiday season and i have more to share so check back again...  It's my favorite season of all :)

Hugs and Smiles..... Teresa


Shapeabilities Adorned Notepad Etched Dies Vintage Treasures by Becca Feeken

Monday, October 14, 2019

APG Holiday Gift Giving Recipe Holder


This month our team is putting together lots of Christmas Gift ideas to share with you using some of our favorite dies that were released by Becca this season.  For my Recipe Card holder project i chose one of my favorite dies called Brilliante Rondelle.  It's such a gorgeous die it can stand on its own and truly make anything you make that much more gorgeous.


I actually had these recipe cards in my stash so i designed this pocket folder around it so that my sister can keep all her favorite recipes in it for the holidays.  You will need a Scor-pal to make the folds nice and straight but other than that just gorgeous christmas papers and a paper cutter.


If you saw our Blog Hop this month for the Oct Die of the Month you would have seen these cute letters that i used for the front too.  You get the whole set with it so you can make them in any colors that you want and i love that since vowels are always such a hard thing to come by.  I cut all my letters in a matching red and then attached them to an ivory band that i added over the dies.  It was really simple and didn't take long at all and now i have something fun to give as a gift this year already.  

Be sure and stop back all month and into Nov to see what i have to share and also the rest of the APG team.  And don't forget to stop by our guest designer Rajni Chawla and see her gorgeous set for this week.  Her flowers are truly amazing.... 

Thank you so much for stopping by today and I hope to see you really soon 


Spellbinders Dies:

Shapeabilities Brillante Rondelle Etched Dies Vintage Treasures by Becca Feeken


Saturday, August 31, 2019

Away in the Manger card


Hello and thank you so very much for stopping by today.  With our new release out of Christmas dies from Becca Feeken and Spellbinders last week i have had so much fun to putting together new cards for the holidays this year.   Each of the dies that she designed in the set can be used for flat cards or these amazing 3D cards that we showed you on the hop last week.  The choice is up to you on how to use all of the pieces and there really is so much that you can do with them.  

My card today is using the 2 die sets that you see below.  I  found some blue snowflake paper that looked like stars so that is where i started and then chose colors to compliment it.  I used a really dark navy, silver and white to cut out all the pieces and then layered them simply on the front of the card.  Pop dots help make all the pieces show up really great and a few rhinestones helped give it that holiday glow and sparkle i wanted.


You all know that my favorite part of these dies is that fact that you can use them separate too.  I made my card flat so i just used the outside edge and then added the star from the nativity set and the Away in the Manger piece.  I was really happy with how it came out and it was super easy to make.


Here is my closeup to see all the gorgeous detailing in the die set.  I love that all the dies compliment each other so well and make such beautiful cards when put together.  I hope that you get a chance to order a few from Becca's new line of 3D dies.  You will not be disappointed and you can have them ready if you start now to pop in the mail in December.  

And our Guest Designer Ginny Nemchak has her last post on Becca's blog and hers so be sure and stop over to see all the inspiration that she shared this month.  She did such an amazing job!!


Thank you for stopping and be sure and stop back for more ideas with these all month.

Hugs and Smiles....Teresa

Supplies List:

Spellbinders

Shapeabilities Grand Christmas Lattice Arch Etched Dies 3D Holiday Vignettes Collection by Becca Feeken


Paper by Bazzill found at Hobby Lobby and online at Scrapbook.com

Sunday, August 25, 2019

Get ready for Christmas


Hi Everyone and happy Sunday to you all.  Today i have just a quick share that i did for Becca to be included in the packaging samples awhile back for the new Christmas dies that were just released.  

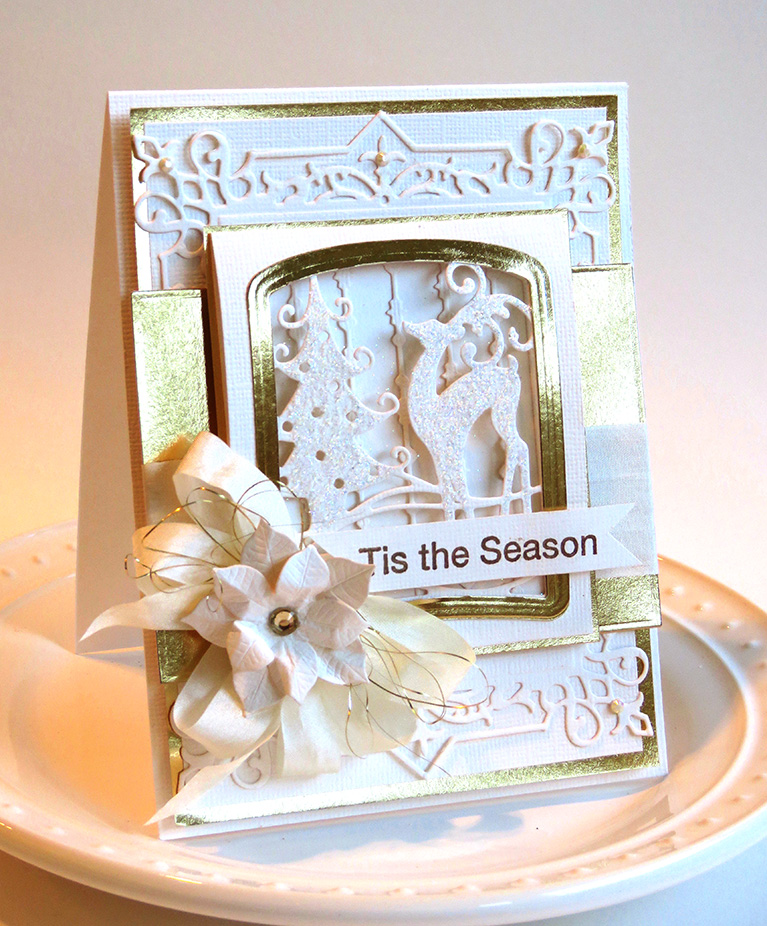
This one is pretty near and dear to my heart because it's all the things a white Christmas should be.    Glittery trees filled with snow and golden bits of trims with reindeer and gorgeous vintage details.

To  get this look i just used 2 colors and did lots of layers to pop out the design in this Reindeer Prance die.  And to make it sparkle i covered it with superfine glitter and then popped it up so that it looks like you are looking outside of a window at the snow.  It would be such a pretty card to make to send to those very special friends and family that you want to do something  really special for.


This is what the die looks like and it comes with 3 pieces so that you can do your own back rounds or add it into the 3D Vignettes die that Becca designed to go with it.  Now that would be an amazing card.  I hope that you have a chance to pick this one up to create with this year and be sure and post your creation on the Spellbinders website so that we can see what you do.

Have a very Blessed Sunday.... and happy crafting to you!

Teresa

And don't forget to visit our Guest Designer this month Ginny Nemchak.  She has another gorgeous card made with Becca's new dies so it's so worth the hop over to see!!

Supplies:


Shapeabilities Grand Holiday Cabinet Etched Dies 3D Holiday Vignettes Collection by Becca Feeken


Paper: Bazzill Ivory Cardstock and Gold Metallic Paper from Hobby Lobby

 Adhesive:  Scrapbook Adhesives by 3L 

Tuesday, August 20, 2019

3D Vignettes Christmas Greetings Snowglobe


It's been a really wonderful week here in terms of weather and it's given me lots of time to work on projects so today i have a new project i did with one of the brand new Holiday 3D dies we just showed all of you this past week on our Christmas Blog hop with our team.  I decided to do a 180 and do a non traditional color scheme for mine this week to see how it would work and i love it.  I found some little snowflakes and crystals on line so i thought how fun to make a wintery wonderland type of snow globe card.  And wow was it ever easy and fun to do.

To make this card you will need to cut 2 sides and 6 pieces of the larger die.  One for the front and back and 4 pieces to put between them.  I altered the colors to give mine some depth and then layered the piece for the Season's Greetings so that it would be thicker and stand out more.  In the very back i added one of the circles that i cut and put the starburst die on it and then popped it up.  It really adds a little bit more and the flowers and rhinestones really set it off.

Here is the picture of the die set and all the pieces that you get.  The poinsettia is a smaller version of the set that came out last season so now you will have 5 sizes.  I used all 5 to make the poinsettia's that match my globe and tucked them in on the sides and front.


And here you can see from above how all the layers work and it's wonderful because it all folds flat if you wanted it too so that you can mail it and they will get this surprise 3D card and can put it out to enjoy it for weeks to come.  I really love these and Becca designed these to be so special for us to create with and it will be fun to make other versions of it in other colors for other holidays too.  

Thank you for stopping by and I hope you have a very nice week.


Spellbinders Supplies:

Shapeabilities Grand Snow Globe Etched Dies 3D Holiday Vignettes Collection by Becca Feeken

Paper: Aqua glittered cardstock, med aqua and light aqua, mutted silver card stock

Pearl stamens, rhinestones, 

Ribbon from Reallyreasonableribbon.com ___iridescent thread, aqua ribbon to match

Saturday, December 22, 2018

Last Minute Christmas Cards


I am so excited to share my newest card i just made with all of you.  I am a true lover of all things victorian and i think this card really says alot about that.  I love all the tiny details in all the dies and the glimmer plates and mixing them.... well that is the best part.  

There are a dozen colors that you can get in the glimmer but this pink i used for the Joy plate really was gorgeous.  I also used Becca Feeken's newest plate called " Elegant Oval".  It has a mixture of gorgeous swirls and a sentiment but for this i only used the outside piece and heated it with the silver foil.  


And then after all the pieces were done i layered them with 3D foam squares and added some ribbon through the side and a pretty bow.


And then I added the tiniest of rhinestones to that beautiful ornament and the sides of the swirls.  It's so pretty in person and i know the perfect person to give it to. 

Thank you for stopping over today and i hope that you and your families have a very Merry and Festive Holiday season.  And don't forget to check back with us for all the new things from Becca Feeken in the New Year.... it's going to be amazing as always!!

    Hugs and Smiles!!

Teresa


Supplies:


Saturday, December 1, 2018

Wishing you Winter Cheer


Hi and thank you for stopping over today for a little few more hot foil ideas with Becca's new plates that were just released.  Today i used another of my favorite plates called " Elegant Border Glorious Glimmer Hot Foil Classic Plates".  I created two different styled cards and i hope that you like them.

For my christmas card above- i used the border with gold foil on white card stock for the front layer and then i added layers of gold and red metallic paper underneath to frame it.


I kept it simple and easy by just adding a few banners on the left side that i flagged the edges on and a pretty poinsettia with gold threads and white silk ribbon to make it look more festive.  This one is going to a very special cousin i have in mind and i hope that she likes it.


And for this card i added the darker pink foil to a piece of pink paper that i fussy cut on the edges.  I then added another layer of the darker pink under the side edges and fussy cut them to give it a bit of a shadow.  Then under that i used the Hemstitch Rectangles to create an elegant border and lined it with silver metallic card stock and the darker pink card stock that i used for the shadow.   And all of it was attached to a soft pink card base. 


And just to add a bit of a feminine touch-- i added 3 beautiful pink roses that matched and a sweet silk bow in a matching pink.  Inside to finish it i added a beautiful sentiment I stamped to say Hello to a friend.  I love pink and i know that she will love it too.  

Thanks so much for stopping by and i hope that you stop back in for more ideas and also our Blog Hop coming up for our second new "Die of the Month".

Supplies:

Elegant Border Glorious Glimmer Hot Foil Classic Plates by Becca Feeken


Stamp: Penny Black Stamps

Adhesive: Scrapbook Adhesives by 3L

Saturday, October 27, 2018

Merry Christmas Angel


I have a really fun project you can make up to decorate your house this year or if have time you can make up a few of these to give for friends too.  I started with the " New Angel Die"  set from Becca Feeken and then added lots of other fun die cuts to create a stand for her and a little house too.


To make this really special and angelical--- i picked lots of white papers and silver to cut the die cuts.
For her stand i used the "charming snowflake doily" i cut it out of white card stock and then cut one side off just a bit and folded it over on top of the other side to make a bit of a cone like you see below for her to rest on.  It was perfect and she actually fit in the slots of the die and I added just a few rhinestones to make it sparkle more.

To make the house for her i cut 3 pieces of the "Grand Cabinet" die set and added a really pretty silver printed paper in 2 of the centers to offset and balance all the white i was using.  Those i used for the back and then i cut out the center using the die in the set so you can see her in the middle.
 It was fun to use multiple cuts of the die differently and it came out really pretty I think.  And to finish it i made a "petite double silver bow" for the front and stamped the words Merry Christmas in silver and embossed it and then cut it out for the front top of the little house.   


The silver mirror card stock you can get at Micheal's or Hobby Lobby and cuts really nice with the dies.  They would be adorable to fill up a Christmas tree or great for kids to make for a craft project.
As always try cutting something in a new way or try new colors, you never know what amazing things you might dream up!!

Have a glorious day!!
Teresa


Spellbinders dies used:

Shapeabilities 3D Angel Ornament Etched Dies Etched Dies A Charming Christmas Collection by Becca Feeken

Shapeabilities Charming Snowflake Doily Etched Dies A Charming Christmas Collection by Becca Feeken


Shapeabilities Petite Double Bow and Flowers Etched Dies Elegant 3D Vignettes by Becca Feeken

Saturday, October 20, 2018

The Greatest Gift of All


This week i am headed in a different direction for designing a Christmas card for a friend.  I am often inspired by my papers that i have in my stash so this one was actually started with the worded backround in that beautiful soft shade of red.  And on top of that i added just the small rectangle from the Charming Tag Pocket to create a pretty backround.  I cut 6 of them in white and attached them like you see on the card above.  Easy peasy so far right?

Then on top of that i cut/embossed the middle size Hemstitch oval in the same white and stamped a sentiment on the top in black Versafine ink.  I then attached it with 3D Foam dots in the center.


And the Poinsettia flowers i wanted to be the same ivory with just a touch of the red in the centers. So I used a mixture of dark rose chalk ink and a darker red ink for the centers and i think it blended really well.  You can add lots of layers to your flowers or just a few and add pretty stamens in the center to really set them off.  I  really love the intricate lines in each of the flowers..... 

So when you get all your flowers made and they dry attach them to the bottom of the card over a small bow made with seam binding ribbon.  Then add a few rhinestones to the sides and it's ready to mail.  I really had fun with this one and i hope that you try something fun and new with your new dies from Becca and you will have to share it with us on the blog... we would love to see what you do too!!

Have a really wonderful weekend,
Teresa

Spellbinders dies:

Shapeabilities Charming Tag Pocket Etched Dies A Charming Christmas Collection by Becca Feeken

LinkWithin

Related Posts Plugin for WordPress, Blogger...