Monday, August 31, 2015

A Sewers tribute to Grandma

Grandmas are always special to the members of their families and when we lose them
so many pictures and stories come out and are shared with family and we remember
all the good times with them.  My husbands grandmother was a gem.  She was so sweet
in everything she did in her life and i am so very sad that she is in heaven now
 but she lived 100 amazing years and had so much to give and share
with us so i am sharing one of many pages that i did of her through the years.


I am going to have to play with the colors on the photos more, these are the ones
that they had up on display but i wanted to share the cute papers that they had to use.
I was lucky enough to get her button box, thimble and measuring tape and for 
that i am so thankful because like all of us she was a crafter and i love what she
made for us all through the years.  She was the best and had such a good heart.


And since there were so many cute things to print i did alot of
the patterns and prints in the "Sew Decorative CD"  The colors were
so pretty and bright and cheerful and they all came out great when i
printed them up.  I used the printed ruler paper for the card above and
mixed it with one of the digital images and aqua paper that matched.
And just for a bit of nostalgia i cut them with a few of my favorite
Victorian dies that they just released this year from Spellbinders.


And for the bag above i have a friend who sews alot like me and we
actually met working at Leah's fabric gallery.  So i thought this would
be fun to make up so i can give her a fun gift card for the quilt store
and maybe some candies.  I really love the colors on this one.....


And this card is a little mixture of alot of things.  I tend to keep all the
bits and pieces of papers so i can use them again and this cute little 
postcard that i printed out went great with papers printed off of the 
"Topography CD".  And i didn't want to lose that pretty rose so i
punched a couple of holes across the card and tied the ribbon on the
side so that i can keep all that gorgeous postcard showing.  All the 
ribbons i used are from "Really Reasonable Ribbon.com".


And lastly .... i know i have lots to share from "Crafty Secrets" today, I 
have a cute little card that i made from the same postcard sheet above 
but i thought i would fussy cut the design out instead and mat it with
a pretty die cut and add some ribbons.  The pink printed paper is also 
the same as the sewing card but a different color and it works so good
on this card.  For the sentiment i used some letters from my stash and
you could also use a clear adhesive sentiment in there too if you want.

Just a few fun ideas for you today.  But head on over to the Crafty Secrets 
website and see what's new for downloads this month and have fun
creating your own cards and gifts to give too.

Have a wonderful and crafty day....Teresa


Tuesday, August 25, 2015

Ruby Rock-it Blog Hop today...


Hello Ruby Rock-It and Daring Cardmakers Fans! We are so excited to be teaming up with this fabulous group of crafters!  We have a fun blog hop that we are kicking off today!!

Yes, that’s right, you can sit, relax, and hop through the blogs of our Creative Team members as we show you what we have been creating! Today i made a special little card box to give as a gift and it has 6 little cards that i made with the new "Happy Days" paper collection. It's filled with cute owls, butterflies, flowers, bee's and adorable prints that you can mix and match.   

My inspiration for this started with a tiny white jewelry box that i had laying around and i 
decided to create a little card gift box that i could give for a present.  The box measures
about 4x4 inches so i made 6 tiny cards for the inside with envelopes.  


For this project i started with the "Happy Days Collection" Patchwork and
cut each of them to fit the tops of the cards.  Then i added tiny die cuts
and the 3D stickers that matched to dress them up.  It was really fun! 


Here is a view of some of the cards.  It was fun that each of the patchwork pieces
had it's own color and design and the sentiments from the "Chit-Chat" paper went perfect.

  
And lastly for the top i used the Spellbinders "Diamondessense" die for my base
and cut it in white and pink and then fussy cut the adorable owls and flowers from
the "Hoot" paper and the "Bouquet" papers.  The ribbons i got from my stash
from Really Reasonable Ribbons. And now it's time to hop on to Miri's blog if you 
are following the order below and i hope you have lots of fun and enjoy!

Here’s your blog hop order…
Kathy http://kathybsworlduk.blogspot.co.uk/
Erin http://www.erinyamabe.com/
Lythan http://slightlysquiffy.blogspot.co.uk/
Pattie http://pattiebeltran.blogspot.com
Jo http://jo-kill.blogspot.co.uk/
Christine https://csantossite.wordpress.com
Nat http://koolkittymusings.typepad.com/kool_kitty_musings/
Alicia http://www.leishasblog.blogspot.com
Leo http://scribblesnscrappin.blogspot.co.uk/
Beck http://beckbt.blogspot.com
Sharon http://glitterangel.typepad.com/glitterangel_blog/
Teresa Horner http://victorianpaperqueen.blogspot.co.uk/
Miri http://bastelmiri.blogspot.de/
Jenifer http://stitchcutcreate.blogspot.com
Beckie http://beckiedreyer.blogspot.co.uk/
Teresa Abajo http://thetamarisk.blogspot.com
Svenja http://www.millefeuille.eu/
Shannon http://designsofapaddymack.typepad.com
Dawn http://allthingsprettycraftee.blogspot.co.uk/
Ruby Rock-It http://www.rubyrock-it.com/articles
Here’s the details: Enjoy the hop and leave a comment for each of our fabulous designers along the way, and be sure to leave one on your last stop, our blog! For those that follow until the end leaving your sweet sentiments along the way, will be entered to win a fabulous prize from us! We will announce our winner the first week of September!
Enjoy the hop!

Friday, August 21, 2015

RRR Fall challenge is up today...

Today we have our Really Reasonable Ribbon Fall Challenge up with the new
"Ribbon Club Assortment" and wow is it ever gorgeous.  It's my favorite time of year-
picking pumpkins and apples- so i remade a basket that i had used for decoration
with some new papers and embellishments that i found in my stash.


I always forget to go check my old things but this time I found the perfect little
basket to redo the top.  I made pretty ribbon bows with fall colors to match the
cute country prints.  The colors are so pretty and the ribbons really make the project.


My favorite ribbon in the set is this new little lace.  It's the perfect shade of
ivory and the size is great for cards and other things too.  I am going to have
to order more next time just to have some on hand, it's so cute.


And here is a quick photo of the top.  I used Basic Grey papers and the stickers
that went with it.  The dies are from Spellbinders of course and they fit the
top perfectly and gave it that pretty lacy feel i was going after. 

So that's it for today.... thanks so much for stopping over and be
sure and check out the other projects on the RRR Challenge blog and
maybe make up something to join with us and win!!  

Big Hugs and Smiles from Cali....Teresa

Sunday, August 16, 2015

Craft Hoarders Anonymous Monthly Blog Hop

Hi Everyone,


ANNOUNCING...

Welcome! I have some exciting news for all you paper craft hoarders out there! On the 5th of every month, starting September 5th, a fantastic group of hoarding crafters will be participating in an inspirational Monthly Blog Hop! We will share projects with you, show you how we are using up our hoarded supplies, and encourage you to dig into your own stash! Our goal is to inspire you to USE IT UP!

Each month, you will start at Gloria Stengel's Blog and hop through 20 amazing blogs. The participating crafters will share projects in all styles and media types, using both old and new product! Some designers will share tutorials; some will share storage solutions; some will share how to use your scraps and leftovers; some will share videos. There is a wealth of experience and creativity among these crafters! Many of the designers are on popular manufacturing teams and a few are part of exceptional challenge blogs. I hope you will take the monthly journey with us, and DE-HOARD your supplies!

Here is the list of the participating Bloggers. Make sure to hop along and say hello! We will share our first projects on September 5th!


We hope you will join us on the 5th of every month starting September 5th as we share our projects with you!


Thanks for visiting! Hugs!

Saturday, August 15, 2015

Crafty Secrets Mom Card

It's been a busy week trying to catch up with projects and i think i
am doing pretty good this month.  So today i made a quick card with one
of the Creative Scraps by Crafty Secrets called "Birds and Blossoms".


This set has 2 sides filled with cute photos of little birds,
flowers, little girls and sentiments.  And i thought with the colors
of paper that i printed from my "Creating Vintage Patterns CD" 
it would go perfect.  I layered two of the patterns with cardstock
and cut a few layers of ivory to match the image with a Spellbinders
die.  Then i just added some seam binding ribbon from RRR in
ivory and this pretty green to match and a flower and it was all done.

There is so many pretty images in the set i will have to make
up a couple more of them.  Here is a photo of the set below.


Thanks so much for stopping over and be sure and go check
out some of the great sale items on the website this week.

Have a wonderful weekend... Teresa

Thursday, August 13, 2015

RRR Blog Hop gettin ready for fall...

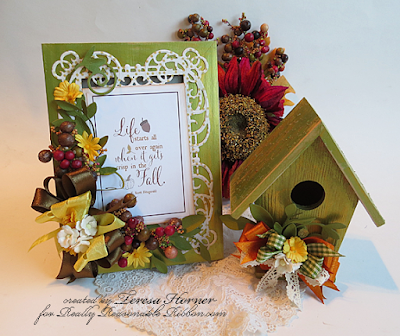
It's time again for our blog hope with Really Reasonable Ribbon and another gorgeous ribbon set this month that you can get started with all your fall projects.  It has gorgeous shades of orange, green, gold and browns and the perfect laces to match.  I decided to use a few wooden things i found in my stash to make up some new decorations for my house.  It was super fun and went pretty quick.

 Along time ago in the Scrapbook store i worked at we got this fun product in called Deco Art Metallic Lustre and we had a go with it on all kinds of things.  One of them was wood so i had this idea to mix the greens and the orange and see what happens.  And this is it.  It's an easy product to use because all you need to do is sand the wood really good and then rub it on with an old t-shirt or something soft.  I did the green layer first and then the orange in a few places.  


Here is a closer view of the frame.  I used lots of ribbons, greenery that i cut from
a Spellbinders die and some other fall things i had in my stash.  The fall quote i found
online and thought it looked really good with my $1.50 wood frame.  The outside
frame is Spellbinders Mystical Embrace and the paper is from Basic Grey.


And here is my little birdhouse to got with it.  These are my mother in laws
favorite colors and i think i was channeling something special for her.  I hope
that she is smiling from heaven at what i did :)  Sure miss her alot.

Other things i used for this are: Sandpaper, Stencil for the Birdhouse roof, Glass
bead glitter gel and Beacon 3 in 1 adhesive.  I really love that glue, it really sticks.

Here is the order of our hop this month and if you just started be sure and
go back to the RRR Blog and check out all the other fun things that everyone is
sharing for you this month.  And here is the link for the new


Thanks so much for stopping over and have a wonderful weekend!!

Teresa

Wednesday, August 12, 2015

New Quietfire Stamps for August

Today i have a quick post to go along with all the new dies being launched
this week from Quietfire Design.  They also have a whole new collection of 
"New Cling stamps" too and today i did a pretty card with one of them.


I picked this stamp because there is so many times that you want
to send a special little something to a friend and this could go so well
with whatever you decide to make for it.  I used pretty summery flower
papers with a bright red accent and stamped it in red to match.

Thanks for stopping over and I hope you have a really good day :)

Monday, August 10, 2015

New Happy Birthday dies from "Quietfire Design" and ECD

All this week on the Quietfire blog our Design Team is sharing fun ideas
to use the new Quietfire Caligraphy dies by Elizabeth Crafts.  These beautiful
dies are Suzanne Cannon's own hand drawn images and are really gorgeous.


For the papers i used a 6x6 Kaisercraft pad and the new "Happy Birthday" 
sentiment that you can get online here.  I thought that white would really
stand out alot on the pretty floral backround papers and I think it did just that.
For the rest of the card i just layered simple squares and used the pieces in
the pack to add more shape.  It was super easy and all i needed was to
add a ribbon to finish it. Be sure and go see all the other dies on the
 Elizabeth Craft Website that they carry for Quietfire Design, you will love them!!


Wednesday, August 5, 2015

Crafty Secrets Garden Journal to share

I had alot of fun making up this journal purse for my upcoming gardening
projects this fall.  I decided to really have a planned idea for it and wanted
to make something to put cards in for planting ideas and notes and also
for maybe putting in a few seeds and other stuff that i needed to save.


So to start my journal i picked lots of papers from the Vintage Patterns CD and lots of flower
and seed pictures from the CS Summertime Images and Journal Notes.  I also
used the Creative Scraps sheet DP-05 814 and some Heartwarming Vintage Stickers
for it.  And lots of other things i had in my stash like ribbon from RRR, envelopes
and cardstock to back the flower pictures with.  And of course good white paper
to print all the papers on.


The purse chipboard book is one from Pinecone Press.  They have lots
of fun base books so this accordian style was purfect for my pocket book
idea with all the envelopes to put fun gardening ideas in.


For the front i added lots of flowers from my RRR Stash and ribbons
too and even a few leaf cuts from a Spellbinders die i have.


On each of the pages I used those pretty floral cards and matted them.  I added
ribbons and doilies that i cut from kraft paper to match. And of course i inked
up the edges with a bit of brown ink.  I added strips of the papers that i printed
on each of them and cut them with a fancy border punch.


The flower cards are all just so pretty... i had to use them all.


Each page has a pocket for other goodies, flower tags and places to write ideas
of new flowers that i might need to get to the next season to fill in.  I have
lots to get in it since i found a new place for seeds online so maybe with lots
of rain and good weather this year my garden will really be nice.

Thanks so much for stopping over and hope you have a wonderful day!

Teresa

Monday, August 3, 2015

Crafty Secrets Blog Hop

It's a beautiful Monday and time for another fun Blog Hop with all of us on
the Crafty Secrets Team.  Today we are all stepping out and doing some fun 
Mixed Media projects so you will have to stop on over to all the girls 
blogs and see all the magical things that they did today.


I really had alot of fun making this beach bag for my money and small items
that i haven when i go to the beach.  I used the "Cotton Scraps Summer Homespun" 
and then found this cute little zipper bag made from Canvas from my local craft
store and it was super cheap.  So i cut out a few things and got some Fabri-Tac and
set to work.  For this project you are going to need a stencil, some paints to match,
glitter, cotton lace and maybe a sewing machine to zig zag around the pieces too.


So as you can see below the first thing i did was to stencil on my circles
with the aqua and green paints using a stipple brush.  This brush is a flat
kind of stiffer brush and makes it so much easier to keep the paint inside
of the lines.  Be sure you get some of the paint off so that it's a bit dryer
on a paper towel before you stencil and most important.... try it on a scrap
piece of fabric first to see how you like it before you work on your good one.


And after i got all the paint on where i wanted it i sprinkled a little glitter into the
paint to make it glisten like the sand does when the sun sets on a sunny day at
the beach where i live.  And then i went ahead and put Fabri-tac on the back of the
pieces and glued them where i wanted them to go.  I think i will go back and do
a quick stitch around all of them just in case but this glue really works good.


And that is all there is too it.  The Cotton Scraps come in all kinds of styles
that you can see here.... and they are so quick and easy to use.

Be sure and follow all the other links to see what everyone else is sharing
today and hope you get some and try this for yourself...

Kathy Clement, Team Leader:   http://www.kathybydesign.com


Shantaie Fowler: http://www.inkingpink.com/


Teresa Horner: http:// victorianpaperqueen.blogspot.com/


Happy Monday...Teresa


LinkWithin

Related Posts Plugin for WordPress, Blogger...