Sunday, January 27, 2019

Mixing your glimmer dies


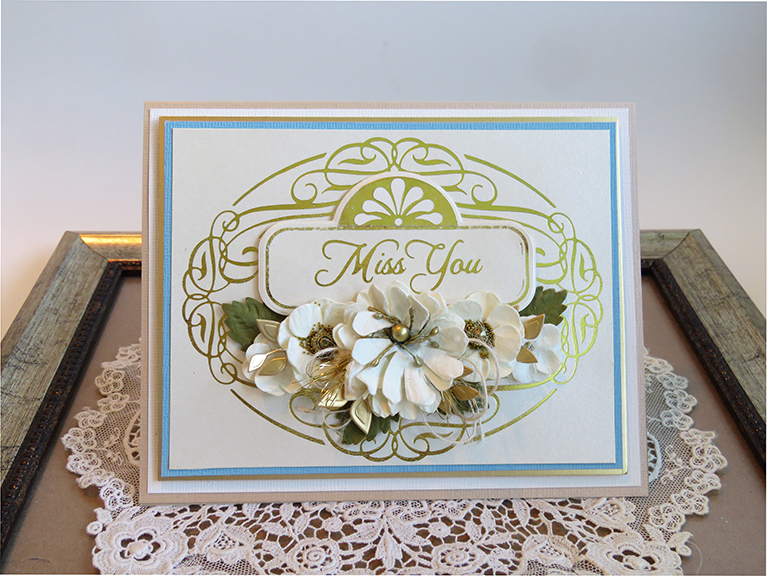
Welcome to my blog on this wonderful Sunday morning here in California.  The weather is wonderful today for crafting pretty things so today i have a fun layered card to share using lots of Becca Feeken dies and her new Glimmer plates.  Mixing plates and dies is one of my favorite things to do and it not only makes gorgeous cards but gives you so much more use out of all those amazing things you have in your crafty stashes.

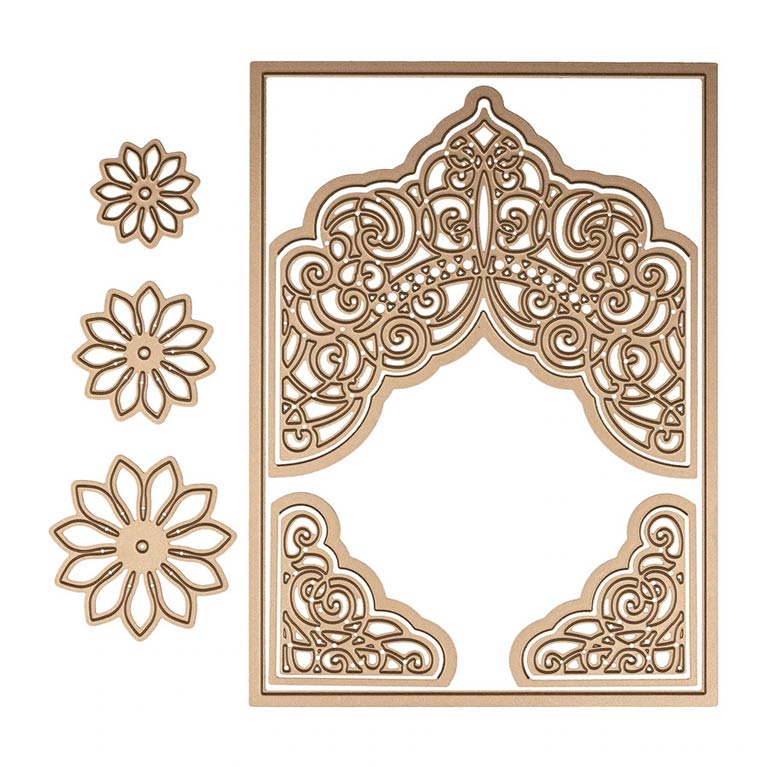
To make my card above i started with the "Elegant Foil Seals Glorious Glimmer Hot Foil Classic Plates by Becca Feeken" and a gold mat finish foil.  This plate comes with an edge die so i made sure i used that part to give it another edge.

Under that piece i layered a circle using Becca's Hemstitch Circles in ivory.  Then i used another of the glimmer plates called Elegant Circle Glorious Glimmer Hot Foil Classic Plates by Becca Feeken.  This one i heated on ivory paper to match the base colors and fussy cut around the edges to add it behind the medallion i created.  Be sure and add 3D foam dots to make all that glorious gold stand out a bit more.  Rhinestones will give it even more pizzazz....


And then for my base of my card i used the Hemstitch Rectangle and cut and embossed it with the same mat gold and cut an ivory mat and another very thin gold layer to attach onto my ivory card.  Using lots of layers in alternating colors can really produce an amazing effect don't you think!

And then just add a bit of ribbon criss crossed in the center before you attach the center medallion layer and add a pretty bow and a flower.  My cute little tag is one of Becca's dies from another collection called Tiny Tags.  I love this set since the stamps are included in it.... so very cute!

I hope you like my inspiration for today and see you back again for another fun idea next week.  If you ever have any questions be sure and leave me a quick note and i will be sure and answer as quick as i can.... Thank you so much for stopping by and have a wonderful week :)

  Teresa

Supplies:

Spellbinders Products:


Ribbon: Stamp Simple Ribbon Store- 1/4 inch silk in ivory
Paper: Ivory card stock and mat gold cardstock

Friday, January 18, 2019

Amazing Paper Grace January Die of the Month Blog Hop


Good morning!!  Like every month, we'll love bringing you inspiration for the Die of the Month; today is our Die of the Month Blog Hop!   This month we have the most elegant of elegant dies that are designed to allow you to cut the die then slip a card into position.  

The Lacework Finery Slip-In Card Die has a tiara-like motif that can be used with the corner pieces or without.  If you are looking for a subdued card, why not use the corner pieces only?  All of the pieces are inlaid, you can use them alone or together to get the look you want.   

Everyone on the Creative Team has joined in today to give you their spin, in their style.  We hope you'll see something that resonates and inspires you.

If you are new to our blogs, the Die of the Month is an exclusive die Becca has designed for Spellbinders - it is called the Lacework Finery Slip-In Card Die.  This particular set has 10 dies and they can be used to make a background, a slip-in card, or a frame with decorative corners, while the individual dies in the set can be used for many things.  Oh, and to make the set complete, there are flowers!
Amazing Paper Grace January 2019 Die of the Month - Lace Finery Slip-In
If you want to find out more about the Club - prices, how you sign up and what's included, please look ------; HERE.

If you missed the introduction and want to know more about what inspired the Die of the Month Club, look -----;HERE.

My Card Today:

I created 2 different projects today to show you that you can do more than just cards if you want.  My pink card uses the sliding method that Becca showed in her You Tube video but i trimmed it down and then added the pink piece over the top to make a double lace front.  


This die set also comes with a gorgeous set of 3 flowers so i created 3 of them and added larger stamens and some tiny silk ribbon underneath the center of them.


And of course a few rhinestones and some sparkly glitter just to dust it.


And for this beautiful little gift box i repurposed a small empty tea box with plain paper and then cut out the lace die to fold over the top and cut out the corners to added beautiful detail to the edges. Under the bow is a layer of silver mirror card with a matching blue mat to make it pop.


Supplies:

Paper by Bazzill Basics
Silk and Satin Ribbons from Stamp Simply Ribbon Store
Adhesives: Scrapbook Adhesives by 3L tape runner and 3D Foam dots
Rhinestones: Micheal's craft store

As always, each member of the Creative Team spins their interpretation of a die.  To see their makes pop down the list of Creative Team Member to see more!

Visit Joanna   – joannakrog.blogspot.com
Visit Teresa   –  victorianpaperqueen.blogspot.com
Visit Ewelina - elinaart.blogspot.co.uk
Visit Melissa  – keepsakesbymelissa.blogspot.com 
Visit Judy       – judyhayesdesign.blogspot.com
Visit Becca     – amazingpapergrace.com/blog

We can’t wait to see what you make with these exclusive dies – be sure to post your creation on the Amazing Paper Grace Die of the Month page ------; HERE or on Instagram using the hashtag #AmazingPaperGraceClubKit 

Sunday, January 13, 2019

A very fancy Miss you card


I am a little late this week on my post only because it was my Birthday yesterday and i spent the day out and about having fun and going to lunch and a movie.  But i finished one of my favorite cards to share with all of you using the Glimmer plates by Becca Feeken with some fancy gold foils.  


When starting my cards i always look around for something really pretty to be the base of my card.  I used the " Elegant Oval Plates" large plate to make the base on a slightly glimmered piece of ivory paper.  It worked beautifully.  Then i used the Elegant Affirmation Sentiment that said "Miss you" and used the same foil to heat it with.  This die contains an extra outside edge to cut it out so i did that and popped it up on the upper part of the center.  Then i filled the lower edge with lots of flowers that had that same golden tone to it underneath.  I love making flowers,  don't get me wrong,  but sometimes you find the perfect ones and when you get in a time crunch... they are the best!!  


And then to finish it i layered a robins egg blue mat then gold, then ivory and then a light tan card stock to make the base.  Under the gold i popped it up with 3D foam dots to make the color stand out more.  I love all the pretty gold swirls on this set and how easy it was to make yet how fancy it is.

Thank you so much for stopping by and hopefully starting with next weeks post i can give you directions for all the things i am making for Becca.....

Have and amazing week.... Teresa


Elegant Affirmation Sentiments Glorious Glimmer Hot Foil Classic Plates by Becca Feeken

Elegant Oval Glorious Glimmer Hot Foil Classic Plates by Becca Feeken


Flowers from Hobby Lobby

Adhesive from Scrapbook Adhesives by 3L

Saturday, January 5, 2019

Happy New Year with Glimmer


Happy New Year and how exciting to begin again with a clean slate and lots of ideas for fun things to make this year.  Our team is still sharing our ideas with Becca's glimmer plates this month so be sure and check out the rest of our teams ideas too.  There are so many beautiful plates to use it's hard to decide which one to use!!  

So for my sweet card today i decided to combine the new "Foil Flowers" with the "Elegant Occasion Sentiments" to make a gorgeous birthday card to send to my family sister for her birthday.  My base colors were pink and ivory so i combined the light pink foil on pink paper for the flowers and used gold foil for the Happy Birthday sentiment and the accents.  Pink and gold are one of my favorite combinations so this was easy to put together.


And to give it more depth i used an old texture plate from Spellbinders and also Becca's Hemstitch Oval to cut the sentiment out with which made it super feminine and added another pretty detail to it.

The flowers I actually cut in half to use on both sides of the oval and tucked them under and layered other pieces over the top edges.  It's less to do and still gives it a balanced look.

And all the layers i attached with 3D Foam dots on an ivory card base.  Simple and easy peasy!!

So that's it for my first post of the year but i promise lots of fun inspiration in the months ahead with all the new things Becca Feeken is coming out with this year!!  

Thanks so much for stopping by

Teresa


Supplies:

Spellbinders:

Elegant Occasion Sentiments Glorious Glimmer Hot Foil Classic Plates by Becca Feeken

Ribbon: Silk ribbon 1/4"

LinkWithin

Related Posts Plugin for WordPress, Blogger...