Showing posts with label Basic Grey. Show all posts

Saturday, December 5, 2015

Craft Hoarders Hop for December

It's time again for another Craft Hoarders Hop this month just in time for
Christmas and we have lots of fun ideas to share with all of you to make for
the Holidays. If you have been hopping along from the start you should have
come over by Wendi's Blog but you can alway start from the list at the bottom.


 I dug deep into my stash and found some fun things to use
and came up with this Christmas tree to put Grandkids photos. It's so cute and easy!!
So for this project you will need some Christmas paper (mine is from Basic Grey), 
circle dies, ink, adhesive, a pencil, nail file to sand the edges and gold cord and bells.
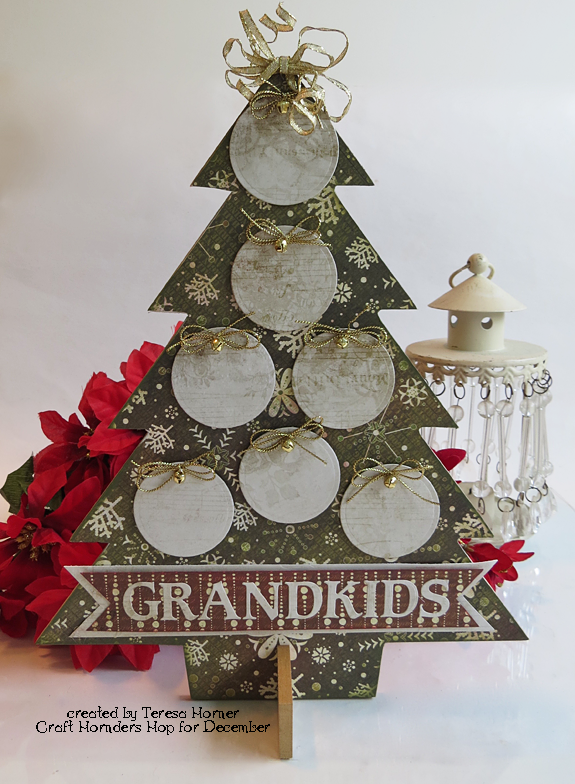

The wood tree is from Kaisercraft and i first traced twice and cut it out and then i glued it
on the base front and back and let it dry.  Then i sanded all the edges and inked them up. 
You can paint all around the edges too if you want to have it match the papers.
The circles i cut/embossed from a Spellbinders "Basic circle die" and glued them on
with 3D Foam squares from Scrapbook Adhesives by 3L.


And finally the grandkids banner was cut/embossed from the Spellbinders "Font One 
uppercase" die set.  I love both the upper and lowers on these because i always have 
enough vowels to use for things... it's wonderful and you can cut whatever 
paper you need too. I really love that part.

So.... that's it for this crafty girl to share and it's time for you to hop on over
to Kathy's blog and see what she has made for all of you.....  Have a wonderful month
and enjoy the holidays and thank you for hopping with us today!!

Merry Christmas everyone!!


Monday, October 5, 2015

Craft Hoarders Blog Hop for October

It's time again for the Craft Hoarders to share lots of projects with an anything goes theme
this month.  Each of us has created something special from all those crafty things we
have in our stashes to give you a little inspiration to create something for yourself.
Today i have a really fun project i made for me.  It's a Starbucks recipe book
with cards from all my friends and their favorite drinks and goodies they like to eat.
I have gone in so many times and listened to their orders but i can't remember
a single one... so an idea was born.


I used the Barista paper line from Basic Grey and it was perfect for this project.
The stickers had fun little coffee images and i filled the other in with some
letter stickers from Ruby Rock-it and bits of their Wood Veneers
with words on them.  So over the moon excited about this!!


Each of the pages is different and has places to slide the recipe cards in for
the coffee and tea ideas and some yummy goodies to bake to go with them.


The tiny letters were some of my favorite things to use and are from
Ruby Rock-it.  They have lots of sizes in each pack and are the perfect
size to use for cards and other fun things like this book.


 My Supply List is:
Pine Cone Press Calendar, Basic Grey Barista 6x6 pad and stickers, brads; Ruby Rock-it
Alpha Stickers and Wood Veneers; Scrapbook Adhesives 3D Foam Squares and E-Z Dots
permanent tape; Really Reasonable Ribbons seam binding and twine; scissors, paper
trimmer and other little goodies i found tucked away :)

So if you are here and haven't started the hop you are going to go back to Gloria's
blog and then hop along with the other's list below.  Have fun and enjoy...

Gloria Stengel 
Vicki Robertson
Debbie Seyer
Ginny Nemchak 
Pam Bray
Jacquie Southas
Glenda Brooks
Amber Milone
Tracey Sabella
Donna Idlet
Bonnie Garby
Nancy Dynes
Wendi Robinson
Teresa Horner
Barbara Rankin
Marisa Job
Christy Houser


                                                     Thanks so much for stopping by today...

Friday, August 21, 2015

RRR Fall challenge is up today...

Today we have our Really Reasonable Ribbon Fall Challenge up with the new
"Ribbon Club Assortment" and wow is it ever gorgeous.  It's my favorite time of year-
picking pumpkins and apples- so i remade a basket that i had used for decoration
with some new papers and embellishments that i found in my stash.


I always forget to go check my old things but this time I found the perfect little
basket to redo the top.  I made pretty ribbon bows with fall colors to match the
cute country prints.  The colors are so pretty and the ribbons really make the project.


My favorite ribbon in the set is this new little lace.  It's the perfect shade of
ivory and the size is great for cards and other things too.  I am going to have
to order more next time just to have some on hand, it's so cute.


And here is a quick photo of the top.  I used Basic Grey papers and the stickers
that went with it.  The dies are from Spellbinders of course and they fit the
top perfectly and gave it that pretty lacy feel i was going after. 

So that's it for today.... thanks so much for stopping over and be
sure and check out the other projects on the RRR Challenge blog and
maybe make up something to join with us and win!!  

Big Hugs and Smiles from Cali....Teresa

Wednesday, April 15, 2015

New Cardabilites #121 is up today...

Yay there is a brand new sketch up today on the Cardabilites blog and
it was a really fun one to use.  Our sponsor this time is Dies R Us so be
sure and stop by and see all the neat things they have and join along with
us for a chance to win too.  It would be awesome if you won!!


I love this sketch with the borders on both sides of it, so start my card
 i used a punch to create the edges with my Basic Grey Fresh Start
paper pad and then i added lots of elements in the middle like the
sketch has.  I used a few Spellbinders dies in different styles to
create the base and then added flowers and some of the die cuts
from the collection too.  It looks like a pretty bouquet of flowers
to send to someone that will never get old.  It was really fun...

Here is the new sketch so that you can play along too.


Here is my supply list :
Spellbinders: Sprigs and Blooms One
Prima: Flowers and say it in crystals
MME: Miss Caroline
Basic Grey: Fresh Cut 6x6 paper pad and elements
Imagine/Tsukineko Versa Magic in Aloe Vera

Thanks so much for stopping by and have a great day!

Friday, July 5, 2013

Quietfire Guest Designer

I love it when doors open for me in my life and I
have the wonderful opportunity to be the guest
designer for Quietfire stamps this month.  They
are an amazing online stamp and calligraphy site
which I really love and it makes me want to get back
into doing my own handwritten sayings and such!
You can check out their website here...

 Today I have a simple card that I did with #6195.

I love this saying because I am a heart collector
of all things.. jewelry, stamps, pillows and lots of
other things that have hearts.  And here is my card..


I created this with 3 Spellbinders dies and
some ink from Studio G and Detail Clear Embossing Powder.
The base die is Decorative Labels Eight and
I stamped on Labels Twenty Five and it fit perfect.
Spellbinders also has tiny single dies called Die-Delights
and I also cut a heart locket in pink and put it under the ribbon
with Love Locket that you can see here...
The papers I used are from Basic Grey's Kissing Booth
6x6 pad and the brad is from the same line.
I am a sucker for pretty pinks so this was really fun
to make and be sure and check out the other card
I did on the Quietfire Blog here.....

Thanks for stopping in and have a great day!

Wednesday, June 12, 2013

Spellbinders and Canvas...

I love working on Canvas and painting and mixing lots of
different medias on them and today I want to share a fun one
i did in the Spellbinders Gallery! Yay!! They have these beautiful
mini dies out called Die Delights and they have the cutest fun
shapes to create with that you can see here...

  
To start my project I tore and inked some paper for the
backround and stamped some chain with a Bo Bunny
stamp I got.  I layered the Basic Grey papers and embossed
a piece to to layer over some lace.  The gate was my focus
so I actually cut 2 layers of it and glued it together and
them inked over it and embossed it with clear to make
it more shiny.  I wanted to create a tiny rose garden around
it so I fussy cut some flowers and added a die cut swirl
from the Flowers and Florishes die set and some extra 
little flowers to tuck in the sides.  I also added a little
flower from Bo Bunny in glitzy brown rhinestones to match
with the centers of the flowers .  It was really fun and I love
to make these to decorate my house with little sayings
that keep me cheerful and thinking amazing positive thoughts!       


This is another 6x6 canvas that I did a while back and 
it seems like a great time to share it with my other one.
It too uses lots of Spellbinders dies for the base and I used 
some Prima flowers and Zva bling for the rest.  This is
a great way to make gifts and decorate and use up
some of the odds and ends you have laying about your craft
room!  Still working on lots of things for Spellbinders so I have to go but
I hope you get inspired to make one up and thanks
as always for stopping in to see what's new :)

Monday, April 15, 2013

Cardabilites Post #73

There is a new sketch up on Cardabilites
 today that you can either do alot
or just a little with.  I wanted to add more so I used my
Basic Grey Lucille 6x6 pad and chose some pretty
prints and layered the backround with the pieces to
start my card like the sketch that you see here:
Then I used my flower Spellbinders dies
and created lots of flowers that coordinate with
the papers that I picked. (I love that I can make my
own matching flowers with the dies) and I cut
the tag from Labels Twenty Five and stamped
the sentiment in black Versafine ink.


To put it together I arranged the foliage and
the flowers and tucked in the sentiment piece
and glued it all down.  I used a few extra
little tiny flowers that I had to fill in
some bare spots and that was all it needed.
Now I have a fun card to send out just to
say hi or just say I am thinking of them.  Perfect!

Thanks so much for stopping in today and
don't forget to see all the other girls blogs on the
Cardabilites Team and see what they have
to share this week with all of you!

Have a very good week,
Teresa

Wednesday, April 10, 2013

On the Edge....

Today I just wanted to share another of my favorite dies
out this season from Spellbinders paper Arts. 
 They are these super cute and easy to use
On the Edge border dies and you get 9 different styles in the set.!!
And they are just perfect for cards... 


 For my card that I made to share today
 I used the hearts and mini scallops to create a border
on the side of the card and also used 
my other favorite circle die called Stately Circles
for the sentiment medallion in the center.


The papers are from Basic Grey and 
I even had one of my homemade roses to pop
on the card in my stash along with the pearls.
The stamp is from a LOTV sentiment set that
I got and the ribbon is from Sharon's Stamp Simply Ribbon 
online store.  Just to give her a little shout out
she has amazing things and ribbons of all kinds so
be sure and check her out if you ever need anything!


And lastly here are the dies so you can see how cute 
they are and how many wonderful and adorable styles 
that you get in the set... so cute and you know i will be
using these lots more!  Thanks so much for stopping
to get inspired today and if you can't find the dies in
your local store you can order online too.

Hugs and lots of Smiles today,
Teresa


Friday, February 1, 2013

Cardabilites #68


There is another fun sketch up on Cardabilites this
week and just to get my Valentine cards done I thought
that I would play along and play with some of my dies.

Here is the sketch for this week

and here is my card that I created


I used 4 different dies this time (some are old and
some of them are new) and mixed
them up in layers to create my card.  The papers
are from the new Basic Grey Valentine Collection
and the flower is from Prima.  The stamp in the center
of the die is from Hero Arts and I used Archival Ink
in Vermillion and clear embossing powder over it
 to get a deep dark red to match the papers.
 I also popped it up alot between the layers so that the
really pretty intricate details of the dies stand out
and I think it came out pretty cool!  
Here are the dies I used just so you know :)
S5-090 Romantic Rectangles
S4-316 Heart Circles
S5-123 Asian Accents
S4-114 Standard Circles

Thanks so much for stopping over 
and I hope you have a very crafty weekend 
and make something fun!!
Hugs and Smiles 

Friday, January 18, 2013

New File Folders for January

Well first I am going to go on a bit about the CHA show.. There 
was so many awesome things there with Mixed Media, New papers,
New Dies, chipboard, wood and card products and I cannot
wait to start making up things for display and for classes in
the store!  And of course for Spellbinders too!  Stacey got the
Attendee's Choice Innovation Award for the New Gold Imperial dies
that were just released and the booth was really hopping with excitement
for the whole show!!  Soo that means there is going to be lots of
exciting things coming your way from all of us for inspiration!  Yay!

But meanwhile back to reality.. I have 2 more File Folders to
share today which fills up our Heidi Swapp file folder with 7 and it will
be time to start another set next month for new classes with new themes. 


 I can't say enough about what a fun project this is
to do and my class only takes about 2 hours to complete 
this whole folder!  How fun that you have a place to
put soooo many photos and journaling and you
still have time for other things with your family
like going out and taking photos for more folders?  LOL!


Inside i created lots and lots of fold outs and little
pockets for goodies that you might have!  This file
is made with the New Basic Grey Valentine line.
It is beautiful and has the prettiest prints to use
and stickers too... I so loved creating this folder :)


And my second file that I want to share for this Saturdays
class at Hearts N Crafts is for a fun trip to California Adventure 
or any Theme Park that you might visit.  These papers
are from October Afternoon and are they ever
adorable.  You get the cutest stickers and it
really went together in a snap!

 Aren't the stickers just so very, very cute?

 and...There is lots of places to put photos on this one!


We even traced and cut out our own custom folders
to use until the new Heidi Swapp folders come out
next month with lots of new prints. It is going to
be so fun for the next couple of months ahead.

Well that's it for today and I hope you try and create
some of these folders to get caught up this year
and be sure and stop back for some other fun
projects with the new Spellbinders dies..
Hugs and Smiles,
Teresa

Wednesday, December 26, 2012

Basic Grey Sketch

There is a new Basic Grey Sketch this week and it has
been way to long since I have played along and for this one it just
 so happened that I had the perfect Basic Grey goodies to do it!

Here is the new sketch up....

And here is my page that I did...


I used the New Basic Grey Christmas line Aspen Frost and
lots of the stickers and new ready made garland that 
matches just perfect.  I really love the pretty colors of
this collection and all the gorgeous stickers that come 
with it.  I also added a few Spellbinders dies with my Ribbon
Banner die and the Poinsettia's die and it was just the perfect
addition for all the pretty reds in the papers.


I love using the sketches to get a quick page done
and now that the Holiday is over I can catch up with 
some of the many photos I need to put in my own books.

I hope you all had a joyous holiday and I wish you 
lots of wonderful blessings to come your way in 2013!

Lots of Hugs,  Teresa


Saturday, December 1, 2012

Snowflakes and Resin

I have another fun project up on the Spellbinders Gallery
this week using my favorite snowflake dies
and this time I made a necklace using Basic Grey paper
and ICE Resin and lots of crystal beads...


To make this project you are going to cut out Spellbinders 
Create a Flake Four Snowflakes and a Snowflake Pendant
out of blue cardstock and coat them both front and back with clear 
ICE Resin and a foam brush and let them dry. 
 (With some papers they actually get a see through
effect that is really beautiful)  I also used Spellbinders Premium 
Craft Foil in silver and cut more Spellbinders snowflakes and 
also coated them with resin and added bits of glass glitter on it.  
When all the pieces were dry I used jump rings and attached them along 
with pretty crystal and silver beads to a pretty silver chain I bought.
  It was really, really fun to make and it shows you that there is 
alot more to these beautiful dies than just making cards with!

Hope you have a great weekend and thanks for stopping in!

Hugs and Smiles... Teresa


Saturday, November 17, 2012

A little bit of Christmas

So I came back from a fun holiday and the first thing I heard
was 33 days until Christmas.  Eeeeek, has the time really gone by
that fast this year?  It feels like I just put everything away... 
But... I love this season and I can't wait to start again so here
are 2 cards that I made to share today and hopefully I
can post more this week as I get more done!


I did some really fun embossing with this card
using Stampendous aged gold distress powders.  
Did you know that you can sprinkle the powders on
 the front with no ink and emboss on the back?  
Well you can and you get the really pretty effect of 
melted gold dots like you see below around the edges! 
 It is really cool!
Around the outside edges I used a Versamark pen and
then sprinkled the powder on and heated it to match.


The Spellbinders dies I used are Lacey Circles,
mix so beautifully together and I really love the old
world effect on the paper that it gives my card.  
This was really fun to make!


My second card today is a wallet card that you
can use for a photo or gift card or anything else
you might want to tuck inside to give as a gift.
The papers for this are from Basic Grey Christmas 2011
and I just adore the beautiful pointsettia's so I hand
cut lots of them out and made a pretty cluster on
the front to decorate it.  For the flap I rounded the
underneath piece of cream paper and then put
a matching piece of Beaded Circles that I cut and
embossed from Spellbinders. And to give it
even more texture I ran the front piece of paper in an
"Elegance"embossing folder and inked that up a little too..  
The brad is from My Minds Eye :)


For the inside I used a Spellbinders Edgeabilites die
Classic Decorative Inserts Five and made the pockets.
I cut a few more flowers and added them on the
side and a little bit of gold stickles on the flowers.
This just says Christmas don't you think?  

I hope you like my cards for today and I hope 
you all have a wonderful day and get inspired to
start a few fun projects for yourself.  I am off to
teach 2 more file folders (Christmas and Disney)
this morning and will share those too....  

Happy Card Making :)


Friday, June 29, 2012

New Sketchabilites

Today there is a new post up with a really fun
twist on using a die cut and i really loved playing
along with this idea!  There is lots of flowers and places
to put embellishments so I picked some of my favorite
papers and stickers from Basic Grey and had fun...

Here is the sketch this time...

and here is my take on it...

Title: Good Company on a journey
makes the way seem shorter....

My inspiration started with the word sticker and I picked 
this fun photo of some of the talented and amazing 
girls that I met on our Spellbinders retreat this spring..
 Just let me say they are even more amazing in person... 
so sweet, so nice and sooo fun too!!!


but on to the page of the day...
I cut my own die cut shaped pieces and overlapped them
to get the shadow behind the smaller one and added 
lots of the stickers from the large sticker sheet and used
lots of foam dots to pop it up and give it dimension.

It was just really fun and I love that some things that really 
mean alot to you seem to go together pretty quick.


If you haven't tried Karan's sketches be sure and 
pop on over to her blog (Sketchabilites) and try a few and 
get caught up on some of those pages you have been 
meaning to do!  And don't forget to post what you did...
We would love to see and brag about you :)

Have a great day and lots of hugs,
Teresa

Wednesday, May 2, 2012

Courtney's sketch with Pagemaps


There is a new contest up at Pagemaps this week with a 
chance to win a copy of Courtney Walsh's new book. Yay!
We were asked to do the sketch with one of the
themes listed and I thought I would do this page
of my daughter and her best friend and boyfriend
at Easter this year.  I used Basic Grey papers
and stickers for it and it went together really fast 
thanks to Becky's wonderful and cute sketch.  
And ----I love BG papers too so that helps spark
my creativity alot.  


Thanks so much for stopping in and be sure
and head over to the Pagemap blog and 
help Becky with her Relay for Life Run!
Lots of Hugs,
Teresa

Friday, February 3, 2012

More Love coming your way...

So I am back from CHA and rested and filled with
lots and lots of inspiration so I am catching up as always
and doing a few challenges for today... I have a card
for Mojo Monday, a page for Basic Grey and another
page for Becky's Pagemaps contest.  I don't really
care if I win but doing these is an awesome way to get
out some goodies from your stash and make a few much
needed things done for who ever you need them done for!
And I am redesigning my scrapbook room so I am finding
all sorts of things that I forgot I had... so here goes....


First up is a card that I made using an embossed Scalloped
Circle and I added 2 embossed Spellbinders dies
and layered them over it.  I added perfect pearls 
in white and finished it with a net and ribbon bow
and 2 crystal stickpins.  The bee mine is from 
the coordinating word sheet and I just cut it out and inked 
around the edges and popped it up with foam dots.
I like this shape alot and it kind of looks like a doily
when you emboss it with an embossing folder.


This card I made from a Mojo Monday sketch a couple
weeks back.  I had this cute little bee sticker and mixed it
with some Basic Grey and 2 Spellbinders dies. The ribbon
on this is from May Arts.  I love the sheer checks in this
line.  They are super cute to mix with things... It was
quick and simple and now I have a fun card to giveaway
for Valentines... Yay!!


For my next project...
Becky Fleck is posting a contest on Page Maps 
and I found this cute sketch which is also showing
pages with Spellbinders dies... I so love this new idea 
cause you know how much I love using their products!
I really loved the soft colors of this paper line and it
wasn't too much to do a page about my son.  For the
border on this I zig-zagged around some pink twine
and tied a big bow in the corner..


The Basic Grey weekly challenge this week is to create
any page you want and start with " I love u" so
I created this page of the girls but just changed the
title a little to "I love that we're BFF's".  I am trying
to get a book together for my daughter to keep all the
fun photos of all her friends and family so now I
have 1 more to add to it....This was a really fun 
page to use lots of my BG stash and I added hearts
for a border and lots of little flowers and bling to it.

Thanks so much for stopping by and I hope you
have a great weekend of creating!!

Hugs,
Teresa

LinkWithin

Related Posts Plugin for WordPress, Blogger...