Showing posts with label Frames. Show all posts

Saturday, April 6, 2019

Friends Forever Card with Graphic 45


I am not going to lie... i love this card and how it came out.  The crisp color combination of the papers and the beautiful details in these dies really make a great match.  And i added some tiny handmade flowers into the mix and it adds just the right amount of femininity to balance it out.


If you have had the chance to hop with our design team for the last month or so we all have been sharing fun ideas with the new Shadowbox Dies from Becca Feeken.  The two i used today are called Adoria Square and the Layered Friends forever Cafe Scene.  They match perfectly over each other and making the cafe scene in a matching black print really pops that part of the die set out.  

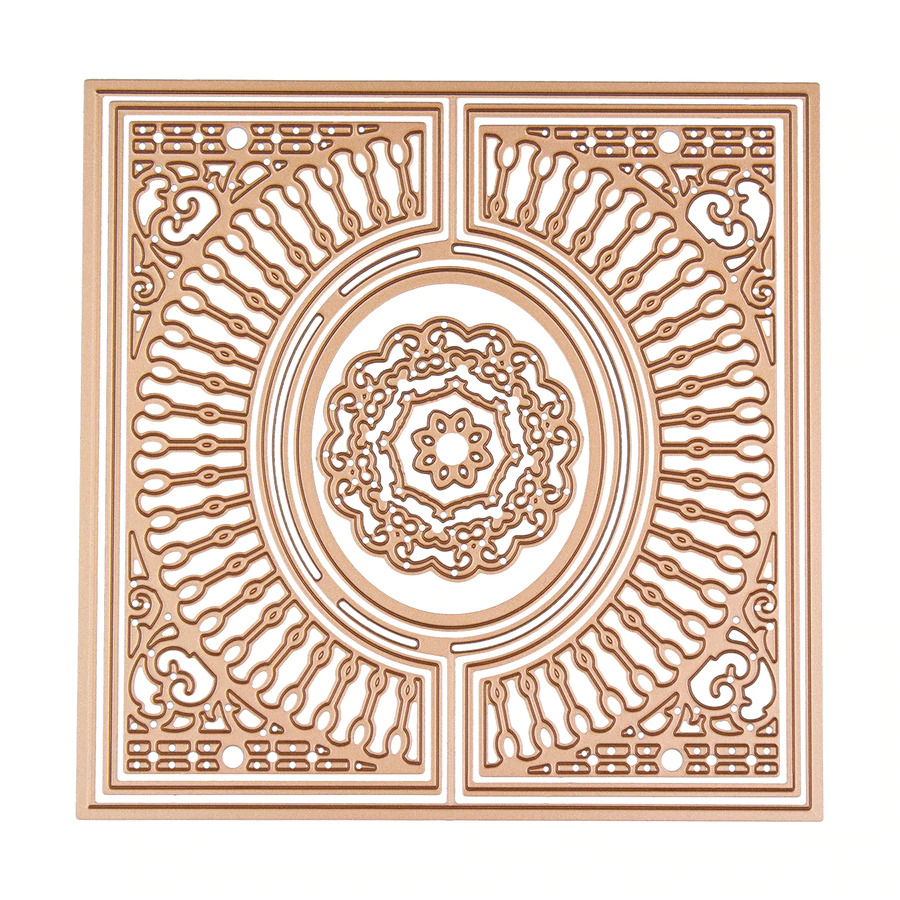
Here is what the die looks like for the base of my card.  I used the outer die set and then the middle square die to set the cafe scene on.


This die set also comes with those tiny flower dies that you see and for me those are always a good one to have on hand and make up in big bunches.  You can keep them handy in lots of colors to use on all your projects. 

And this is the cafe set of dies.  And don't forget you can use just pieces of dies from sets to make fun things.  And always interchange them with your other dies to get more use out of them.  I just love Becca's dies and love how versatile that they are .  

We are having a blog hop this week on the 10th sharing the brand new Die of the Month.
It is beautiful and i hope that you have the chance to stop and see all of our projects.

Here are my supplies that i used:

Spellbinders:

Shapeabilities Adoria Square Shadowbox Frame Etched Dies Shadowbox by Beeca Feeken

Shapeabilities Layered Friends Forever Cafe Scene Etched Dies Shadowbox by Becca Feeken

Platinum Die Cutting and Embossing Machine - 8.5" Platform


Paper: Graphic 45 and Bazzill Basics cardstock in ivory
Pearls: Want2Scrap
Adhesive: Scrapbook Adhesive by 3L 3D foam dots and permanent tape runner

Saturday, February 23, 2019

APG Shadowbox gift for a friend


Hi and thank you so much for stopping by today.... I hope that you had a chance to hop with us on the new release of Becca Feeken's newest Shadowbox dies.  These are so fun to use and they really make a gorgeous gift for your family and friends.  I can't say enough about them... they are so unique and so fun to make too.

Today i found some pretty new papers in one of my favorite color palettes- pink and black.  The prints were the perfect sizes and not to big to overwhelm the intricate details in the dies that i picked.  I made a 4x5 inch frame first with the black doted rose paper and then used the pale pink paper in the set to cut the "Callista Rectangle Shadowbox frame".  It also comes with photo corners and that cute piece in the center that i stamped my sentiment in.  I think it's one of my new favorite sets :)


I also wanted to share that sometimes your paper can be pretty thin so with projects like this you might want to cut the piece 2x and glue it together.  I did that but left it at a slight shadow in a darker pink to make it pop.  Now it's sturdy and can decorate the house for months ....


I stamped my sentiment higher on the card for the inside so that i could criss cross pink ribbons and a bow over the gorgeous Butterfly, bow and flower i finished it with at the bottom.  And of course i had to add a few rhinestones and pearls.  I will have to find a cute easel and paint it black to keep this out to remind me to "Start each day with a grateful heart".   It's one of my favorite sayings.

Thank you so much for stopping by and be sure and check out the entire release here

Have a very nice weekend,
 Teresa

Supplies:

Spellbinders:

Die D-Lites Adjustable Shadowbox Frame with 1/2" Border Etched Dies Shadowbox by Becca Feeken


Papers: 6x6 pad from Prima


Adhesive: Scrapbook Adhesives by 3L

Sunday, February 17, 2019

Amazing Paper Grace Die of the Month Blog Hop


Are you ready to be inspired?  Every month we love bringing you inspiration for the APG Die of the Month and today is our Die of the Month Blog Hop!!   If you have the die, we'd love for you to be able to make multiple things that perhaps you haven't thought of yet.  Stroll through the list of links at the bottom and maybe, just maybe, your next project is at one of those links!

The Enchantment Tall Flip and Gatefold Card Die Set natively makes into a tall gatefold card or a tent card by way of the unique base.  It is much like the December Die of the Month in that respect, but we wanted to give you a tall version.  Chalked full of extra pieces that include rims and unique inlays, these intricate motifs can be used in any number of ways.  If you do nothing more than to create a frame, there are four corner pieces that will help you do that.   The patterns are so delicate and romantic and we've found them to be a charming change of pace.

If you are new to our blogs, the Die of the Month is an exclusive die Becca designed for Spellbinders - this month it is called the Enchantment Tall Flip and Gatefold Card Die Set.  

This particular set has 9 dies and they can be used to make a gatefold card, a tent card, a background, a slip-in card frame with decorative corners, a basket, a purse . . . and the list goes on, while the individual dies in the set can be used for many things.  As always, there are sweet flowers included!  It's available until February 28th and then we make way for the March Die of the Month!


If you want to find out more about the Club - prices, how you sign up and what's included, please look -------; HERE.
If you missed the introduction and want to know more about what inspired the Die of the Month Club, look ------;HERE.

My Project for today is a Wedding Frame:


If you really want to get the extra mile from your dies think out of the box and use the pieces of the die for other kinds of projects like i did for this wedding frame to remember my nieces wedding last year.  It doesn't always have to be cut the way you see it and it will be really fun to mix other dies with it to make something really special and unique for another special gift or occasion.  

For my project i used the 2 outer layers of dies to fit under the picture at the bottom and top with a basic backround and then layered a second set of them with gold paper under my matted picture with 3D Foam squares to make it more dimensional.  I also cut those corners in the die and then cut away the middle to create that fun bar you see that ties them all in on both sides.  This was so fun to do and now i have a beautiful framed photo to put up of them or give as a gift for an anniversary.  

Oh and the picture is 4 x 6 inches to give you a size of how this will work.

Thank you so much for stopping by today and don't forget to stop by the rest of the teams blogs for more gorgeous inspiration for using this special club die set :)  

Hugs and Smiles,
Teresa

Supply List:

Paper: Gold metal paper from Hobby Lobby/ Ivory card paper from Bazzill
Flowers: Hobby Lobby
Accessories: Ivory Bias Ribbon from Really Reasonable Ribbon.com

As always, each member of the Creative Team spins their interpretation of a die.  To see their makes pop down the list of Creative Team Member to see more!
Visit Joanna   – joannakrog.blogspot.com
Visit Teresa    –  victorianpaperqueen.blogspot.com
Visit Ewelina  - elinaart.blogspot.co.uk
Visit Melissa  – keepsakesbymelissa.blogspot.com 
Visit Judy       – judyhayesdesign.blogspot.com
Visit Becca     – amazingpapergrace.com/blog

We can’t wait to see what you make with these exclusive dies – be sure to post your creation on the Amazing Paper Grace Die of the Month page ------; HERE or on Instagram using the hashtag #AmazingPaperGraceClubKit


Monday, December 10, 2018

Amazing Grace December Die of the Month Blog Hop


Good morning!!  Every month we'll be bringing you inspiration for the Die of the Month; today is our Die of the Month Blog Hop!!   The Die of the Month is like a "swiss army knife"  you can manipulate it to do a variety of things.  At the very least you can do a card and normally you can use the pieces and parts for cards and other 3D items.  The Creative Team has joined in for everyone to give you their spin, in their style.  We hope you'll see something that resonates and inspires you.

If you are new to our blogs, the Die of the Month is an exclusive die Becca has designed for Spellbinders - it is called Softly Spoke'n Flip and Gatefold Die.  This particular set has 9 dies and they can be used to make a background, a gatefold card, a tent card and the individual dies in the set can be used for many things.

If you want to find out more about the Club - prices, how you sign up and what's included, please look --------; HERE.
If you missed the introduction and want to know more about what inspired the Die of the Month Club, look -------;HERE.

Amazing Paper Grace December 2018 Die of the Month by Spellbinders - Softly Spoken - learn about this die at wwwamazingpapergracecomp34430
My First Project:


      I love to make money cards so using the beautiful die this month to create one for a birthday coming up in the family was just perfect.  I created the fold over part of the die for the front and made a small pocket inside to add the money for the gift.  And behind that i added another layer for a sentiment.  Each layer is carefully matted with off white and a light pink to make the beautiful details in the die really shine.


 Here is a peek at the inside and the pocket that i created.  The die has a fold on it so i created a small one to fold up for the money pocket.


I really love the center pieces in this set and this will be fun to mix with other dies.

My second project using this new die set is:


This shadowbox frame i made for a family friend of his grandparents.  It's such a gorgeous picture and deserves to be out on a table to admire.  Imagine doing this for a wedding gift, wouldn't that be nice!


Supplies: 

Papers: for both projects you will just need basic card stock in ivory, light pink and some gold.  

Ribbon: Silk from the Stamp Simply Ribbon store

Rhinestones and Pearls: Micheal's Craft Store

Flowers: Micheal's Craft Store

There is much more inspiration in store for what you can use this die set for.  Just pop down the list of Creative Team Member to see more!

Visit Joanna   – joannakrog.blogspot.com
Visit Teresa   –  victorianpaperqueen.blogspot.com
Visit Ewelina - elinaart.blogspot.co.uk
Visit Melissa  – keepsakesbymelissa.blogspot.com 
Visit Judy       – judyhayesdesign.blogspot.com
Visit Becca     – amazingpapergrace.com/blog

Thanks so much for joining us for the Amazing Paper Grace December Die of the Month Blog Hop.   We can’t wait to see what you make with these exclusive dies – be sure to post your creation on Instagram using the hashtag #AmazingPaperGraceClubKit.

Thursday, August 13, 2015

RRR Blog Hop gettin ready for fall...

It's time again for our blog hope with Really Reasonable Ribbon and another gorgeous ribbon set this month that you can get started with all your fall projects.  It has gorgeous shades of orange, green, gold and browns and the perfect laces to match.  I decided to use a few wooden things i found in my stash to make up some new decorations for my house.  It was super fun and went pretty quick.

 Along time ago in the Scrapbook store i worked at we got this fun product in called Deco Art Metallic Lustre and we had a go with it on all kinds of things.  One of them was wood so i had this idea to mix the greens and the orange and see what happens.  And this is it.  It's an easy product to use because all you need to do is sand the wood really good and then rub it on with an old t-shirt or something soft.  I did the green layer first and then the orange in a few places.  


Here is a closer view of the frame.  I used lots of ribbons, greenery that i cut from
a Spellbinders die and some other fall things i had in my stash.  The fall quote i found
online and thought it looked really good with my $1.50 wood frame.  The outside
frame is Spellbinders Mystical Embrace and the paper is from Basic Grey.


And here is my little birdhouse to got with it.  These are my mother in laws
favorite colors and i think i was channeling something special for her.  I hope
that she is smiling from heaven at what i did :)  Sure miss her alot.

Other things i used for this are: Sandpaper, Stencil for the Birdhouse roof, Glass
bead glitter gel and Beacon 3 in 1 adhesive.  I really love that glue, it really sticks.

Here is the order of our hop this month and if you just started be sure and
go back to the RRR Blog and check out all the other fun things that everyone is
sharing for you this month.  And here is the link for the new


Thanks so much for stopping over and have a wonderful weekend!!

Teresa

Sunday, June 23, 2013

Fun with embossing...

So the other day I was looking for something special in my local
craft store and came upon the markdown area.  I found
a cute frame and some kraft flowers each for $1 so I thought
lets see what i have at home and what i can put together.
And I have time to do something so this is what I made.


To make the flower frame 
 I used some scraps of kraft paper I had and drew out
the shape of the frame and embossed it with my
big Spellbinders M-bossabilites folder called Garden Lattice.
This I glued down and let it dry so I could sand the edges.
And then I inked around all of it with my 
chalk ink from Tsukineko... love the gingerbread color!

One very cool thing about their folders is that you get 2
designs in one folder.. You just flip it the other way and
the other design is on the other side.  It's really neat 
and it saves lots and lots of space.... 


A really fun trick to making the designs pop is to just 
take a chalk ink and run it carefully over the top so that
the designs are nice and shaded.  This was the perfect
pattern to use and I added black lace with scor-tape to the
outside and then a thin band of black printed cardstock
on the inside rim with scor tape.  The ribbon is black
seam binding and I inked the sale flowers that I got to match
and tucked in some leaves to fill in the gaps.  It needed 
just a thin piece of ribbon on the inside edge and that was
all and I am really happy with the way it came out.
It's kind of vintage looking western and I really love
all the texture that it has... I am not a flat paper kind of
gal and I think that is why I love Spellbinders so much..
It's pretty much in my blood now so you will always
see something from their amazing line of craft dies and things.

Hope you all have a great Sunday!!
Hugs,  Teresa

LinkWithin

Related Posts Plugin for WordPress, Blogger...