
Hi Everyone, Welcome
to the first day of our CHA Summer Sneak Peek!
I am the first stop
on the hop and I am so excited to share Spellbinders
latest innovation in
die design called-Nestabilities Enhancing Elements.
.jpg)
I have a really beautiful Brand New Die to share with you
called, Gold Squares
One (S4-410).
These unique die
templates can be used on their own or mixed
with all of your existing dies to create
beautifully detailed inset designs that enhance without limits.
with all of your existing dies to create
beautifully detailed inset designs that enhance without limits.
They Cut, Emboss, Stencil, and Deboss too!
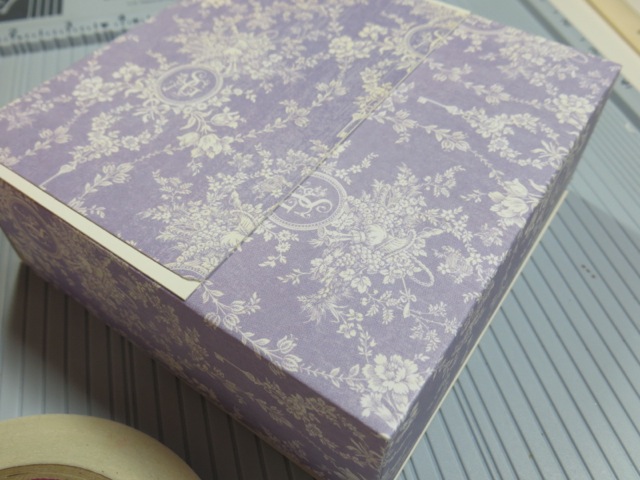
For my project today,
I am sharing with you a special stationery gift set
that I created using
the dies both on the front of the gift box and on the
beautiful cards made
to put inside of it. And I am sharing the directions
on how to use the dies and how to put it together too.
So grab a cup of tea and lets get started!
on how to use the dies and how to put it together too.
So grab a cup of tea and lets get started!

First here is a list of things that you will need...
Spellbinders Dies:
S4-410 Gold
Squares One
LF-018 Grand
Decorative Labels One
S4-380
Decorative Labels Twenty Seven
S4-375 Scalloped Labels One
S4-395 Les
Papillions Two
S5-145 French
Frills
GC-015 Junior
Magnetic Mat
GC-001 Grand
Caliber® Die Cutting and Embossing Machine
Cross
Promotional Partners:
Graphic 45 Secret
Garden- Sunkissed, Beautiful Blooms
Bazzill Basics
Paper® Ivory Cardstock
Scor-Pal® 1/4" Scor-tape and a Scor-Pal
SCRAPBOOK ADHESIVE
BY 3L™, E-Z Runner, 3D Foam dots
Want2Scrap(C) 72 count adhesive pearls in ivory
Other: Ribbon,
scissors, papercutter, polka dot vellum
Instructions:
- To begin this project you
are going to first cut a piece of the lavender printed cardstock 9 ½” x
12”. Using a Scor pal score the
paper on the 9 ½” side at 2” and 7 1/2”.
Turn the paper and score again at 5 and 7”. Fold the lines in and then cut in on the
5 and 7” sides to the center. Fold
the box up and adhere the sides together with Scor-tape.
- For the lid you need to cut another piece of the lavender printed cardstock 5 ¼”x 10 1/2”. Also cut a piece of the ivory cardstock 5 ½” x 11 inches and adhere the lavender on top of the ivory paper. Scor this piece on 5 1/2" and 71/2" too. Fold on both lines. Lay your lid on the top of your box to find placement and mark where 2 lines of scor-tape will go to the back to hold on the lid. Undo the tape and carefully glue in place. Mark with pencil 2 small dots for the Velcro in the front and add small white Velcro dots to hold the front in place.

3. For the front pieces cut and emboss #1 Grand Decorative Labels
one with the #6 and #7 square enhancing elements
using the magnetic mat on your grey base plate.
Lay the paper on top and then the cutting mat and run
it through your Grand Caliber. Replace the cutting plate with the
embossing mat and the pink embossing plate and run it through again.
Don't the enhancing dies just work just beautiful?
But wait there is more....

- Now you can do the same
thing with #3 Decorative Labels Twenty-Seven with the #1, 2 and #3
enhancing squares inside of it, this time on an angle as shown using ivory cardstock.

- And lastly cut and emboss the #5 scalloped labels one with the #5 Enhancing element in the center with the purple printed cardstock. Also cut and emboss 4 of the small corners from the French Frills die set in the same purple patterned cardstock.

- To assemble the pieces for
the front adhere the large ivory piece to the front of the box flap. Adhere the top piece to the purple
printed cardstock and then to the labels twenty seven piece. Adhere this piece to the box with small
foam dots to make it pop up more as shown in the photos below.
Adhere the decorative photo corners on with adhesive and add tiny
pearls. Cut and emboss a butterfly
cutout and a base and glue them together.
Adhere this to the right side of the box and gently lift the wings and add tiny pearls.


- For the inside cards cut
ivory cardstock to measure 5 ¼” x 5 ¼”.
Cut 4 for your box. Cut and
emboss the #1 Grand Decorative labels One in ivory for each one. Cut and emboss the scalloped labels one
in lavender cardstock for each one.
Cut and emboss the labels twenty seven in ivory for each one. And
finally use the #3 scalloped label and cut and emboss the #1,2,3 and #5
dies in the front as shown at different angles. To make the designs pop more cut a small
label in lavender and adhere under the top piece. Add tiny pearls on the corners and a
pretty satin bow. Emboss envelopes
to match or create your own with vellum.
You can make all of them the same or have fun and mix up the dies to
create fun an unique cards made especially by you! It’s really fun and wait until you see
the other amazing dies available soon… you are going to want them all!


So now that you know
how they work I have another
simple project to share using the same
Square Enhancing Elements dies and a few of
simple project to share using the same
Square Enhancing Elements dies and a few of
my other Square
Nestabilites dies to make a cute desk
calendar. When you pair these elements with your
existing dies
you can really create
some one of a kind designs.
It’s really fun and easy to do.
It’s really fun and easy to do.

I hope you loved these new dies and you are going
to love all the other amazing products being shown this week!
Be sure and leave a comment to let us know what you think and
enter the contest for lots of prizes to win this week too.
Giveaway Rules HERE
Enter Giveaway HERE
Your next stop today
is the Amazing Becca Feeken
who will share
another New Release die for Summer CHA

Questions? calexander@spellbinders.us
No entries will be accepted at this email address.
Wow! Just amazing!
ReplyDeleteoh my goodness, your stationary box and cards are absolutely divine!! just beautiful, Teresa!!! Hugs, Darsie
ReplyDeleteBeautiful projects Teresa!! Great tutorial and instructions, you did a fantastic job!!
ReplyDeleteWow! This set is gorgeous!
ReplyDeleteSuch stunning projects! The new dies look amazing - so many possibilities!
ReplyDeleteThese are stunning Teresa!! Love the colors and all the special details!!
ReplyDeleteBeautiful!
ReplyDeleteGorgeous projects! I can see Christmas presents out of those beautiful calendar cards. You have my juices going!
ReplyDeleteThis comment has been removed by the author.
ReplyDeleteIncredibly beautiful! Love all the details that the dies create in the papers on the existing dies that we already own! These new ones add so many possibilities for unlimited variations! Your cards and box are stunning!
ReplyDeleteWow! Simply Beautiful!
ReplyDeletedundas64@aol.com
What beautiful work you share with us today! I love that box!
ReplyDeleteBeautiful!!! Wishing I was at ho.e to play...
ReplyDeleteAbsolutely stunning, I love your tutorial on how to incorporate with our existing dies!
ReplyDeleteSOOOO PRETTY!!!!!!!! I LOOOOOOOOOOOOVE these NEW DIES!!!!!:) GORGEOUS WORK!!!!!!!:)
ReplyDeleteThese projects are absolutely stunning! Spellbinders has really done a good thing for craters by giving us new products to enhance the dies we already own. You have combined the dies into creations that are elegant but useful. The box with note cards is a beautiful gift idea and is something I have wanted to make for awhile. I cannot wait to try your projects. Thank you!
ReplyDeleteGorgeous! I am loving the new dies so far. Your work is absolutely beautiful.
ReplyDelete2 Very very beautiful projects here with some really awesome dies. I absolutely love the projects you made here, sooo gorgeous. And that calendar is such a great gift for a hostess or birthday or something, where you don´t give any bigger gifts. Very useful and soooo beautiful.
ReplyDeleteWow how gorgeous are your creations, and the new dies are amazing x
ReplyDeleteBeautiful Teresa. Love the cards and box. What a wonderful calendar to have in my scrapping room.
ReplyDeleteYour cards are gorgeous!! I love the new dies - you used them beautifully!! Thanks for the inspiration :)
ReplyDeleteLisa
A Mermaid's Crafts
Beautiful Teresa!
ReplyDeleteOMGoodness....What gorgeous projects. The colors and the dies are so amazing. And a tutorial to boot. Thank you soooo much. I would love to try to make this set. I write to several dear friends from out of State and, wow, would they enjoy these as a gift. Thank you so much for sharing. Just Fabulous!
ReplyDeleteGreat ideas, beautiful results.
ReplyDeleteWow - these are gorgeous!! Additional dies to add to my every growing collection and/or wish list!!! :)
ReplyDeleteEileen L. said...
ReplyDeleteVery complex, but very beautiful box and cards.
WOW!! This is gorgeous! I love all the details that these new dies give and you showcased them perfectly.
ReplyDeleteBeautiful set of cards and love the coordinating box!
ReplyDeleteIt makes my head spin to think of all the possibilities! Love you awesome project!
ReplyDeleteBeautiful projects Teresa. Especially love the box. Those dies are awesome.
ReplyDeleteFabulous project Teresa. I love the calendar. These are definitely must have dies.
ReplyDeleteMarcie
What a gorgeous project, Teresa, and thank you so much for the instructions. Your second project is lovely as well. You've showcased the new products wonderfully!
ReplyDeleteBeautiful project! Thank you for sharing.
ReplyDeleteHow pretty, love the calendar. These new dies are fantastic.
ReplyDeletehugs, antonella :-)
Absolutely stunning! I am so intrigued and excited about these new products!
ReplyDeleteThese new dies are fantatic when you can use them with other dies. Beautiful projects!
ReplyDeleteVery beautiful and delicate lacing! Thanks for the tutorial!
ReplyDeletePretty project - thank you for the detailed tutorial!
ReplyDeleteWow these cards are BEAUTIFUL must HAVE these dies
ReplyDeleteLove Marion x
That is the most goregeous gift set I have seen!
ReplyDeleteTheresa Gorgeous work!! LOVE both projects! You have definitely inspired me! ((HUGS))
ReplyDeleteGorgeous creations, love the new embossing plates.
ReplyDeleteWhat a gorgeous work. Thank you for sharing with us. hugs! MOjca
ReplyDeletewowzers!!! Those are gorgeous, Theresa!!!
ReplyDeleteBeautiful project! I like that spellbinders gave us even more creative strive for dies we alredy love to use!
ReplyDeleteLarina M.
Your creations are absolutely beautiful. What wonderful projects to showcase the great new products from Spellbinders. Thank you.
ReplyDeleteWow... These are Gorgeous. So very elegant. I love how you switched the colors from the box and the cards.
ReplyDeletethis was awesome. great work.
ReplyDeleteMy oh my, impressive - thanks for the pic tutorial and love that paper as well.
ReplyDeleteGorgeous card set!
ReplyDeleteWow that is one amazing project,
ReplyDeleteYour projects are so beautiful! I really love Spellbinders dies!
ReplyDeleteI love both of your projects Teresa, but I think the second one is my favorite...love the colors. Great job showcasing the dies.
ReplyDeleteOh my, your projects are absolutely stunning, love every element of them. The new dies look amazing, I feel a wish list coming on...again!! xhugsx Nikki
ReplyDeleteI"m so glad Spellbinders is making enhancing dies for our standard oldie and goodie die shapes. Your stationary set is truly beautiful. So many choice and combination so little time. You make it look so easy :)
ReplyDeleteYour projects using these beautiful Spellbinders dies are stunning, especially when paired with Graphic 45 papers. I can't wait until I can get my hands on a set of these.
ReplyDeleteBeautiful and very inspirational work.....your projects look just Devine :)
ReplyDeleteOMGoodness thanks for sharing your gorgeous projects
ReplyDeleteWOW! Your project is amazing! What a creative way to use the Spellbinders dies!
ReplyDeletewhat a beautiful card set. the layers are so lovely and way you have mixed Spellbinders is perfect!
ReplyDeleteBeautiful projects. X
ReplyDeleteHugs Erika.
Wow love that card set. Just really beautiful and great layering. The desk calendar is very nice too.
ReplyDeletewhat can I say that hasn't already been said- These dies are beutiful and your projects-stunning- thanks for sharing and the inspiration.
ReplyDeleteJust so stunning! I love your set of cards and gift box, who would't love to receive this.
ReplyDeleteGorgeous projects. Love the set of cards and gift box.
ReplyDeleteSuch Lovely elegant set for the first one, and love how it can also make for a great every day look on the calendar!
ReplyDeleteA great idea - use your regular dies and jazz them up with the new, fancier dies.
ReplyDeleteLove your projects. they look like lace.
Hi Teresa what a fantastic die,and your gift sets are stunning.
ReplyDeleteSmiles
Ita in Ireland
ROCK ON GREAT PROJECT TFS!
ReplyDeleteWhat a stunner Teresa even though as a pensioner I can only dream of owning all the stunning dies you have used here you have given me great ideas of how I can combine my limited dies together. Bless you for sharing.
ReplyDeleteGreetings from Carole in South Australia
Gorgeous Teresa. If only my inventory was as large as yours...yep just a little envy showing. Thanks for the tutorial and for sharing your talent.
ReplyDeleteOooohhhh . . . isn't this gift set stunning!!! And these new dies look super elegant. Thanks for the tutorial on how to use them.
ReplyDeleteWow Teresa your work is stunning! I love how you've nested the decorative dies with the new Enhancing Elements. Really Beuatiful!
ReplyDeleteAmazing work!!!!!
ReplyDeleteBeautiful!!!
ReplyDeleteHi Teresa. I just discovered your blog today. What beautiful cards.
ReplyDeleteWhat a wonderful new set of dies, gorgeous project!
ReplyDeleteWow those are really beautiful cards. These look like they would be so fun to do some projects with.
ReplyDeleteBeautiful Teresa! Love how you used Square Enhancing Elements on different shapes!
ReplyDeleteSuper job!
stunning, Great job, great projects...
ReplyDeleteHugs
Simply AMAZING!!!!
ReplyDeleteFabulous projects.
ReplyDeleteThis is so lovely.
ReplyDeleteThanks so much for sharing.
mary l.
Your projects are just stunning! You had me from the beginning with the purple paper, and it just got better from there! These new dies seem to create endless possibilities.
ReplyDeleteShellee
Beautiful project.
ReplyDeleteThat is darn right Gorgeous
ReplyDeleteColleenB
Your projects are wonderful! Loving these dies!
ReplyDeleteWhat a gorgeous project!
ReplyDeleteOutstanding samples you've shown us with the new dies, loving them already! x
ReplyDeleteStunning Theresa.... Loving the new dies already... your projects are beautiful and great tutorial. tfs
ReplyDeleteHugs
Heather (UK)
Thats so lovely - I love all spellbinder dies. Good wishes
ReplyDeletePhil D in Dublin
This is absolutely gorgeous. I love the elegant look. Hugs! xx
ReplyDeletepretty card, adding this set to my wish list
ReplyDeleteWow...This is what i have been looking for and you have done a great job.
ReplyDeleteSpellbinders
Your projects are absolutely stunning! I need to hit the lottery! So I can just buy every single one! LOL
ReplyDeleteLovely! Can't wait to see the rest of the release. How exciting!!
ReplyDeleteWow! What gorgeous cards! Love these dies!!!
ReplyDeleteTruly beautiful.
ReplyDeleteOh my goodness, these are gorgeous. I jut love the box and matching cards.
ReplyDeleteWow, love the inspiration, I have been a follower for awhile, love your blog and your ideas!
ReplyDeleteI am loving these new dies especially as they will work so well with all my basics of squares, circles and ovals.
ReplyDeletesaving up now!!!!
Kathleen mc xx
I have to say I am amazed at all the comments and am trying to visit each of you!! Thank you for taking the time to let us know at SB how you like the new products!! We love them too and can't wait to give you lots more inspiration in using them this season!! Hugs to all of you :)
ReplyDeleteI love how you've used these new enhancing dies. Your projects are beautiful.
ReplyDeleteWowee! These dies are gorgeous. Your samples are wonderful with such pretty cardstock. I can't wait to be able to play with these as I'm itching to get my hands on them! Thanks for a great giveaway - I've got everything crossed!
ReplyDeleteWow Teresa, these are all stunning! These new dies look amazing! Hugs, Carole Zxx
ReplyDeleteHow beautiful and feminine, Teresa. Thank you for showing the sandwiches you used - makes me fall more in love than ever with these new products.
ReplyDeleteAbsolutely beautiful!! Wow. So love these dies.
ReplyDeleteGorgeous card! Those new dies look incredible. :)
ReplyDeleteThis card is beautiful and so well laid out. It takes lots of time to arrange these dies to be "just right." You did a wonderful job. Just beautiful.
ReplyDeleteWow, you created such beautiful die cuts and projects with these new dies, they are wonderful.
ReplyDeleteI'm not quite sue I've gotten just how to use these but, if it is Spellbinder's, it has got to be the best!!
ReplyDeleteBeautiful set. This would be a wonderful gift to receive. How do I get on your gift list?? LOL.Thanks so much for sharing.
ReplyDeleteTeresa - your work is beautiful! I love the way you have used the new Enhancing Elements Dies - just beautiful - what a gorgeous way to start the Sneak Peeks!! Thanks for always inspiring my friend! {{{Hugs}}}
ReplyDeleteI love what you have done with the new and "old" dies together. what a gorgeous gift you have made for someone!
ReplyDeleteBeautiful as always xo
ReplyDeleteWOW! The creativity is endless with spellbinders... Love this project!
ReplyDeleteGreat. The possibilities are definitely endless!
ReplyDeleteGorgeous box & cards set! I love the easel card also!
ReplyDeleteAbsolutely Beautiful...The box and the cards. Outstanding job. There are infinite ways to create cards and boxes....Thank you for what you do....
ReplyDeleteJust gorgeous.
ReplyDeleteGorgeous! These new dies are going to be so much fun to play with!
ReplyDeleteI was really searching for such a nice post and got here...Thanks for sharing such a nice
ReplyDeleteinformation, its beneficial for me...Keep sharing more.
spellbinders