
Hi Everyone, Welcome
to the first day of our CHA Summer Sneak Peek!
I am the first stop
on the hop and I am so excited to share Spellbinders
latest innovation in
die design called-Nestabilities Enhancing Elements.
.jpg)
I have a really beautiful Brand New Die to share with you
called, Gold Squares
One (S4-410).
These unique die
templates can be used on their own or mixed
with all of your existing dies to create
beautifully detailed inset designs that enhance without limits.
with all of your existing dies to create
beautifully detailed inset designs that enhance without limits.
They Cut, Emboss, Stencil, and Deboss too!
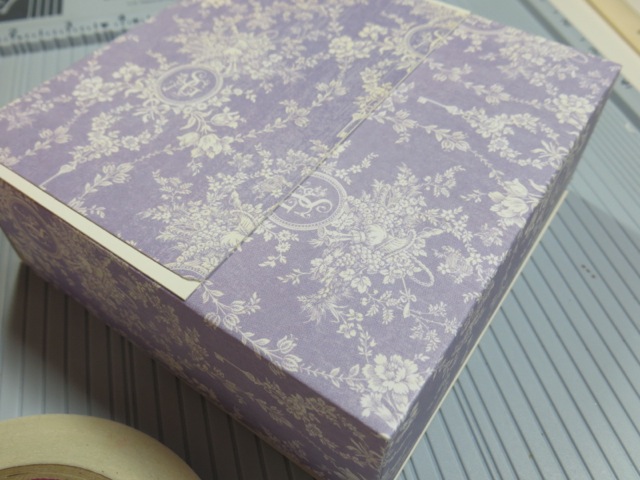
For my project today,
I am sharing with you a special stationery gift set
that I created using
the dies both on the front of the gift box and on the
beautiful cards made
to put inside of it. And I am sharing the directions
on how to use the dies and how to put it together too.
So grab a cup of tea and lets get started!
on how to use the dies and how to put it together too.
So grab a cup of tea and lets get started!

First here is a list of things that you will need...
Spellbinders Dies:
S4-410 Gold
Squares One
LF-018 Grand
Decorative Labels One
S4-380
Decorative Labels Twenty Seven
S4-375 Scalloped Labels One
S4-395 Les
Papillions Two
S5-145 French
Frills
GC-015 Junior
Magnetic Mat
GC-001 Grand
Caliber® Die Cutting and Embossing Machine
Cross
Promotional Partners:
Graphic 45 Secret
Garden- Sunkissed, Beautiful Blooms
Bazzill Basics
Paper® Ivory Cardstock
Scor-Pal® 1/4" Scor-tape and a Scor-Pal
SCRAPBOOK ADHESIVE
BY 3L™, E-Z Runner, 3D Foam dots
Want2Scrap(C) 72 count adhesive pearls in ivory
Other: Ribbon,
scissors, papercutter, polka dot vellum
Instructions:
- To begin this project you
are going to first cut a piece of the lavender printed cardstock 9 ½” x
12”. Using a Scor pal score the
paper on the 9 ½” side at 2” and 7 1/2”.
Turn the paper and score again at 5 and 7”. Fold the lines in and then cut in on the
5 and 7” sides to the center. Fold
the box up and adhere the sides together with Scor-tape.
- For the lid you need to cut another piece of the lavender printed cardstock 5 ¼”x 10 1/2”. Also cut a piece of the ivory cardstock 5 ½” x 11 inches and adhere the lavender on top of the ivory paper. Scor this piece on 5 1/2" and 71/2" too. Fold on both lines. Lay your lid on the top of your box to find placement and mark where 2 lines of scor-tape will go to the back to hold on the lid. Undo the tape and carefully glue in place. Mark with pencil 2 small dots for the Velcro in the front and add small white Velcro dots to hold the front in place.

3. For the front pieces cut and emboss #1 Grand Decorative Labels
one with the #6 and #7 square enhancing elements
using the magnetic mat on your grey base plate.
Lay the paper on top and then the cutting mat and run
it through your Grand Caliber. Replace the cutting plate with the
embossing mat and the pink embossing plate and run it through again.
Don't the enhancing dies just work just beautiful?
But wait there is more....

- Now you can do the same
thing with #3 Decorative Labels Twenty-Seven with the #1, 2 and #3
enhancing squares inside of it, this time on an angle as shown using ivory cardstock.

- And lastly cut and emboss the #5 scalloped labels one with the #5 Enhancing element in the center with the purple printed cardstock. Also cut and emboss 4 of the small corners from the French Frills die set in the same purple patterned cardstock.

- To assemble the pieces for
the front adhere the large ivory piece to the front of the box flap. Adhere the top piece to the purple
printed cardstock and then to the labels twenty seven piece. Adhere this piece to the box with small
foam dots to make it pop up more as shown in the photos below.
Adhere the decorative photo corners on with adhesive and add tiny
pearls. Cut and emboss a butterfly
cutout and a base and glue them together.
Adhere this to the right side of the box and gently lift the wings and add tiny pearls.


- For the inside cards cut
ivory cardstock to measure 5 ¼” x 5 ¼”.
Cut 4 for your box. Cut and
emboss the #1 Grand Decorative labels One in ivory for each one. Cut and emboss the scalloped labels one
in lavender cardstock for each one.
Cut and emboss the labels twenty seven in ivory for each one. And
finally use the #3 scalloped label and cut and emboss the #1,2,3 and #5
dies in the front as shown at different angles. To make the designs pop more cut a small
label in lavender and adhere under the top piece. Add tiny pearls on the corners and a
pretty satin bow. Emboss envelopes
to match or create your own with vellum.
You can make all of them the same or have fun and mix up the dies to
create fun an unique cards made especially by you! It’s really fun and wait until you see
the other amazing dies available soon… you are going to want them all!


So now that you know
how they work I have another
simple project to share using the same
Square Enhancing Elements dies and a few of
simple project to share using the same
Square Enhancing Elements dies and a few of
my other Square
Nestabilites dies to make a cute desk
calendar. When you pair these elements with your
existing dies
you can really create
some one of a kind designs.
It’s really fun and easy to do.
It’s really fun and easy to do.

I hope you loved these new dies and you are going
to love all the other amazing products being shown this week!
Be sure and leave a comment to let us know what you think and
enter the contest for lots of prizes to win this week too.
Giveaway Rules HERE
Enter Giveaway HERE
Your next stop today
is the Amazing Becca Feeken
who will share
another New Release die for Summer CHA

Questions? calexander@spellbinders.us
No entries will be accepted at this email address.