Showing posts with label Canvas. Show all posts

Friday, March 20, 2015

RRR Bright Spring Colors Challenge is up

Happy Spring to all of you that have tiny flowers popping up where you live!  It's
been a funny weather season for us here in California but my spring bulbs are just
beginning to pop up and I think i will have some beautiful blooms to see soon.

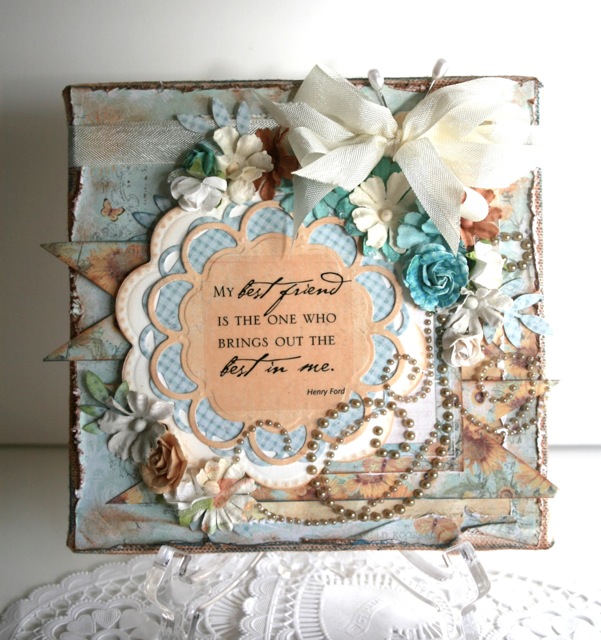
Our challenge over on the Really Reasonable Ribbon blog this time is bright
spring colors and ribbons so i decided to make up a quick canvas with some
really pretty ribbons and papers that matched by Kaiser Kraft.


Sometimes you can find the perfect papers to create something and this one went
together in a snap just for that reason.  The papers had the words on it and lots of
fun layering already so i started with a black back round and then added bits of torn
and distressed paper to make the layers.  I also added my favorite Versa Mark
 inks from Tsukineko called Sea Breeze and Midnight Black.  They went perfect.


This was my perfect chance to use some of my favorite ribbons from the RRR
May Arts collection in this gorgeous shade of pink melon.  It ties the most
beautiful bows and has the prettiest lines in it.  It's called Textured two tone rose
and actually comes in lots of other colors that you can see here.


All these fun banners came with the sticker sheet so i used them up on the top
and attached some RRR bakers twine on it with lots of loops across it.


And here is a closeup of the stenciled dots and glitter paste that
i used from Deco art and Fab Scraps.  I love to add those fun layers of
texture on my projects to make it more fun!

Thanks so much for stopping over and be sure and join us on the 
challenge this month.  It's going to be lots of fun :)

Wednesday, June 12, 2013

Spellbinders and Canvas...

I love working on Canvas and painting and mixing lots of
different medias on them and today I want to share a fun one
i did in the Spellbinders Gallery! Yay!! They have these beautiful
mini dies out called Die Delights and they have the cutest fun
shapes to create with that you can see here...

  
To start my project I tore and inked some paper for the
backround and stamped some chain with a Bo Bunny
stamp I got.  I layered the Basic Grey papers and embossed
a piece to to layer over some lace.  The gate was my focus
so I actually cut 2 layers of it and glued it together and
them inked over it and embossed it with clear to make
it more shiny.  I wanted to create a tiny rose garden around
it so I fussy cut some flowers and added a die cut swirl
from the Flowers and Florishes die set and some extra 
little flowers to tuck in the sides.  I also added a little
flower from Bo Bunny in glitzy brown rhinestones to match
with the centers of the flowers .  It was really fun and I love
to make these to decorate my house with little sayings
that keep me cheerful and thinking amazing positive thoughts!       


This is another 6x6 canvas that I did a while back and 
it seems like a great time to share it with my other one.
It too uses lots of Spellbinders dies for the base and I used 
some Prima flowers and Zva bling for the rest.  This is
a great way to make gifts and decorate and use up
some of the odds and ends you have laying about your craft
room!  Still working on lots of things for Spellbinders so I have to go but
I hope you get inspired to make one up and thanks
as always for stopping in to see what's new :)

Friday, March 2, 2012

How I love flowers

It has been a busy week at the store and we are
getting swamped with lots of boxes filled with
fun product but of course that means I have
to find a place to put it too.  So there is
lots of moving and pricing and making fun
samples up.  Yay, my favorite part....

Today i am showing 2 things
I did quick since I have so many more things
to get out in the next couple of weeks.


We got in lots of canvas to create things to 
decorate with so I made this little gifty canvas
to put on an easel that you can give to a friend or
 put up in your own house.  I used the Prima mini
pad for the back round papers and added flowers
and layered some Spellbinders die shapes under
the sentiment.  If you click on the picture you can
probably see it better.  I have been messing around 
with taking pictures in natural light and it doesn't
always want to cooperate with my artsy vision - big smile :)


Sometimes I like to use the intricate papers as a back round
to save time and money.  I love doing intricate pages
like the sunflower one I did on my last post- so 
don't get me wrong- but sometimes you just need to get 
the pictures scrapped and in the book right?   So for
this page I cut a circle and made my own doily for the
back round with a corner punch and put the matted 
photo on a ledge with flowers and added the glistening
bit of pearls to the bottom.  These papers are pretty
neutral so I added some extra pink and green inks
to the back round with a blending sponge from Tim Holtz.
Total time was only about 20 mins.  Yay!!


Thanks for stopping by and I have lots to make for
this scrappy happy weekend and maybe a possible 
trip to San Diego Wild animal park.  It's almost time
for the butterflies and I am sure there is lots of new
animal babies everywhere to take pictures of.  

Lots of hugs,
Teresa

LinkWithin

Related Posts Plugin for WordPress, Blogger...